Thursday, 31 October 2013

TFS - Lab Build - Deployment Script - Copy Build Output Zip to Lab Env. Machine and Extract

As a continuation to my last post "TFS - Lab Build - Create Zip File with Build Output in the Drop Folder", today I am going to explain how to use a deployment script with lab build (Build-Deply-Test workflow), to copy the build out put zip file, to Lab Environment Machine and extract.

1. First I am going to create a batch file and a PS script. My PS script will do all the work. Batch file (.bat) will be used to initiate the powershell script from Lab Workflow. To get this to work I need to make sure my batch file and the PS script is copied to build output folder, since it is the place that I can execute a deployment script from Lab Work Flow.

I have added my .bat file and the PS script file under a VS project that is under a solution I am building, and set the Copy to Output as always.


2. This will copy my .bat and PS script to Build Drop folder.


3. This is what I have in my .bat file. It is simply executing the PS script making sure execution policy is not blocking anything. Build location here is passed as an argument from the Lab Workflow.


4. In my Lab Build in the deployment steps I specify the .bat file to run as below. For more information and how to use xcopy to copy build out put have a look at "Creating Deployment Scripts for Build-Deploy-Test Workflows". I used a poweshell script since I am going to do lot more than just copying files, like adding dlls to GAC, etc which I will explain in a next post.

$BuildLocation is giving the build output location of the build that is queued/used by  Lab workflow.


5. In my poweshell script I am copying zip to my lab environment machine. The path C:\ ..refers to the path in the lab environment machine, since  the deployment script get executed in the context of given lab environment machine as specified in the above screenshot.

After copying this script will extract contents to the copied location and remove the zip file from the Build Drop folder. Build Location is passed to the poweshell script from the above .bat file as a parameter.


6. I queue a build and I can see my zip file copying actions get executed in the Build Log as below.


7. In my lab environment machine I see the extracted files .


This is cool .. don't you think..


TFS - Lab Build - Create Zip File with Build Output in the Drop Folder

Sometimes it takes long time to copy files from drop folder to the lab environment when you have your lab environment in different locations( distributed environments), and you have several hundred files in your drop folder (example - published website with lot of files).

I will explain how to use a Build Activity to zip, by customizing LabDefaultTemplate.11.xaml.

How to add a custom code activity to a build template is clearly explained in this article http://www.ewaldhofman.nl/post/2010/04/29/Customize-Team-Build-2010-e28093-Part-4-Create-your-own-activity.aspx

Go through the above article if you want to know the basics.

So lets look at how to add a build activity to zip the build output.

1. First you need to have a code activity similar to below


2. Once compiled and add reference to your build template project you can view the New Activity --> Zip in the Toolbox when you open the build template.


3. Drag and drop the  Zip activity to LabDefaultTemplate.11.xaml after the "Compute build location needed" activity to make sure BuildLocation variable is filled with the correct build location (This variable will contain the Build Folder path of the Build queued or used by the Build task of the Lab Workflow).


4. Set the properties as below in the Zip build activity. DirectoryLocation is set to Build Location and Zip file path will be Build Location path with ".zip" extension. This will make sure zip file is created at the drop location of the build used by the lab workflow.


5. Create a build definition using the lab template and set the lab workflow build step to use the release build definition of yours (Output of this build will be used to create the zip file).


6. Queue a build with the lab build and you will see lab(build-deploy-test) build, queues  the release build, once complete use the build location and create the build output as a zip file.


7. In the drop location of the release build you will have the build out put files and the zip file of the output.


In my next post, I will explain "How to use a deployment task of the Lab Workflow to copy the output zip file and extract it in the Lab Environment Machine".

Sunday, 27 October 2013

TFS - Delete WIT Custom Fields Permanently


When you delete a custom filed from a Work Item Template and import is it really deleted from TFS fully? Or is it only hidden from that work item type and remains in TFS?

To find out the answer I have done a small experiment.

1. Fist I have added a new HTML type filed "CH.Test1" and added a HTML field control to User Story work item.


2. When I have imported the template I can see my new field in User Story work item.


3. I saved some data to newly created field.


4. Then I deleted the HTML field control and the filed "CH.Test1" in the template.


5. When viewed the previous user story I could not see the field and that is correct and field is deleted.


6. But what happens if I add the field again? To Investigate I tried adding the field with Same Reference Name but with a different name.


7. Import failed with

Error importing work item type definition:

TF26177: The field CH.Test1 cannot be renamed from 'Chaminda Test 1' to 'Chaminda Deleted And Added Field'.


8. This means that the field was not really deleted. To test I changed to the initial name "Chaminda Test 1"


9. Import was successful and when I viewed the same user story data I had entered before deleting the field was still available. It looked clear that even if I deleted a field from WIT template and import it did not delete the field or the data from TFS Collection.


8. Search in MSDN got me here Manage work item fields [witadmin]
I used witadmin listfields with Reference Name to see my field. The command gave the details of the field, whether it was used, In which project it was used.


9. Again I tried deleting from template and import.


10. When I used witadmin listfields with Reference Name, it clearly showed field is existing in collection but "Not In Use" in any team project.


11. How to delete permanently? I used witadmin deletefield with Reference Name, this gave me a warning and a confirmation question. When said Yes deleted. To verify I executed witadmin listfields with Reference Name again and an error shown that the field does not exist.


12. To confirm I tried re-adding the field with same Reference Name but with a different Name, and a different data type (String).


13. This time I did not get TF26177 when the template was imported.


Conclusion: When a field is deleted from the work item template and imported it remains in TFS collection and previously entered data related to work item also preserved. To delete the field permanently witadmin deletefield can be used and all data and the field will be completely destroyed with this command.

Tuesday, 15 October 2013

TFS 2013 RC - Rename Work Item Type

How can I rename a Work Item Type in TFS? Is it impossible? Answer is yes you can rename and it is very simple to do it.

Here is the steps you need to do.

Open up the VS Developer Command prompt (If using TFS 2012 use VS 2012 developer command prompt, for TFS 2013 RC use VS 2013 RC command prompt)

  • First list all work item types with the below command
witadmin listwitd /collection:YourTfsServer/VirtualDirecory/TeamProjectCollection /p:YourTeamProject

Example
witadmin listwitd /collection:http://localhost:8080/tfs/DefaultCollection /p:Scrum3RenameTest

  • Then rename the work item type using
witadmin renamewitd /collection:YourTfsServer/VirtualDirecory/TeamProjectCollection /p:YourTeamProject /n:FromWorkItemTypeName /new:ToWorkItemTypeName

Example
witadmin renamewitd /collection:http://localhost:8080/tfs/DefaultCollection /p:Scrum3RenameTest /n:"Feature" /new:"Epic"


I renamed the Feature to Epic. Now when I try to view the backlog in Web Access Below error shows up. TF400917: The current configuration is not valid for this feature


Reset IIS by running resetiis on the command prompt and you are good to go!


Now my Feature work item renamed to Epic and I can add new Epic work items. that is cool...But.. :(

Why but? Still the Menu in left says Features? Can I change that?

Lets see how we can do this change?

Export the ProcessConfiguration xml with below command

witadmin exportprocessconfig /collection:YourTfsServer/VirtualDirecory/TeamProjectCollection /p:YourTeamProject /f:FileNameWithPath

Example
witadmin exportprocessconfig /collection:http://localhost:8080/tfs/defaultcollection /p:Scrum3RenameTest /f:"C:\temp\ProcessConfiguration.xml"

Then open the .xml file in a notepad and change Plural Name  and Singular Name for Feature Category.

After the change import xml with below command (I copied xml and renamed as ProcessConfigurationmodified.xml)

witadmin importprocessconfig /collection:YourTfsServer/VirtualDirecory/TeamProjectCollection /p:YourTeamProject /f:FileNameWithPath

Example
witadmin importprocessconfig /collection:http://localhost:8080/tfs/defaultcollection /p:Scrum3RenameTest /f:"C:\temp\ProcessConfigurationmodified.xml"


Refresh web access

Above message is completely OK, just click on Epics

Now this is really cool.. :)

Thursday, 10 October 2013

TFS 2012/2013 - Different Layouts for Work Items in Web Access and VS/Team Explorer

Have you ever thought of having a different layout for a given work item in TFS Web Acess & inside Visual Studio/Team Explorer? Is it possible? Yes. It is. Let me show you how.

I am trying to have different layout for my User Story work item.

First I download the UserStory template xml using power tools.


Now for folks who are used to do TFS customizations only with power tools..Hey this not going work that way..You need to have a bit of a  XML here.

Open the downloaded UserStory.xml file (for safety I keep original and use a copy of UserStory.xml as UserStoryModified.xml)

Go to the  Form node and copy the Layout node content and paste it between Form xml tags

Then Add attribute Target to each of the Layout node "WinForms" for Visual Studio/Team Explorer, "Web" for Web Access layout.


Important: If you have used Name attribute in any nodes of the duplicated Layout node content make sure the "WinForms" and "Web" layouts have different names defined for example like below.


Now we can customize the layouts as we would like it to appear in Web Access & within Visual Studio or Team Explorer. (Again if you try to open this with TFS power tools you will only see the Layout which is in top. So you have to do this in xml :) )

 For Visual Studio/ Team Explorer

For Web Access


After importing UserStoryModified.xml with power tools,

User Story in Visual Studio/Team Explorer


Same User Story in Web Access


Cool isn't it?

For more info check below

Specifying Different Layouts for Different Targets
Design the Layout of the Work Item Form


Wednesday, 9 October 2013

TFS - Adding HTMLFeildControl to Work Item

There are two important points to consider if you are adding HTMLFeildControl to a work item.

1. First You need to have the correct type for the field that you are adding. HTML is the type that works for HTMLFeildControl.


To illustrate I have added three fields, two having type HTML and one having plain text. See the behaviour of the "PlainText" type field on a HTMLFieldControl. It does not give the HTML field control editiong options and notifies an error with color.


2. Use MinimumSize attribute

Tip from MSDN 

"When you add several HTMLFieldControl elements on a form that will be stacked vertically, you should specify the MinimumSize attribute for each field control. In this manner, you can make the text boxes all a similar size. Otherwise, the last HTML control element is sized to fill the form, and the previous elements appear together with smaller text boxes."

For more information refer Control the Display of Work Item Fields: Adding Formatted Text Fields


Friday, 4 October 2013

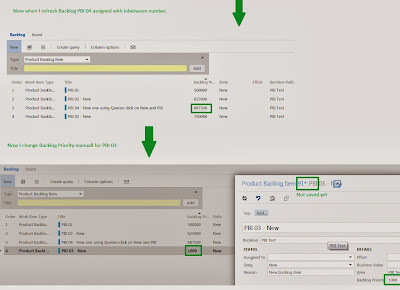
Backlog Priority - How it works

I was trying to answer a question posted in MSDN forum and to explain how Microsoft.VSTS.Common.BacklogPriority works. I have done a small test cycle. Thought worth sharing it here for everyone's benefit.

Test 1: I created PBI through web access just providing Name and click add in Backlog.
Test 2: I create PBI with web access going to Queries-->New-->PBI
Test 3: Changed Microsoft.VSTS.Common.BacklogPriority manually.

See how it behaves..and hope you will have a clear understanding of  Microsoft.VSTS.Common.BacklogPriority. In terms of usage you can go through this MSDN article.


Popular Posts