Wednesday 30 September 2015

Disable Lock Screen on Windows 8.1 to Prevent - Automation engine is unable to playback the test because it is not able to interact with the desktop.

You might run into below error with automated testing with lab environments.
*******************************************************************************************************Error calling Initialization method for test class xxxxxxxx: Microsoft.VisualStudio.TestTools.UITest.Extension.UITestException: Automation engine is unable to playback the test because it is not able to interact with the desktop.  This could happen if the computer running the test is locked or it’s remote session window is minimized.
*******************************************************************************************************

image
This could be because you have RDP to the test agent machine and you have logged out, minimized the RDP session. This can be prevented by repairing the lab environment and let it restart the test agent machine. Then as long as you do not RDP to test agent it should run automated tests without any issue.image
But if your test agent machine is Windows 8 or Windows 8.1 you might still run into the same error, even though you are 100% certain, that after repairing the lab environment, you have not RDP to the test agent machine.
This happens due to the lock screen functionality of Windows 8 and 8.1. to fix this issue disable the lock screen. This can be done in Group Policy Editor. Run gpedit.msc and set the “Do not display the lock screen” to “Enabled” sate.image
This will set the registry key HKEY_LOCAL_MACHINE\SOFTWARE\Policies\Microsoft\Windows\Personalization with DWord “NoLockScreen” to value 1.image
More information on setting lock screen to disable, can be found here.

Disable the screen saver for Test Agent user.image
Set “Turn off the display” to never.image

In registry set the following DWord “DisableLockWorkstation”. Instructions here.image

More instructions in the answer here. Set and verify all of them.

Repair the lab environment again to make sure the restart of the test agent and, as long as no RDP sessions to the test agent machine, automated test will not run into “Automation engine is unable to playback the test because it is not able to interact with the desktop”.

image

Tuesday 29 September 2015

Resolve Common Errors - Run Automated Tests with VS Release Management 2013


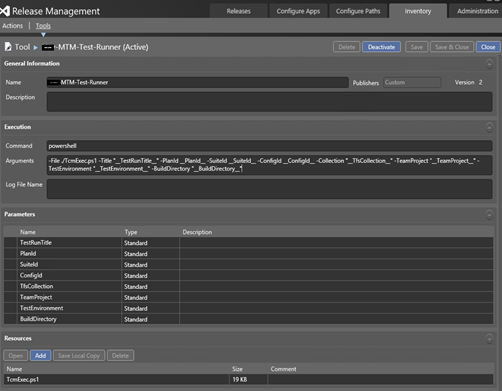
There is a tool available in Release Management 2013 to execute automated tests, once the deployment completes. image
image
How to setup this is well explained in article here. http://nakedalm.com/execute-tests-release-management-visual-studio-2013/
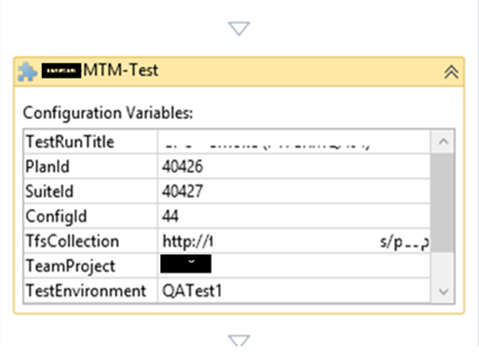
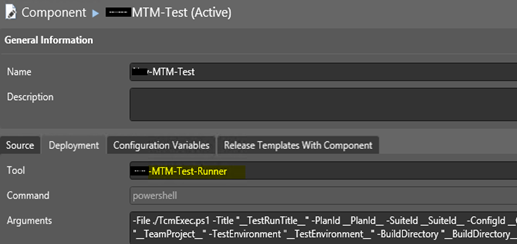
With the custom component set as below in release template, you should be able to excute tests.image
Below are few issues you might encounter, and steps to fix them.
*******************************************************************************************************
Error 01:
Cannot process argument transformation on parameter
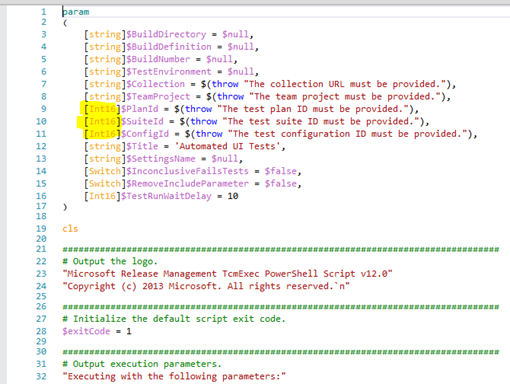
'PlanId'. Cannot convert value "40426" to type "System.Int16". Error: "Value was either too large or too small for an Int16."  Unfortunately this error comes with the component reporting a “succeed”. But log shows the failure. This error is discussed here.
image
This is obvious error if you have more TFS projects and larger IDs for work items above 32767. You would not be able to use the Microsoft provided tool  image
To Resolve:
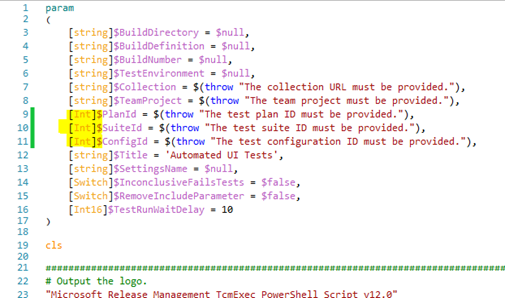
You need to get the TCM.ps1 from the tool and edit it. Downloading it from RM tools is not possible simply because downloading or any other modification is not available for Microsoft published tools.image
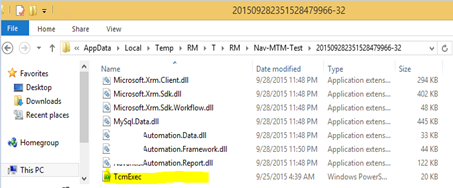
In the deployment agent machine, deployment agent user’s temporary folder (component log contains this path with the error), you can find the file.
C:\RMT\RM\T\RM\XX-MTM-Test\201509241626076897123-31\TcmExec.ps1
In this example users temp path is set to  C:\RMT. Default path is C:\users\username\AppData\Local\Temp\.. as shown below. (More info here) image
Copy this script and change the Int16 parameters highlighted below to Int.image
image
Then create a new tool in Release Management using the powershell script.New MTM RM Tool
Set arguments as follows.
-File ./TcmExec.ps1 -Title "__TestRunTitle__" -PlanId __PlanId__ -SuiteId __SuiteId__ -ConfigId __ConfigId__ -Collection "__TfsCollection__" -TeamProject "__TeamProject__" -TestEnvironment "__TestEnvironment__" -BuildDirectory "__BuildDirectory__"
Change the component in the template to use the new tool created, instead of provided “MTM Automated Tests Manager”.image
*******************************************************************************************************
Error 02:
If MTM (Microsoft test Manager)  not available in the deployment server below error occurs.“ERROR: Unable to locate C:\RMT\RM\T\RM\XX-MTM-Test\IDE\TCM.exe”image
To Resolve:
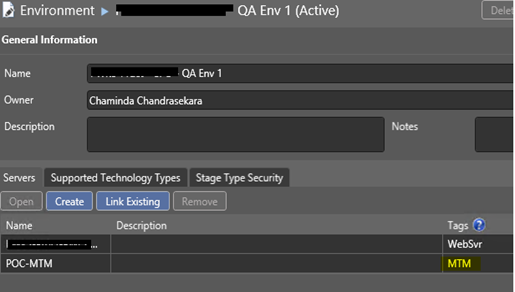
It is mandatory to have MTM(Microsoft test Manager) installed on the server that is initiating the tests. For this purpose separate machine is setup with deployment agent and it is installed with Visual Studio Test Professional 2013. It is not recommended to install Visual Studio in the target deployment server (DevInt/QA/UAT servers should be similar to Production, without having Visual Studio in them). Better option is to keep a separate machine attached to each environment to trigger tests after deployment.image
image
This is used in the Release template to execute tests after deployment.image
*******************************************************************************************************
Error 03:
With new tool test execution failed with below error.
“TF30063: You are not authorized to access http://yourtfs:8080/tfs/collection.” image
To Resolve:
Add the deployment agent user configured in test initiating machine, to the Test Service Users in the relevant project collection.image
*******************************************************************************************************
Error 04:
After fixing all above issues, tests initiated after the deployment with release template. image
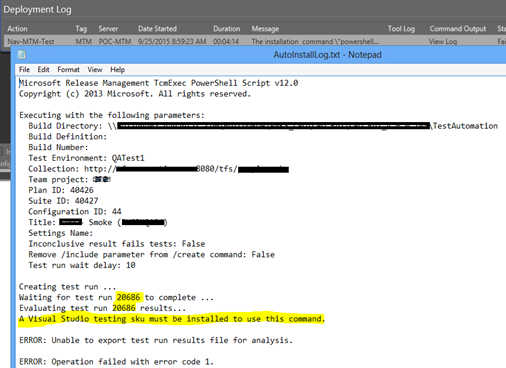
This time reading results fails with “A Visual Studio testing sku must be installed to use this command.”image
To Resolve:
As discussed in this forum thread only working solution was to install “Visual Studio Ultimate (2013)” in the machine which is acting as deployment agent, triggering the tests using the component in the release template.
*******************************************************************************************************
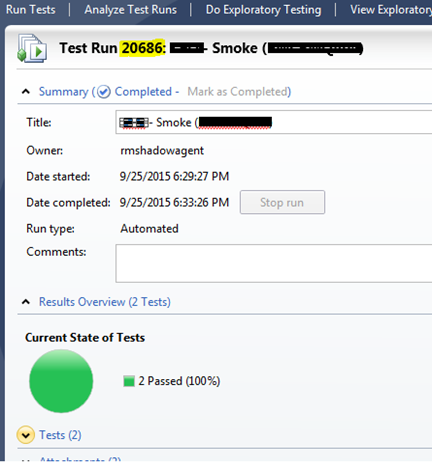
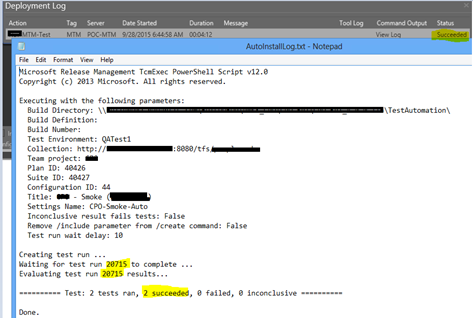
With all above fixed test were executed successfully and results were shown in the tool log.image image

Wednesday 16 September 2015

Get a Build Note Between Given Two Builds Using PowerShell

A build associates work items from last good build to the current successful build. What if you want to find the associated work items between two builds, while having other successful builds in the middle.

image

Below script supports that. This is developed based on previous post script “Send Custom Build Notes with TFS Build Using PowerShell”.


  1
2
3
4
5
6
7
8
9
10
11
12
13
14
15
16
17
18
19
20
21
22
23
24
25
26
27
28
29
30
31
32
33
34
35
36
37
38
39
40
41
42
43
44
45
46
47
48
49
50
51
52
53
54
55
56
57
58
59
60
61
62
63
64
65
66
67
68
69
70
71
72
73
74
75
76
77
78
79
80
81
82
83
84
85
86
87
88
89
90
91
92
93
94
95
96
97
98
99
100
101
102
103
104
105
106
107
108
109
110
111
112
113
114
115
116
117
118
119
120
121
122
123
124
125
126
127
128
$tfsCollectionUrl = "http://yourtfsserver:8080/tfs/yourcollection"
$teamProject = "yourteamproject"
$versionControlPath = "$/yourteamproject/versioncontrolpath"
$buildDefinition = "yourbuilddefinitionname"
$fromBuildNumber = "frombuildnumber"
$toBuildNumber = "tobuildnumber"
$workItemStates = @("Resolved") # @("Resolved","New", "Active") @("Resolved") @("All")
$Recipients = @("user1@yourcompany.com","user2@yourcompany.com")
$EmailSender
= "sender@yourcompany.com"
$SMTPserverName = "smtpservername"

[void][System.Reflection.Assembly]::LoadWithPartialName("Microsoft.TeamFoundation.Client")
[void][System.Reflection.Assembly]::LoadWithPartialName("Microsoft.TeamFoundation.Common")
[void][System.Reflection.Assembly]::LoadWithPartialName("Microsoft.TeamFoundation.Build.Client")
[void][System.Reflection.Assembly]::LoadWithPartialName("Microsoft.TeamFoundation.Build.Common")
[void][System.Reflection.Assembly]::LoadWithPartialName("Microsoft.TeamFoundation.VersionControl.Client")
[void][System.Reflection.Assembly]::LoadWithPartialName("Microsoft.TeamFoundation.VersionControl.Client.VersionSpec")
[void][System.Reflection.Assembly]::LoadWithPartialName("Microsoft.TeamFoundation.WorkItemTracking.Client")


$server = new-object Microsoft.TeamFoundation.Client.TfsTeamProjectCollection(New-Object Uri($tfsCollectionUrl))
$buildServer = $server.GetService([Microsoft.TeamFoundation.Build.Client.IBuildServer])

$fromBuild = $buildServer.QueryBuilds($teamProject, "CPO.Rel") | where { $_.BuildNumber -eq $FromBuildNumber }
$toBuild = $buildServer.QueryBuilds($teamProject, "CPO.Rel") | where { $_.BuildNumber -eq $toBuildNumber }

$versionControlServer = $server.GetService([Microsoft.TeamFoundation.VersionControl.Client.VersionControlServer])
$workItemStore = $server.GetService([Microsoft.TeamFoundation.WorkItemTracking.Client.WorkItemStore])
$LinkingService = $server.GetService([Microsoft.TeamFoundation.Client.TswaClientHyperlinkService])

$fromChangesetVersionSpec = New-Object Microsoft.TeamFoundation.VersionControl.Client.ChangesetVersionSpec($fromBuild.SourceGetVersion.Substring(1))
$toChangesetVersionSpec = New-Object Microsoft.TeamFoundation.VersionControl.Client.ChangesetVersionSpec($toBuild.SourceGetVersion.Substring(1))

$recursionType = [Microsoft.TeamFoundation.VersionControl.Client.RecursionType]::Full

$historyBetweenBuilds = $versionControlServer.QueryHistory($versionControlPath, $toChangesetVersionSpec, 0, $recursionType, $null, $fromChangesetVersionSpec, $toChangesetVersionSpec,[Int32]::MaxValue, $true, $false)
$workItemsBetweenBuilds = $historyBetweenBuilds | foreach-object {$_.workitems}

$tabName = "WorkItemTable"

#Create Table object
$WorkItemTable = New-Object system.Data.DataTable $tabName

#Define Columns
$colWorkItemType1 = New-Object system.Data.DataColumn WorkItemType,([string])
$colId = New-Object system.Data.DataColumn Id,([int])
$colTitle = New-Object system.Data.DataColumn Title,([string])
$colState = New-Object system.Data.DataColumn State,([string])
$colAssignedTo = New-Object system.Data.DataColumn AssignedTo,([string])
$colWILink = New-Object system.Data.DataColumn WILink,([string])

#Add the Columns
$WorkItemTable.columns.add($colWorkItemType1)
$WorkItemTable.columns.add($colId)
$WorkItemTable.columns.add($colTitle)
$WorkItemTable.columns.add($colState)
$WorkItemTable.columns.add($colAssignedTo)
$WorkItemTable.columns.add($colWILink)

$workItemsBetweenBuilds |
foreach-object {
if ($_.Type.Name -eq "Task")
{
# Get parent work item of task
foreach($link in $_.WorkItemLinks)
{
if ($link.LinkTypeEnd.Name -eq "Parent")
{
$ParentWorkItem = $workItemStore.GetWorkItem($link.TargetId)

if (($workItemStates -contains $ParentWorkItem.State) -or ($workItemStates -contains "All"))
{
#Create a row
$row = $WorkItemTable.NewRow()

#Enter data in the row
$row.WorkItemType = $ParentWorkItem.Type.Name
$row.Id = $ParentWorkItem.Id
$row.Title = $ParentWorkItem.Title
$row.State = $ParentWorkItem.State
$row.AssignedTo = $ParentWorkItem.Fields["Assigned To"].Value
$row.WILink = $LinkingService.GetArtifactViewerUrl($ParentWorkItem.Uri).AbsoluteUri

#Add the row to the table
$WorkItemTable.Rows.Add($row)
}

break
}
}
}
else
{
# Adding associated work item other than task

if (($workItemStates -contains $_.State) -or ($workItemStates -contains "All"))
{
#Create a row
$row = $WorkItemTable.NewRow()

#Enter data in the row
$row.WorkItemType = $_.Type.Name
$row.Id = $_.Id
$row.Title = $_.Title
$row.State = $_.State
$row.AssignedTo = $_.Fields["Assigned To"].Value
$row.WILink = $LinkingService.GetArtifactViewerUrl($_.Uri).AbsoluteUri

#Add the row to the table
$WorkItemTable.Rows.Add($row)
}
}

}

$style = "<style>BODY{font-family: Arial; font-size: 10pt;}"
$style = $style + "TABLE{border: 1px solid black; border-collapse: collapse;}"
$style = $style + "TH{border: 1px solid black; background: #dddddd; padding: 5px; }"
$style = $style + "TD{border: 1px solid black; padding: 5px; }"
$style = $style + "</style>"

#$WorkItemTable |sort WorkItemType,Id -Unique | Select-Object WorkItemType, Id, State, Title, AssignedTo, WILink | ConvertTo-HTML -head $style | Out-File "$PSScriptRoot\tmpBuildNote.txt"

#$messageBody = Get-Content "$PSScriptRoot\tmpBuildNote.txt" | Out-String

$messageBody = $WorkItemTable |sort Id -Unique |sort WorkItemType,State | Select-Object WorkItemType, Id, State, Title, AssignedTo, WILink | ConvertTo-HTML -head $style | Out-String

Send-MailMessage -From $EmailSender -To $Recipients -SmtpServer $SMTPserverName -Body $messageBody -Subject "$toBuildNumber Build Notes from $fromBuildNumber" -BodyAsHtml

With set to get only Resolved state work items, this will send a build note with, User Stories/PBIs, Bugs which are associated with the changesets of the in between builds.


image image


If State is set to All, all state work items are sent.imageimage


Multiple state values can be specified as below.imageimage

Thursday 10 September 2015

Release Stopped while Deployment Task - Communication with the deployer was lost during the deployment.

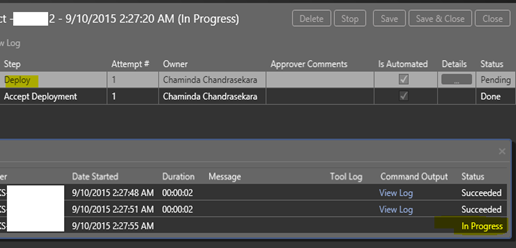
What happens if a release a VS Release Management agent based release is stopped, while a deployment action is pending?
1
2
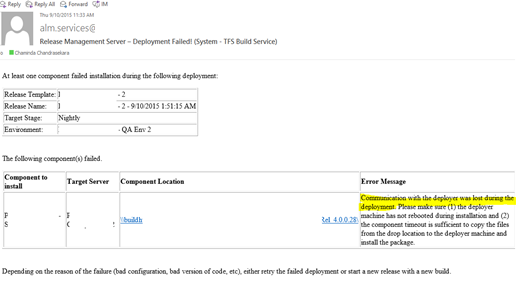
Release stopped and following message received.
Communication with the deployer was lost during the deployment. Please make sure (1) the deployer machine has not rebooted during installation and (2) the component timeout is sufficient to copy the files from the drop location to the deployer machine and install the package.
3
Worst is when the next release is triggered the first action is staying in pending state for ever. It not proceeding not failing.
How to resolve?
Go to the target machine and restart the deployment agent. Release actions comes alive.
4
The above error “Communication with the deployer was lost during the deployment.” can occur in few other situations. Few helpful links below.
http://blogs.blackmarble.co.uk/blogs/rfennell/post/2014/05/01/Release-Management-components-fail-to-deploy-with-a-timeout-if-a-variable-is-changed-from-standard-to-encrypted.aspx
http://blogs.blackmarble.co.uk/blogs/rfennell/post/2014/09/18/Communication-with-the-deployer-was-lost-during-deployment-error-with-Release-Management.aspx
https://social.msdn.microsoft.com/Forums/expression/en-US/c633f125-b323-4d1c-8206-a14e6250e0c3/release-management-deploying-components-failing-since-update-2?forum=tfsbuild

Thursday 3 September 2015

Change RM Deployment Agent Temp Download Path – Resolve “The specified path, file name, or both are too long”

In an agent based release template, when the build output is downloaded to with a components using XCopy tool, the error below might be encountered, if there is web sites or projects, containing a lot of folder hierarchy and long file/folder names.
The specified path, file name, or both are too long. The fully qualified file name must be less than 260 characters, and the directory name must be less than 248 characters.
image
Shortening the Installation Path, not helped to resolve the problem. Manually downloading build output to this path, did not have file name paths exceeding the limit.
image
The issue occurred since deployment agent initially downloads build output to a temporary location. The default path is below.
C:\Users\<UserNameForDeploymenyAgent>\AppData\Local\Temp\ReleaseManagement\<ComponentName>\<VersionNumber>
image
To change this path there is no special configuration found anywhere in the Deployment Agent installation folder. None of the config files contain information on this path.
image
How to Resolve
This download path can be changed by, changing the Release Management Deployment Agent Service, running users Temp folder locations in environment variables.
image image
Change it to a shorter path.
image
Restart the “Microsoft Deployment Agent” service. Now the deployment agent successfully downloads the files without path limit exceeding error, using the new Temp path.
image
Build output is getting downloaded to installation path defined.
image

Popular Posts