Showing posts with label VS 2013. Show all posts

Sunday, 20 July 2014

Setup Release Management Client

This is the second step of setting up VS 2013 Release Management environment. Prerequisite for this step is Release Management Server which is described here.
Trial version of VS 2013 Release Management with update 2 can be downloaded from http://go.microsoft.com/?linkid=9843020.
Note: You cannot apply a license key for the trial to make it licensed version. Instead you have to uninstall trial and install licensed copy downloaded with MSDN or Volume License to apply license.

In the downloaded ISO run rm_Client.exe to install Release Management Client. This is a very quick install.
001

Installation is quick and smooth.

002
 003

Once lunched provide the url of the release management server. example – http://ReleaseManagmentServer:1000
Below picture shows TFS since this installation of the Release Management Client is done on tfs box.

004

This url is correct but cannot be connected by the client.

005

Check if Release Management Server app pool is running and if not start it.

 006

Try browsing to http://releasemanagemntserver:1000/ReleaseManagement

008

This could happen, if the Release Management Server is installed in TFS box with Sharepoint Foundation. To resolve this issue refer Release Management Server in TFS box with Sharepoint Foundation, the fix specified in there is below.


  • On the machine where the Release Management Server was installed with TFS and Sharepoint, start a Command Prompt. Run as Administrator but not sure this was required.
  • Navigate to C:\Windows\System32\Inetsrv
  • Enter the following command
    appcmd.exe set config -section:system.webServer/globalModules /[name='SPNativeRequestModule'].preCondition:integratedMode,bitness64

  • 009

    Browsing to http://releasemanagemntserver:1000/ReleaseManagement succeeds.

    012

    Below error occur if the user running Release Management Client is not added as a user in Release Management Server.

    013

    To resolve this issue add the user to Release Management Server, users, by clicking new on Administration tab Manage Users. (To do this log on to the Release Management Client with a user already available in release management server – example - run client as installation user of release management server).

    020

    Add the required user.

    021
     022

    Release manager is the super user role in Release Management Server.

    023

    The user should be able to connect to the Release Management Server from a remote machine using the Release Management Client.

    025
     026
     027

    We have setup a Release Management Server, and Release Management Client accessing the server from a remote machine successfully. Next step is to set up Deployment Agent(s).

    Wednesday, 2 April 2014

    07. Setup Development Workstation Base - Setup Virtual Environment for TFS 2013 - Using Virtualbox

    In this step of Setup Virtual Environment for TFS 2013 - Using Virtualbox, we will setup a base machine hard disk for virtualbox so that we can use them to create development environments.

    01. Setup the OS but DO NOT add to domain

    02. Setup IIS (This is not mandatory but I prefer to have IIS)


    03. Run Visual Studio 2013 Setup. You need to install .Net framework for the setup to run.


    04. Another requirement is IE 11


    05. download from http://windows.microsoft.com/en-us/internet-explorer/ie-11-worldwide-languages


    06. Now you will be able to run the setup and install VS 2013.


    Install any other tools which you think might help in development. Two great tools are

    Microsoft Visual Studio Team Foundation Server 2013 Power Tools
    Productivity Power Tools 2013

    The next step will be to create instance of the base machine and add it to the domain, which I am hoping to explain in few days.

    Wednesday, 4 September 2013

    TFS 2013 - Team Explorer - Undock Pending Changes & Build windows

    A much awaited capability to have "Pending Changes" window outside of the Team Explorer, like what we had in VS 2010, is added by MS in TFS 2013 Team Explorer (and in VS 2013). This will be a very good news for the developers who did not like the pending changes inside team explorer in VS 2012. (Including me as a matter of fact).

    Cool thing about this is anybody who wants "Pending Changes" inside Team explorer, like in VS 2012, still can have it. People like me can switch it to a separate window.

    Let me show you how to do this "Undock" of "Pending Changes" window from team explorer.

    1. You can get "Pending Changes" window inside Team Explorer by clicking Pending Changes in Team Explorer Home.


    2. Click on the top right hand side arrow as shown below.


    3. There you go... now your Pending Changes appear as a separate window, you can dock it in VS as you like and unpin,pin works as all other windows.


    4. If you hide it it will appear in the position you dock it in VS. You have the option to dock it back in Team Explorer by clicking the menu option or by closing the Pending Changes window.


    5. Same behavior exists for Build explorer window as well.

    Sunday, 18 August 2013

    ALM - Productivity Enhancements - VS 2013 Peek Definition (Enhanced "Go To Definition")

    How many time you lost the code segment you were looking at, when try to "Go To Definition" (F12) few time with VS Text Editor (Code Window)? Upcoming VS 2013 going to have a great feature enabling us much more..and a BIG thank must go to MS for giving us this cool..great feature called "Peek Definition" (Alt+F12).

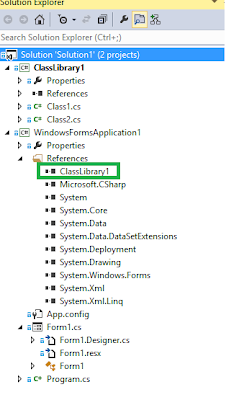
    To explain what it is, I am going to use a very simple and doing nothing application. The application contains Class Library and Window Form app which is referring the class library.


    Class Library has two classes, Class1 and Class2. The Class1 has a method "GeMgs" calling "GetMessage" method in Class2.


    The windows application button click event is calling Class1 "GetMgs" method.


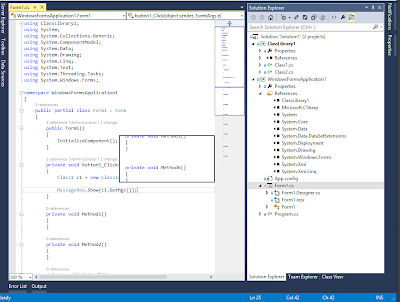
    Lets close all other code windows except the code window of Form1 which is having the button click event. Click on GetMsgs method and press "Alt+F12". New feature "Peek Definition" is in action and you can see you current code shifts down and the Class1, "GetMgs" appears in a preview window.


    Can we peek definition inside preview window opened? Yes we can. Let's click on "GetMessage" and press "Alt+F12".


    Class2 "GetMessage" appears in preview window and you can see navigation buttons also appear in the window.


    By clicking navigation buttons you can navigate back and forth.


    Great, isn't it?


    Awesome !!! The enhanced scroll bar preview, I explained in my previous post, even works inside the Peek Definition preview window.


    Amazing thing about this new feature is that we have not gone out of the code segment we were originally in. In this instance we are still in the Form1 button click, and once you hit "ESC" (escape) button Peek Definition preview window will disappear.

    Full list of keyboard shortcuts of Peek Definition feature  and more information available at http://msdn.microsoft.com/en-us/library/vstudio/dn160178%28v=vs.120%29.aspx

    Await for more productivity enhancements in VS 2013.. and enjoy coding with VS 2013..

    Thursday, 15 August 2013

    ALM - Productivity Enhancements - VS 2013 Enhanced Scrollbar

    Enhanced Scroll bar is simple, but very useful feature included in upcoming VS 2013. Lets have a look what we can do with this.

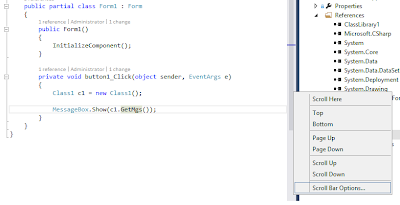
    To enable this feature you can right click on the scroll bar of the text editor -- > Select Scroll Bar Options.


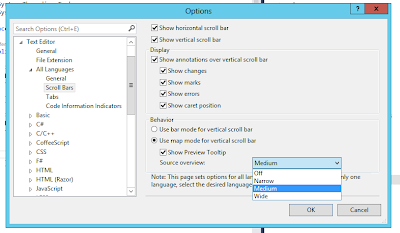
    You will get the below window where you can set the options as per your preference.
     

    Once you enable Medium or Wide mode you can see the break points, bookmarks and lot of other information.

    You can preview the areas of code that is not visible using the preview tool tip option by moving your mouse over the scroll bar.


    Once you click on scroll bar you will be navigate to the code you previewed. Still you can see the cursor position in original place you left as in below image.


    Once you click on code the cursor position correctly indicated in scroll bar.


    Explore more with enabling and disabling options in Scroll Bar Options window... and enjoy VS 2013...

    Popular Posts