After the session I had at
dotnet user group (dotnetforum.lk) yesterday I thought of writing this short
post to address queries made by several pepole on evaluating TFS 2010. I will
provide a guide to a simple setting up of TFS 2010 in a single server and will
give you links where you can download every piece of software I mention here. This
single server deployment can even be used in a real live enviorenment as well
to manage the liecyle of your organization’s software development process.
Step 1 – Setting up OS
One of the following os is
recommended. You can install on Vista or Win 7 but you will be restricted to
basic configuration
·
Windows Server®
2003 (32-bit) with Service Pack 2 or later (all editions)
·
Windows Server®
2003 R2 (32-bit) or later (all editions)
·
Windows Server®
2008 (both 32-bit and 64-bit) with Service Pack 2 or later
·
Windows Server®
2008 R2 (64-bit)
You can download trial Windows
Server® 2008 R2 from http://technet.microsoft.com/en-us/evalcenter/dd459137.aspx
Step 2 – Add your Server to
domain
This step is really important
since active directory domain is a must with TFS 2010. Make sure you login to
the server with a domain account which is member of administrators of the
server you are setting up.
Step 3 – Setup IIS &
ASP.Net roles or install IIS in windows 2003 server.
You can use the gide in this
link http://learn.iis.net/page.aspx/29/installing-iis-7-and-above-on-windows-server-2008-or-windows-server-2008-r2/
Step 4 – Install SQL Server
2008 with SSRS(Sql Server Reporting Services)
Configure SSRS in native mode
and make sure to add your domain account as a user for the SQL server. You can
get SQL server 2008 R2 trial here http://www.microsoft.com/sqlserver/en/us/get-sql-server/try-it.aspx
Step 5 - Install Sharepoint
Services 3.0
Ypou can skip this step but
you will miss the prject portal and document libraries + web based TFS access.
My advice..DO NOT skip.
The following link provide
more details http://technet.microsoft.com/en-us/windowsserver/sharepoint/bb400747
and the download also..
Step 6 – Install TFS 2010
You can dowload trial from http://www.microsoft.com/download/en/details.aspx?displaylang=en&id=15070
. After the installation you need to configure the TFS server
And you can install SP1 for
TFS 2010 and Power Tools as well…will give mor info on them in my next post.
I think enough work is there
to setup the software…so in my next post I will give a detail explanation of
how to configuring TFS server 2010…
Friday, 9 March 2012

Saturday, 14 January 2012
REST Filter for Choice Column in Sharepoint List.svc
I just figured out how to filter against a sharepoint list choice type column. Myself being a beginner of sharepoint surfed web a lot to find how to filter for choice type column in a sharepoint list with no success. May be for experienced sharepoint developer this would be a piece of cake. But for me it took some 30 minutes of thinking. So I decided to post this for sharepoint beginners like me.
I have created a sharepoint list called "Customers" in my sample site called "contoso" and I tried to read the list as a feed using my browser. This list has four columns and Region and Size columns are Choice columns.

When I typed
http://spsrv/sites/Contoso/_vti_bin/ListData.svc/Customers
in my browser I got my customer list as a feed. Then I tried filtering for Name and it was easy and success.
http://spsrv/sites/Contoso/_vti_bin/ListData.svc/Customers?$filter=Name eq 'Fabrikam'
But when I tried to filter for Region column using
http://spsrv/sites/Contoso/_vti_bin/ListData.svc/Customers?$filter=Region eq 'East'
it did not give me the feed but gave "HTTP 400 The webpage cannot be found". I googled around but was not successful.
Then I thought a bit and and just opened the feed page viewsource. Aha! there I found the solution and what I was doing wrong. The choice columns had a suffix added as "Value". So my Region was RegionValue.

I then tried with following in my browser and successfully got the filter working against choice column.
http://spsrv/sites/Contoso/_vti_bin/ListData.svc/Customers?$filter=RegionValue eq 'East'
I have created a sharepoint list called "Customers" in my sample site called "contoso" and I tried to read the list as a feed using my browser. This list has four columns and Region and Size columns are Choice columns.

When I typed
http://spsrv/sites/Contoso/_vti_bin/ListData.svc/Customers
in my browser I got my customer list as a feed. Then I tried filtering for Name and it was easy and success.
http://spsrv/sites/Contoso/_vti_bin/ListData.svc/Customers?$filter=Name eq 'Fabrikam'
But when I tried to filter for Region column using
http://spsrv/sites/Contoso/_vti_bin/ListData.svc/Customers?$filter=Region eq 'East'
it did not give me the feed but gave "HTTP 400 The webpage cannot be found". I googled around but was not successful.
Then I thought a bit and and just opened the feed page viewsource. Aha! there I found the solution and what I was doing wrong. The choice columns had a suffix added as "Value". So my Region was RegionValue.

I then tried with following in my browser and successfully got the filter working against choice column.
http://spsrv/sites/Contoso/_vti_bin/ListData.svc/Customers?$filter=RegionValue eq 'East'
Friday, 6 January 2012
Application Pool Identity for WCF to Work with IIS 7
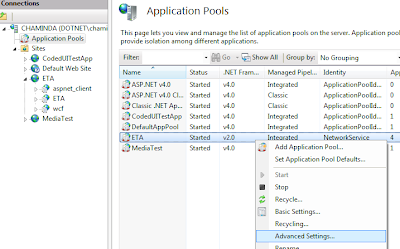
If you host your WCF services in IIS7 there is small trick you have to do to make it work. You have to change your application pool identity to Network Service.
You can do this by expanding your IIS Server --> Application Pools --> Right Click and Select the Application Pool Advance Settings
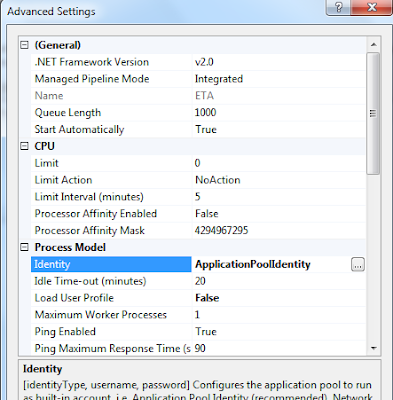
In the popup window click the Identity under Process Model
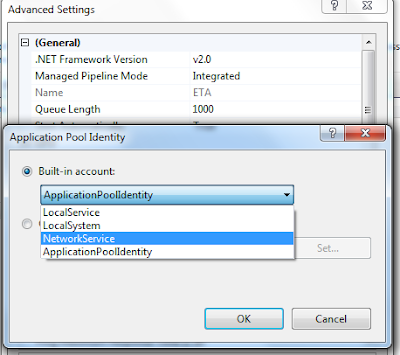
 Change the Identity to Network service.
Give NetworkService access to the physical folder of the wcf site. and you are good to go.
You can do this by expanding your IIS Server --> Application Pools --> Right Click and Select the Application Pool Advance Settings

In the popup window click the Identity under Process Model
 Change the Identity to Network service.
Give NetworkService access to the physical folder of the wcf site. and you are good to go.
Tuesday, 1 November 2011
VS2010 ALM Tools - Automating Functional Testing using Coded UI Test
Automating functional testing with Coded UI Test is another cool new feature available with Visual Studio 2010. Today I'll walk you through, how to author a functional test to check basic operation of a web based simple calculator.
Build a simple calculator
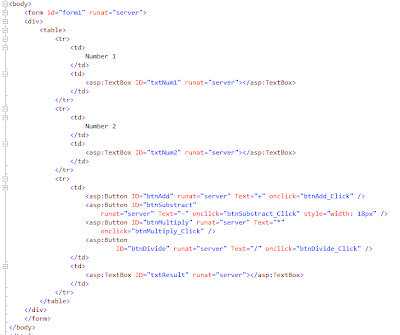
First we have to develop a simple calculator to use for our first Coded UI Test. Create a ASP.NET Empty Web Application and add a web form Calculator.aspx. Then Add following html in between the form tag of the aspx.
 In the code behind write the methods to handle calculator operations.
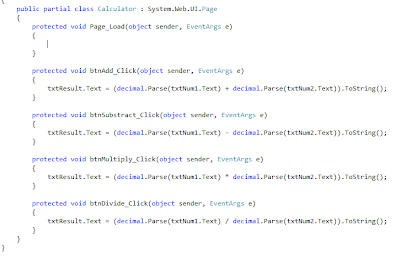 Build the web application project and host it in the IIS as a website. Now our calculator is ready for functional testing.
Recording the test actions
First create a Test project in visual studio 2010. Right click on the project and click Add New Item.
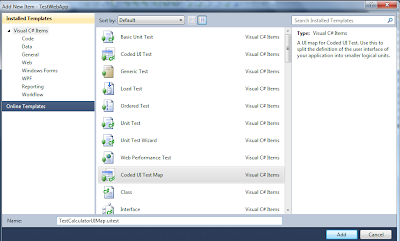 Add Coded UI Test Map file to the test project naming it to TestCalculatorUIMap.uitest. This will minimize the visual studio and launch Coded UI Test Builder.
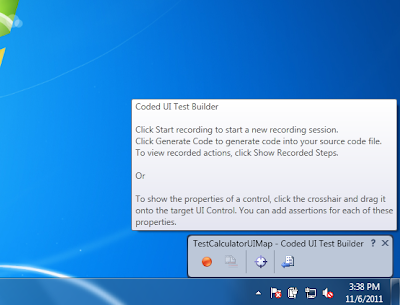 In the test builder click start recording. Launch the IE 7 or 8 and load the calculator we have have hosted earlier. If you are running IE 9 then you have to set it to compatibility mode which I will explain later. Enter Input data and click on + button.
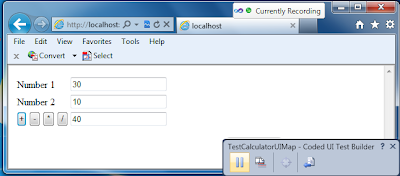 Pause the recording and click on generate code button. Give EnterNumsAndClickAdd as the method name and generate the method. This will create code for the actions that you have done. Now drag the cross hair icon from coded UI test builder to the results text box it will be highlighted and you will see the assert window. Assert will evaluate the result of the add action.
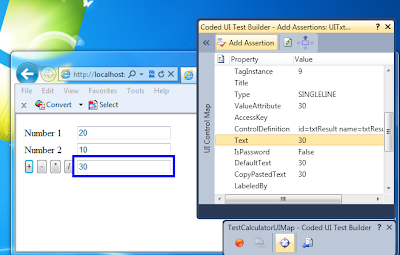 In the Assertion window select the Text Property of the text box and click Add Assertion. This will prompt for a method name.
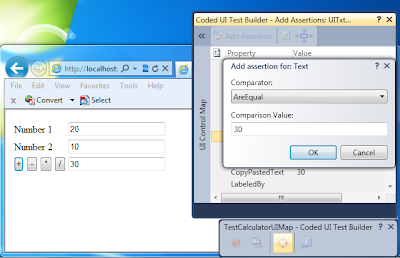 Select the comparator as AreEqual and enter value as 30 and click OK button. Then click on generate code and give the method name as AssertAdd.
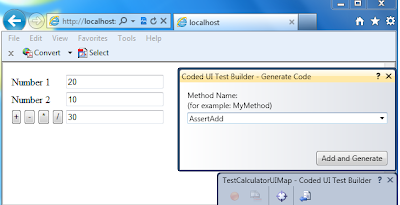 Once the code is generated close the Coded UI Test Builder. You can see a code files TestCalculatorUIMap.cs and TestCalculatorUIMap.Designer.cs are added. The designer.cs file contains the generated methods.
Next we will add a CodedUITest to our test project to execute the generated test methods. Right click on the project and click add CodedUITest naming it to TestCalculator. "Generate Code for Coded UI Test" window will popup but we will skip this option by clicking cancel since we have already generated our methods for enter numbers and evaluate add operation. Why I am suggesting this way is it will give you a grater flexibility to author a code UI test rather than using the prompted window.
If you examine the added Coded UI test file TestCalculator.cs you will see following methods and few other attributes.
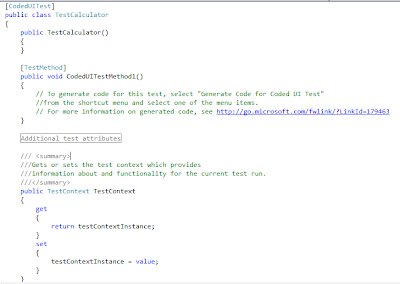 We will manually add code for the CodedUITestMethod1 to do our test. First rename CodedUITestMethod1 to TestCalc and insert the below code.
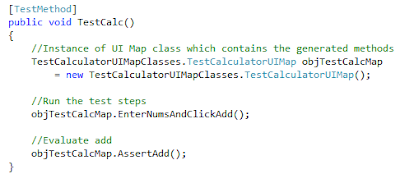 Open the Test View window (Test --> Windows --> Test View) and click refresh to build the project. You will see the TestCalc method appears in the Test View window.
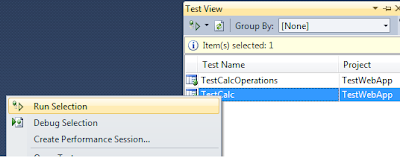 If we run this coded UI test TestCalc it will open up IE , navigate to TestCalculator.aspx and do a test for add operation. Test will pass. But you will see a small problem... Ok.. it always run with the data you have recorded the test with. I will explain how we can make the coded UI Test to work with different set of data in my next post.
Now If you want to generate test and assert methods for other operations of our calculator, you can do so by right clicking on TestCalculatorUIMap.uitest and clicking on Edit with Code UI Test Builder. This will launch the Coded UI Test Builder where you can record more test actions and asserts to the same TestCalculatorUIMap.uitest file.
IE 9 compatibility mode
MSDN says "You cannot create an action recording using the standard mode for Internet Explorer 9 because the new features and controls for Internet Explorer 9 are not currently supported." . So you have to set the IE 9 to compatible mode to Author Coded UI Test with it. In IE 9 go to Tools --> Compatibility View Settings.

In the popup window add localhost (Where our calculator is hosted) to compatibility view.
Build a simple calculator
First we have to develop a simple calculator to use for our first Coded UI Test. Create a ASP.NET Empty Web Application and add a web form Calculator.aspx. Then Add following html in between the form tag of the aspx.
 In the code behind write the methods to handle calculator operations.
 Build the web application project and host it in the IIS as a website. Now our calculator is ready for functional testing.
Recording the test actions
First create a Test project in visual studio 2010. Right click on the project and click Add New Item.
 Add Coded UI Test Map file to the test project naming it to TestCalculatorUIMap.uitest. This will minimize the visual studio and launch Coded UI Test Builder.
 In the test builder click start recording. Launch the IE 7 or 8 and load the calculator we have have hosted earlier. If you are running IE 9 then you have to set it to compatibility mode which I will explain later. Enter Input data and click on + button.
 Pause the recording and click on generate code button. Give EnterNumsAndClickAdd as the method name and generate the method. This will create code for the actions that you have done. Now drag the cross hair icon from coded UI test builder to the results text box it will be highlighted and you will see the assert window. Assert will evaluate the result of the add action.
 In the Assertion window select the Text Property of the text box and click Add Assertion. This will prompt for a method name.
 Select the comparator as AreEqual and enter value as 30 and click OK button. Then click on generate code and give the method name as AssertAdd.
 Once the code is generated close the Coded UI Test Builder. You can see a code files TestCalculatorUIMap.cs and TestCalculatorUIMap.Designer.cs are added. The designer.cs file contains the generated methods.
Next we will add a CodedUITest to our test project to execute the generated test methods. Right click on the project and click add CodedUITest naming it to TestCalculator. "Generate Code for Coded UI Test" window will popup but we will skip this option by clicking cancel since we have already generated our methods for enter numbers and evaluate add operation. Why I am suggesting this way is it will give you a grater flexibility to author a code UI test rather than using the prompted window.
If you examine the added Coded UI test file TestCalculator.cs you will see following methods and few other attributes.
 We will manually add code for the CodedUITestMethod1 to do our test. First rename CodedUITestMethod1 to TestCalc and insert the below code.
 Open the Test View window (Test --> Windows --> Test View) and click refresh to build the project. You will see the TestCalc method appears in the Test View window.
 If we run this coded UI test TestCalc it will open up IE , navigate to TestCalculator.aspx and do a test for add operation. Test will pass. But you will see a small problem... Ok.. it always run with the data you have recorded the test with. I will explain how we can make the coded UI Test to work with different set of data in my next post.
Now If you want to generate test and assert methods for other operations of our calculator, you can do so by right clicking on TestCalculatorUIMap.uitest and clicking on Edit with Code UI Test Builder. This will launch the Coded UI Test Builder where you can record more test actions and asserts to the same TestCalculatorUIMap.uitest file.
IE 9 compatibility mode
MSDN says "You cannot create an action recording using the standard mode for Internet Explorer 9 because the new features and controls for Internet Explorer 9 are not currently supported." . So you have to set the IE 9 to compatible mode to Author Coded UI Test with it. In IE 9 go to Tools --> Compatibility View Settings.

In the popup window add localhost (Where our calculator is hosted) to compatibility view.
Wednesday, 26 October 2011
VS2010 ALM Tools - Unit Testing - Writing A Simple Unit Test
Unit testing made easier with Visual Studio 2010. Authoring a unit test involves three key concepts called ThreeAs.
You can see the generated test specifies that you have to set values for expected result and input parameters. If you run this test now you will get inconclusive status withe message Verify the correctness of this test method. You can set the values to input parameters and expected result and remove the Assert.Inconclusive("Verify the correctness of this test method.") to make the test to fully work similar to the test that we have manually written.
- Arrange - Prepare the parameters and expected result for you test.
- Act - Invoke the method to test with the parameters and obtain the actual result.
- Assert - Evaluate expected and actual result to determine the success of the test.
 For the simplicity we will write very small method to add two numbers and a unit test to test that method.
Start VS2010 , create a new solution and add a c# class library project named CodeLib. Add a new class MathFunc.cs to the library and include the following code to get the smaller integer out of given two integers.
Now, add a new c# TestProject to your solution TestCodeLib reference the CodeLib Project, and add new class TestMathFunc.cs. To the TestmathFunc class definition add[TestClass]attribute. This attribute defines that TestMathFunc contains test methods which can be denoted by [TestMethod] attribute and it make these test method available in Test windows such as TestView. Writing test method TestGetSmallerNumber to test our GetSmallerNumber method is our next task.

Assert Class
Assert class provide quite few useful methods to validate your actual result with the expected result. In this Assert.AreEqual method an AssertFailedException will be thrown if expected and actual does not match. You can specifically throw an AssertFailedException in your test method by calling Assert.Fail method. There is no Assert.Succeeded available since if there is no exception that obviously means the test is successful. You have a Assert.Inconclusive to denote
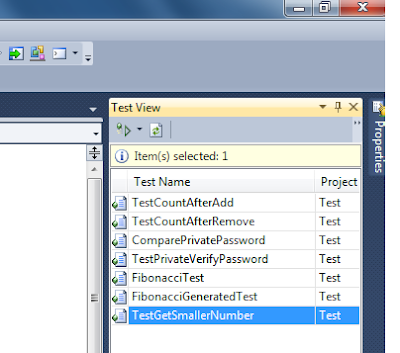
Now build the solution. You can view the test with the TestView window.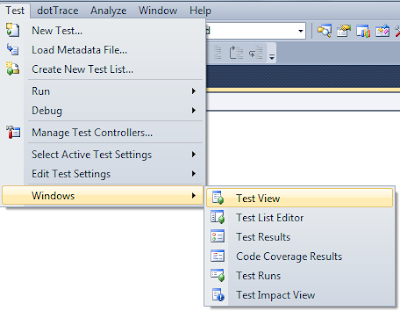
Assert class provide quite few useful methods to validate your actual result with the expected result. In this Assert.AreEqual method an AssertFailedException will be thrown if expected and actual does not match. You can specifically throw an AssertFailedException in your test method by calling Assert.Fail method. There is no Assert.Succeeded available since if there is no exception that obviously means the test is successful. You have a Assert.Inconclusive to denote
Now build the solution. You can view the test with the TestView window.

You can see your Test Method now in the test view window.
Now right click on the test in the TestView window and click Run Selected. You will see the unit test runing and the Test Result windows pops up with the passed status.
To check whether test method correctly working if the method is returning the wrong value edit GetSmallerNumber to have the following code.

If you run the test now result will be failed.

Following error message is giving the reason for failure. We are getting greater number from the method instead of the smaller number.
Expected:<10>. Actual:<20>. Actual value 20 and expected value 10Double clicking on the failed test result will open up the detail view of the test results.
Generating Unit Test
You can use Visual Studio 2010 to generate unit test for your method. Open the MathFunc.cs and right click on the GetSmallerNumber method. In the popup menu click on Create Unit Tests.
Below popup window that appears. Make sure your test project is selected as the output project and your method is correctly selected. Now Click on the Settings Button.

In the settings window you can specify preferred suffix for the test class file, test class and test method.

Mark all test result Inconclusive will notify this generated test is not yet inspected and Verified by the developer. Click OK to close the settings window and click OK in the Create Unit Test window to generate the unit test.

You can see the generated test specifies that you have to set values for expected result and input parameters. If you run this test now you will get inconclusive status withe message Verify the correctness of this test method. You can set the values to input parameters and expected result and remove the Assert.Inconclusive("Verify the correctness of this test method.") to make the test to fully work similar to the test that we have manually written.
Thursday, 9 October 2008
DataReader Extension to Get Typesafe Database Values
This extension to IDataReader can be used to get Typesafe values from a reader. This is furthur enhanced to get even Enum types. Compile this in to a dll and reference it from your Data Access logic. There will be a extension method available on DataReaders(eg: SqlDataReader ...etc).
 Click to enlarge
You can use this as following sample
Business Entities
 Click to enlarge
using System;
using System.Collections.Generic;
using System.Linq;
using System.Web;
using System.Text;
using System.Data;


public static class DataReaderExtensions
{
  public static T GetDBValue<T>(this IDataReader dr, int ordinal)
{
    if (dr.IsDBNull(ordinal)) //Value in the DB is null
        return default(T); //Returns the default type of the value (string->null,int->0,int?->null)
    if (typeof(T).BaseType.Name == "Enum") //Check for enum types
        return (T)Enum.Parse(typeof(T), dr.GetValue(ordinal).ToString(), true);//Parse and return enum value

    return (T)dr.GetValue(ordinal); //not Enum then cast to the relevant type and return
}


  public static T GetDBValue<T>(this IDataReader dr, string ColumnName)
{
    try
{
  int ordinal = dr.GetOrdinal(ColumnName);//Get the ordinal using column name
  return dr.GetDBValue(ordinal);
}
    catch (IndexOutOfRangeException exception)
{
       throw new ApplicationException("'" + ColumnName + "' is invalid", exception);
}
}

}
You can use this as following sample
Business Entities
You can write your data access logic as follows
public enum ItemType {NonPerishable, Perishable }
public class Item
{
public int ItemNo{get;set;}
public string Description{get;set;get;set; }
public decimal UnitPrice{get;set; }
public int StockQuantity{get;set; }
public ItemType Type{} //Enum get;set; public int? AlternativeItemNo { //Nullable Type } }
public class Items : List<Item> { };
private Item FillItem(SqlDataReader Reader)
 {
     if (Reader.Read())
     {
         Item objItem = new Item()
         {
             ItemNo = Reader.GetDBValue<int>("ItemNo"),
             Description = Reader.GetDBValue<string>("Description"),
             StockQuantity = Reader.GetDBValue<int>("StockQuantity"),
             Type = Reader.GetDBValue<ItemType>("ItemType"),
             UnitPrice = Reader.GetDBValue<decimal>("UnitPrice"),
             AlternativeItemNo = Reader.GetDBValue<int?>("AlternativeItemNo")

         };

         return objItem;
     }
     else
            return null;
 }


 public Items GetAllItems()
 {
     Items objItems = new Items();
     using (SqlConnection con = new SqlConnection("Data Source=DOTNETDBSRV;Initial Catalog=SimpleApp;Persist Security Info=True;User ID=sa;Password=sa"))
     {
         using (SqlCommand cmd = new SqlCommand("Item_GetAll", con))
         {
             cmd.CommandType = CommandType.StoredProcedure;
             try
             {
                 con.Open();
                 using (SqlDataReader rdr = cmd.ExecuteReader())
                 {
                     while (true)
                     {
                         Item objItem = this.FillItem(rdr);
                         if (objItem == null) break;
                         objItems.Add(objItem);
                     }

                     rdr.Close();
                 }
             }
             catch (Exception ex) { throw new ApplicationException("Get Items failed", ex); }
         }
         con.Close();
     }
     return objItems;
 }
Wednesday, 8 October 2008
Extension Method for Generic List<T> to Comma Seperated Values
Extension methood can be implemented as follows to convert List of type T values to a comma seperated string. (CSV)
You will get extension method for any List
 Click to enlarge
Usage is as follows
List<short> lst = new List<short> { 1, 5, 7 };
string str = lst.ToCSV<short>();// str will assigned with "1,5,7"
using System;
using System.Collections.Generic;
using System.Linq;
using System.Web;
using System.Text;
///
/// Summary description for MyExtensions
///
public static class MyExtensions
{
   public static string ToCSV<T>(this List<T> lst)
 {
  StringBuilder sb = new StringBuilder();

  foreach (T val in lst)
     sb.Append("," + val.ToString());

  if (sb.Length > 0)
     return sb.ToString().Substring(1);
  else
     return null;

}

}
You will get extension method for any List
 Click to enlarge
Usage is as follows
List<short> lst = new List<short> { 1, 5, 7 };
string str = lst.ToCSV<short>();// str will assigned with "1,5,7"
User Control Properties with Enum Types
Rather than specifying web user control properties with string type we can have much controlled properties using enums. For example.. I need to create a user control with two command buttons which I should be able to use in few places in a page. Two command buttons should appear horizontally or vertically depending on a property (DrawMode) in the user control.
I have following layout in html
 Click to enlarge
Then I can write property as follows in the user control
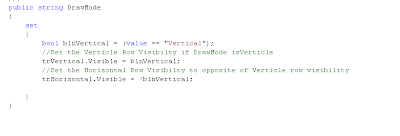 Click to enlarge
The user of this user control must specify the "Verticle" correctly for this to work. There is no control over the value you can set to the property.
You can enhance this code using an enum as follows

Click to enlarge
The advantage is that you have the total control over the property values that can be assigned.
 Click to enlarge
I have following layout in html
 Click to enlarge
Then I can write property as follows in the user control
 Click to enlarge
The user of this user control must specify the "Verticle" correctly for this to work. There is no control over the value you can set to the property.
You can enhance this code using an enum as follows

Click to enlarge
The advantage is that you have the total control over the property values that can be assigned.
 Click to enlarge
Subscribe to:
Posts (Atom)
Popular Posts
-
 The hosts file in /etc/hosts is allowing the WSL distros to map IP addresses to domain names before going to domain name servers, similar...
 -
 Can a Coded UI test executed with a Console Application? Yes it is possible. I am going to explain how it can be done. I am going to exec...
 -
Pull Request are the controlled way to bring in the changes to your stable branches in your Azure Git repos, or for that matter all Git prov...
-
The new Azure Managed Redis can be deployed with balanced compute and memory with high availability, and useful modules such as RedisJson a...
-
We have discueed, that we have to use an environment variable to handle input parameter default values, if we are using trigger for workflo...


