Showing posts with label alm. Show all posts

Sunday, 18 August 2013

ALM - Productivity Enhancements - VS 2013 Peek Definition (Enhanced "Go To Definition")

How many time you lost the code segment you were looking at, when try to "Go To Definition" (F12) few time with VS Text Editor (Code Window)? Upcoming VS 2013 going to have a great feature enabling us much more..and a BIG thank must go to MS for giving us this cool..great feature called "Peek Definition" (Alt+F12).

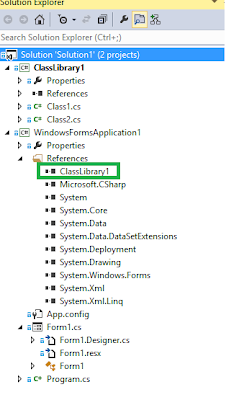
To explain what it is, I am going to use a very simple and doing nothing application. The application contains Class Library and Window Form app which is referring the class library.


Class Library has two classes, Class1 and Class2. The Class1 has a method "GeMgs" calling "GetMessage" method in Class2.


The windows application button click event is calling Class1 "GetMgs" method.


Lets close all other code windows except the code window of Form1 which is having the button click event. Click on GetMsgs method and press "Alt+F12". New feature "Peek Definition" is in action and you can see you current code shifts down and the Class1, "GetMgs" appears in a preview window.


Can we peek definition inside preview window opened? Yes we can. Let's click on "GetMessage" and press "Alt+F12".


Class2 "GetMessage" appears in preview window and you can see navigation buttons also appear in the window.


By clicking navigation buttons you can navigate back and forth.


Great, isn't it?


Awesome !!! The enhanced scroll bar preview, I explained in my previous post, even works inside the Peek Definition preview window.


Amazing thing about this new feature is that we have not gone out of the code segment we were originally in. In this instance we are still in the Form1 button click, and once you hit "ESC" (escape) button Peek Definition preview window will disappear.

Full list of keyboard shortcuts of Peek Definition feature  and more information available at http://msdn.microsoft.com/en-us/library/vstudio/dn160178%28v=vs.120%29.aspx

Await for more productivity enhancements in VS 2013.. and enjoy coding with VS 2013..

Thursday, 15 August 2013

ALM - Productivity Enhancements - VS 2013 Enhanced Scrollbar

Enhanced Scroll bar is simple, but very useful feature included in upcoming VS 2013. Lets have a look what we can do with this.

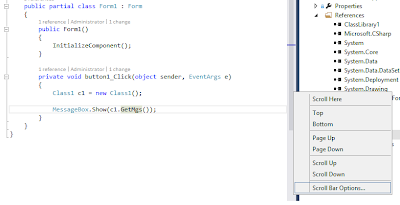
To enable this feature you can right click on the scroll bar of the text editor -- > Select Scroll Bar Options.


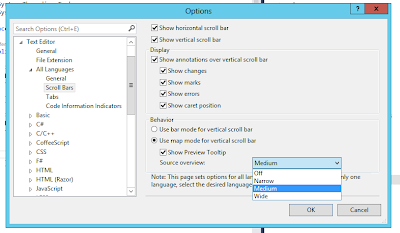
You will get the below window where you can set the options as per your preference.
 

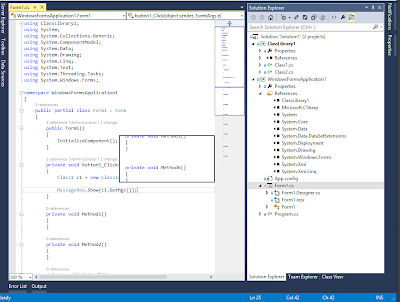
Once you enable Medium or Wide mode you can see the break points, bookmarks and lot of other information.

You can preview the areas of code that is not visible using the preview tool tip option by moving your mouse over the scroll bar.


Once you click on scroll bar you will be navigate to the code you previewed. Still you can see the cursor position in original place you left as in below image.


Once you click on code the cursor position correctly indicated in scroll bar.


Explore more with enabling and disabling options in Scroll Bar Options window... and enjoy VS 2013...

Wednesday, 12 June 2013

TFS 2012 Email Alerts with Gmail Account

In my recent ALM session @ .Net user group, Sri Lanka, there were few queries on setting up TFS email with a Gmail account. For those folks and all others who would like to setup email alerts with a gmail account, there are two simple steps to do.

1. Enable POP in Gmail.
 Goto --> Your Gmail account --> Settings --> Forwarding and POP/IMAP and set the settings as below. (Set to enable POP for emails from now on and after save you should see POP is enabled)


2.Setup Gmail account settings as Email Alert settings in TFS 2012.

Open Team Foundation Administration Console --> Application Tier --> Alert Setting

and set the settings as below example. It should be your Gmail account and password :)


And now all is setup and your TFS users can subscribe for alerts in TFS 2012 and will get an email from your TFS Gmail account that you set in above.

Wednesday, 8 May 2013

Why CI Build

There is lot of talk on CI builds nowadays. Have you ever thought why it has become a hot topic? Or is it really important? What is the benefit of it? OK to answer all above I will take you through a very simple demo with even simpler sample.

For simplicity let's say we only have two developers in our team. The Developer A and the Developer B. They both are working on a windows forms application referring to a class library from that.


Our Developer A starts development and he creates a method "GetWelcomeMessage" in Class1. Then he uses it in his Form1 he is developing in the Windows Application.


Developer A compiles this code successfully and checks-in the Class1 and Form1. Now the source control server (TFS) has the files as below.


Now our Developer B takes the latest version from source control server and he adds another form, Form2 and use the method developed by Developer A.


Developer B compiles his code successfully in his development PC and checks-in the code. Now the server copy will be like below.


The source control server (TFS) now have the code checked-in by both Developer A and Developer B. This source code is valid and compiles without any issue if latest version is downloaded to any of the developers' PCs.

Now our Developer A becomes a little bit lazy next day morning and do not bother to get the latest version from the server. So he still has only Form1 and the Class1 in his solution.


Developer A starts modifying code from yesterday WITHOUT getting the latest version from source control server. He changes Class1 "GetWelcomeMessage" method to accept a parameter (username) and include that in the return message. Then he modifies the Form1 method call to Class1."GetWelcomeMessage" to send the username.

The Developer A compiles the code in his development PC, and it looks good and compiles successfully. Developer A checks-in the modified Class1 and Form1 code to the source control server(TFS).

Now what is the status of the code in source control server. The Developer A has checked-in set of changes which is causing build errors in the solutions latest copy in the source control server.


Now if developer A or B download the latest version from source control server, none of them will be able to compile the solution. If both of them lazy enough to not to get the latest version, they will keep on developing and adding new files for their respective tasks without knowing about the errors in the latest copy of the solution. May be they will discover this just before, when they try to release to QA.

Wouldn't it be nice to have someone who compiles the source code checked-in to the Source Control Server (TFS) and alert the two Developers A,B about the broken build status, and the changes that caused the build break.

Exactly that is the job of a CI build in TFS world. CI build will build the Source Control Server version of the source code for each checked-in, change-set and alert if there is any build failures. This will give lot of benefit to the developers to easily identify the issue in the build by detecting the change-set caused the build break.

In my next post I will explain how to setup a CI build , for a solution with TFS 2012 & VS 2012.

Wednesday, 17 April 2013

Code Review with TFS 2012 and VS 2012

Let's have a look at another cool feature comes along with VS 2012 and TFS 2012. There is traceability and visibility of entire code review process with this new feature. It is very easy to use as well.

I will explain everything related to  code reviews with a very simple example. I have simple button click which assigns a text to a text box in my form. I want my supervisor to do a code review on this great implementation that I have done before I check in my source code. So I got to Team Explorer --> My Work and request a code review.

I can choose who would do the code review.It can be more than one person. I enter a title for the code review and a description if I want.  When I submit my request VS 2012 associates all code files I have changed or newly added (my all pending changes) to the code review request. Behind the scene what happens is my pending changes are shelved and that shelve-set is associated automatically to the Core Review Request TFS work item.


It is possible to submit already checked in change-set to code review as well. Simply right click on change-set and request a code review.


The supervisor(s) will see the code review request on his My Work. He has the
option to accept or decline the request.


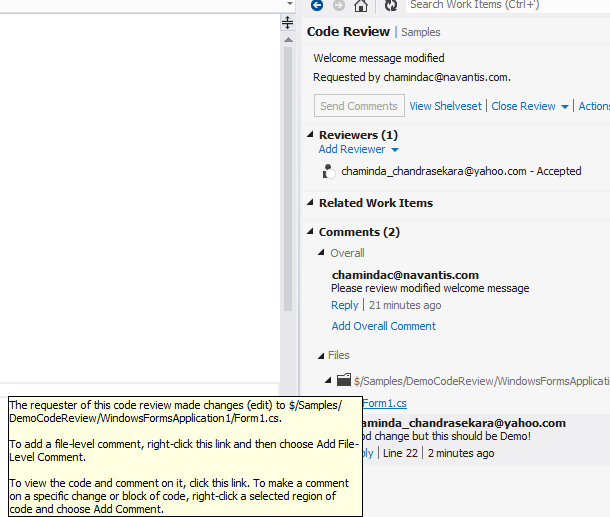
Reviewer can view the changes done and can comment  as overall comment or comment on files or even add comment highlighting the code sections.


Reviewer can mark each individual file as reviewed to keep track of his own activities.


 He can add comments and save them. The comments will only be seen by the other party when he send them.


Once reviewer send the code review comment or finishes the code review I can see it in My Work and close the code review request.


I can do changes on my supervisors recommendations and mark them as done to keep track, and create a new code review request if I want. This time my old code review is automatically linked with new code review. Like all other work items in TFS world, history is recorded for Code Reviews and you can review your code reviews.

Great stuff..isn't it? VS 2012/ TFS 2012 rocks with these new cool features.


Tuesday, 19 February 2013

Set up TFS 2012 on Windows Server 2008 R2 - A quick guide to installation

After a year long break I thought of writing on ALM again. I am going to give set of steps to install TFS 2012 on a Single server. You can use TFS2012 on cloud with visualstudio.com, but installing/configuring it will give you a good experience and  in depth knowledge. Anyone planing to take MS certification exam for Administering Visual Studio Team Foundation Server 2012 will have a definite advantage when you do all by yourself.

So lets start,

1. Install Win 2008R2
2. Change computer name and Setup as PDC or Add to existing domain - It is useful to configure your own domain if you are trying out in a VPC for learning purpose.
3. Install Web Server(IIS) Role with ASP.net and Basic Authentication
4. Install SQL 2012 Standard/Enterprise or developer (Express is not having Analysis Services/Reporting Services)
5. Install Sharepoint Foundation 2010 -- REMEMBER --> Do not configure now
6. Install Sharepoint Foundation 2010 SP1 --  Configure Sharepoint..Add TFS service account to Farm Administrators group of sharepoint...Create default team site
7. Install TFS 2012
8. Configure TFS 2012 in Advanced Mode, make sure to select the installed Sharepoint Foundation 2010 in the sharepoint configuration step.

Above is brief but that's all you need. Additionally you can install MS office/MS project to have a better ALM experience integrated with TFS 2012.

If you need more info or help...contact me.. :)

I hope to discuss more details on ALM with VS 2012 & TFS 2012 in coming weeks...

Tuesday, 1 November 2011

VS2010 ALM Tools - Automating Functional Testing using Coded UI Test

Automating functional testing with Coded UI Test is another cool new feature available with Visual Studio 2010. Today I'll walk you through, how to author a functional test to check basic operation of a web based simple calculator.

Build a simple calculator
First we have to develop a simple calculator to use for our first Coded UI Test. Create a ASP.NET Empty Web Application and add a web form Calculator.aspx. Then Add following html in between the form tag of the aspx.
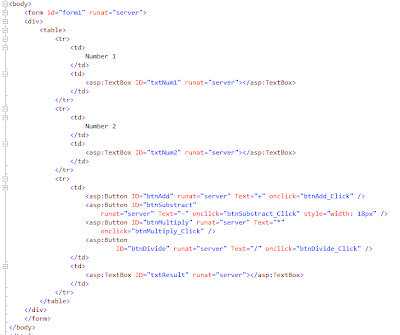
In the code behind write the methods to handle calculator operations.
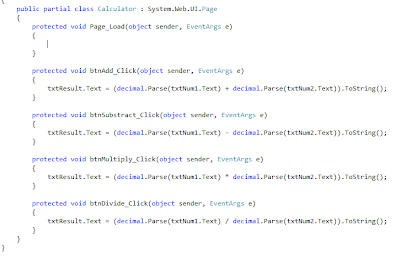
Build the web application project and host it in the IIS as a website. Now our calculator is ready for functional testing.

Recording the test actions
First create a Test project in visual studio 2010. Right click on the project and click Add New Item.
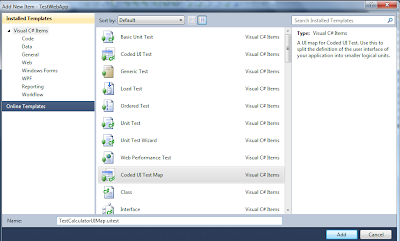
Add Coded UI Test Map file to the test project naming it to TestCalculatorUIMap.uitest. This will minimize the visual studio and launch Coded UI Test Builder.
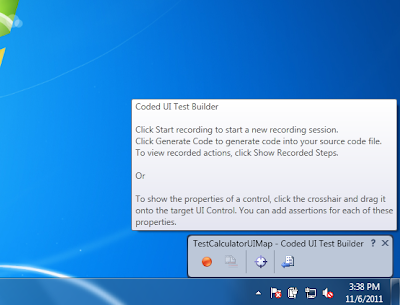
In the test builder click start recording. Launch the IE 7 or 8 and load the calculator we have have hosted earlier. If you are running IE 9 then you have to set it to compatibility mode which I will explain later. Enter Input data and click on + button.
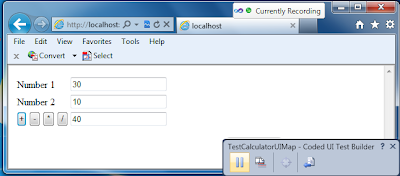
Pause the recording and click on generate code button. Give EnterNumsAndClickAdd as the method name and generate the method. This will create code for the actions that you have done. Now drag the cross hair icon from coded UI test builder to the results text box it will be highlighted and you will see the assert window. Assert will evaluate the result of the add action.
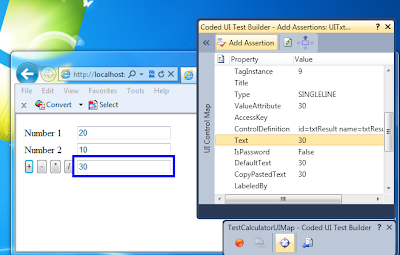
In the Assertion window select the Text Property of the text box and click Add Assertion. This will prompt for a method name.
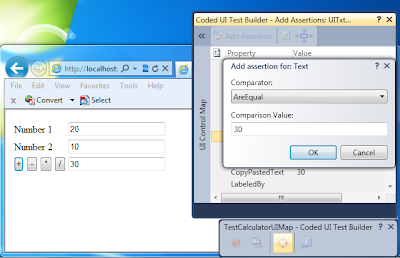
Select the comparator as AreEqual and enter value as 30 and click OK button. Then click on generate code and give the method name as AssertAdd.
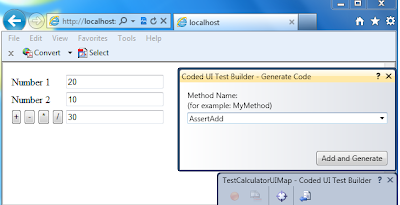
Once the code is generated close the Coded UI Test Builder. You can see a code files TestCalculatorUIMap.cs and TestCalculatorUIMap.Designer.cs are added. The designer.cs file contains the generated methods.

Next we will add a CodedUITest to our test project to execute the generated test methods. Right click on the project and click add CodedUITest naming it to TestCalculator. "Generate Code for Coded UI Test" window will popup but we will skip this option by clicking cancel since we have already generated our methods for enter numbers and evaluate add operation. Why I am suggesting this way is it will give you a grater flexibility to author a code UI test rather than using the prompted window.

If you examine the added Coded UI test file TestCalculator.cs you will see following methods and few other attributes.
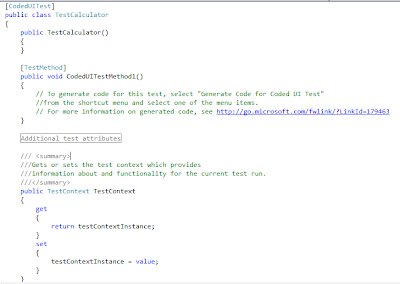
We will manually add code for the CodedUITestMethod1 to do our test. First rename CodedUITestMethod1 to TestCalc and insert the below code.
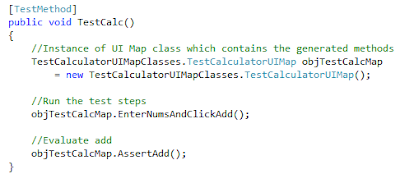
Open the Test View window (Test --> Windows --> Test View) and click refresh to build the project. You will see the TestCalc method appears in the Test View window.
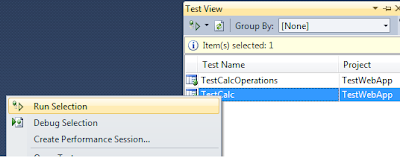
If we run this coded UI test TestCalc it will open up IE , navigate to TestCalculator.aspx and do a test for add operation. Test will pass. But you will see a small problem... Ok.. it always run with the data you have recorded the test with. I will explain how we can make the coded UI Test to work with different set of data in my next post.

Now If you want to generate test and assert methods for other operations of our calculator, you can do so by right clicking on TestCalculatorUIMap.uitest and clicking on Edit with Code UI Test Builder. This will launch the Coded UI Test Builder where you can record more test actions and asserts to the same TestCalculatorUIMap.uitest file.

IE 9 compatibility mode
MSDN says "You cannot create an action recording using the standard mode for Internet Explorer 9 because the new features and controls for Internet Explorer 9 are not currently supported." . So you have to set the IE 9 to compatible mode to Author Coded UI Test with it. In IE 9 go to Tools --> Compatibility View Settings.

In the popup window add localhost (Where our calculator is hosted) to compatibility view.
Popular Posts