Showing posts with label unit test. Show all posts

Wednesday, 18 October 2023

Code Unit Test Coverage with Azure Pipelines

 Unit tests are essntial to ensure the code we develop is working as intended. Running the unit tests Azure pipelines is really helpful to not to miss the unit test failures. However, to give afurther assuarance we need to check the coverage of code with unit tests in our projects. Let's look at steps required to obtain a code unit tests coverage report in Azure piplines in  cobertura format.

The expected outcome

The coverage here shows the first library, all code lines (100%) are covered with tests and the the other library has only 22.2% code coverage. 


Thursday, 7 September 2023

Avoid GitHub Action Workflow Code Duplication - Using Composite Actions to Create Reusable Templates

 Azure DevOps yaml files for piplines can be created as templates to avoid duplicating same set of tasks in multiple areas of the pipelines. For GitHub actions workflow, we have seen here in "Build and Unit Tests for .NET Apps with GitHub Actions" the same steps are repeated in both Windows and Linux, build and unit test run. The solution to avoid duplicating same steps in multiple jobs in a GitHub actions workflow is the usage of composite actions. Let's modify our workflow implemented in "Build and Unit Tests for .NET Apps with GitHub Actions" to use composite action to build and unit test, and reuse that in both Windows and Linux job.

Wednesday, 23 August 2023

Build and Unit Tests for .NET Apps with GitHub Actions

 Executing unit tests and viewing results in unit tests in a build pipeline is essential to keep high quality in an application deployment via any pipeline system. GitHub actions are the way forward to implement pipelines with repositories in GitHub. Let's explore how to run unit tests and view results in GitHub actions workflow.

Thursday, 2 August 2018

Solving OutOfMemoryException and Getting NUnit Tests on Visual Studio Test Explorer

It is fun to work with latest tools and frameworks but sometimes errors are bit confusing and searching for fix is not that easy. One team worked with NUnit and .NET 471 and complaint that the when compiling they get outofmemory exception “ NUnit Adapter 3.7.0.0: Test discovery starting Exception System.OutOfMemoryException, Exception converting mytest” . Searching pointed to few links in GitHub issues as shown below but those workarounds seem to be not applicable as .NET framework change back to 462 is not an option.Fix was really simple but looking for a solution sometimes takes time. So let’s explore the problem and the simple fix.

Wednesday, 9 March 2016

Run xUnit Unit Tests for (dnx)ASP.Net 5 with VS Team Services Build


To run the xUnit unit tests developed for ASP.Net 5 (ASP.Net Core 1.0 now), you need to setup a powershell step/task. Setting up a build with VS Team Services, for ASP.Net 5 is explained here.
First thing we need is a powershell script, which can runt xUnit tests, in VS Team Services build. (Hardcoded paths and project names in the script)

Set-ExecutionPolicy unrestricted -Scope CurrentUser -Force

$VerbosePreference = "continue"
$ErrorActionPreference = "Continue"
     
&{$Branch='dev';iex ((new-object net.webclient).DownloadString('https://raw.githubusercontent.com/aspnet/Home/dev/dnvminstall.ps1'))}
$globalJson = Get-Content -Path $PSScriptRoot\..\..\EventBooking\global.json -Raw -ErrorAction Ignore | ConvertFrom-Json -ErrorAction Ignore
 
if($globalJson)
{
    $dnxVersion = $globalJson.sdk.version
}
else
{
    Write-Warning "Unable to locate global.json to determine using 'latest'"
    $dnxVersion = "latest"
}
 
& $env:USERPROFILE\.dnx\bin\dnvm install $dnxVersion -Persistent
 
$dnxRuntimePath = "$($env:USERPROFILE)\.dnx\runtimes\dnx-clr-win-x86.$dnxVersion"

dnx -p $PSScriptRoot\..\..\EventBooking\BookMyEvents.UnitTests test 
Check this script in.image
We have to make sure test results are available to publish in the build. for that we can change the test project .json to create a results xml.image
Next add a powershell script task/step to the build. Set the script to execute and let it continue on error, to make sure, it will not break the build on a test failure.image
To publish the results, use “Publish Test Results” step. Set the test results xml file name specified in the project .json, for the results files. Select the Test result format as XUnit.image
Once a build queues it executes the test and publish the results.image
image
When there are multiple tests running in the build, a detailed test report helps to identify which tests fail.image

Monday, 29 February 2016

Unit Test for ASP.Net 5 with xUnit

Unit testing plays a significant role in assuring the quality of the applications we develop. To unit test an ASP.Net 5 RC1 Update1 (ASP.Net Core 1.0 now), web application we can use xUnit.
To add xUnit test to the solution add a Class Library (Package) project.image
image
Edit the default project.json shown below.image
Add dependency to the ASP.Net 5 web project, and to xUnit and xUnit.Runner.Final project.json should be similar to below.image

{
  "version": "1.0.0-*",
  "description": "BookMyEvents.UnitTests Class Library",
  "authors": [ "Chaminda" ],
  "tags": [ "" ],
  "projectUrl": "",
  "licenseUrl": "",

  "dependencies": {
    "BookMyEvents": "1.0.0-*",
    "xunit": "2.1.0",
    "xunit.runner.dnx": "2.1.0-rc1-build204"
  },

  "commands": {
    "test": "xunit.runner.dnx"
  },

  "frameworks": {
    "dnx451": { },
    "dnxcore50": {}
  }
}
Once the project.json saved the references get updated.image
Let’s write a test for a very simple controller method.image
Test method as a Fact (There are two types of Unit Tests in xUnit. Fact and Theory. More information here).image
Go to test explorer in VS to view the test.image
image
If you cannot see test as above build your solution. Test will be then available in the explorer. Execute and you can see the results.image
Next post let’s learn how to run the unit tests (xUnit), with VS Team Service build and publish test results.

Friday, 3 January 2014

.Net Forum - Sri Lanaka Jan. 2014 Session - Build-Deploy-Test Part 2 - Unit Tests & Automation with TFS Builds

Done the second part of Build-Deploy-Test Automation session series @ Sri Lanka . Net Forum on 02 January 2014. Awesome start to the year for me with, receiving the precious award of MVP for ALM.

For the folks asked for the slides and the sample code I used at the session, download them from the below links.

Build-Deploy-Test -Part2 - Unit Tests.pptx
Demo_MS_Fakes.zip

References

Wednesday, 26 October 2011

VS2010 ALM Tools - Unit Testing - Writing A Simple Unit Test

Unit testing made easier with Visual Studio 2010. Authoring a unit test involves three key concepts called ThreeAs.
  1. Arrange - Prepare the parameters and expected result for you test.
  2. Act - Invoke the method to test with the parameters and obtain the actual result.
  3. Assert - Evaluate expected and actual result to determine the success of the test.
Writing a Unit Test from the scratch

For the simplicity we will write very small method to add two numbers and a unit test to test that method.

Start VS2010 , create a new solution and add a c# class library project named CodeLib. Add a new class MathFunc.cs to the library and include the following code to get the smaller integer out of given two integers.

Now, add a new c# TestProject to your solution TestCodeLib reference the CodeLib Project, and add new class TestMathFunc.cs. To the TestmathFunc class definition add[TestClass]attribute. This attribute defines that TestMathFunc contains test methods which can be denoted by [TestMethod] attribute and it make these test method available in Test windows such as TestView. Writing test method TestGetSmallerNumber to test our GetSmallerNumber method is our next task.

Assert Class

Assert class provide quite few useful methods to validate your actual result with the expected result. In this Assert.AreEqual method an AssertFailedException will be thrown if expected and actual does not match. You can specifically throw an AssertFailedException in your test method by calling Assert.Fail method. There is no Assert.Succeeded available since if there is no exception that obviously means the test is successful. You have a Assert.Inconclusive to denote

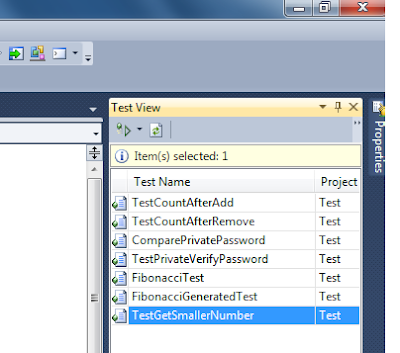
Now build the solution. You can view the test with the TestView window.
You can see your Test Method now in the test view window.

Now right click on the test in the TestView window and click Run Selected. You will see the unit test runing and the Test Result windows pops up with the passed status.

To check whether test method correctly working if the method is returning the wrong value edit GetSmallerNumber to have the following code.

If you run the test now result will be failed.

click to enlarge

Following error message is giving the reason for failure. We are getting greater number from the method instead of the smaller number.

Expected:<10>. Actual:<20>. Actual value 20 and expected value 10

Double clicking on the failed test result will open up the detail view of the test results.

Generating Unit Test

You can use Visual Studio 2010 to generate unit test for your method. Open the MathFunc.cs and right click on the GetSmallerNumber method. In the popup menu click on Create Unit Tests.

Below popup window that appears. Make sure your test project is selected as the output project and your method is correctly selected. Now Click on the Settings Button.


In the settings window you can specify preferred suffix for the test class file, test class and test method.

Mark all test result Inconclusive will notify this generated test is not yet inspected and Verified by the developer. Click OK to close the settings window and click OK in the Create Unit Test window to generate the unit test.


You can see the generated test specifies that you have to set values for expected result and input parameters. If you run this test now you will get inconclusive status withe message Verify the correctness of this test method. You can set the values to input parameters and expected result and remove the Assert.Inconclusive("Verify the correctness of this test method.") to make the test to fully work similar to the test that we have manually written.

Popular Posts