Friday 20 September 2013

TFS - How to Restore Deleted Files

Have you ever wanted to find a deleted file in TFS and Restore/Undelete it? Is it possible? Yes. It is. Let me show in few quick steps how you can restore a deleted file in TFS using Visual Studio Source Control Explorer.

1. Your VS Source Control Explorer would normally look like below and will not show the deleted files.


2. Go to Tools --> Options in Visual Studio menu and open the options. Select Source Control --> Visual Studio Team Foundation Server and tick the option "Show deleted items in Source Control Explorer" and click OK.


3. Now you can see the deleted files appear in Source Control Explorer. Right click on the Folder/File you want to restore and click "Undelete" to get it restored.


Friday 13 September 2013

TFS 2012 - Build/Release Notes with Community TFS Build Manager

Community TFS Build Manager is really useful add-on to VS 2010/2012/2013 to  create Build/Release Notes automatically.

You can download this free from Visual Studio Gallery  and this project source code can be found here at codeplex if you want to further customize.

Once you install Community TFS Build Manager you can see a new link appear in VS Team Explorer as below.


Launch this tool and select the builds.


Right click on the build which you want to generate a release note, and click on "Experimental Build Note".


Set the necessary information.


Click "Generate" and there you go...


Awesome. Isn't it?

For information on getting the necessary changesets associated to a build see my post TFS 2012 - Get a Release Build With Changesets Associated From a Given Changeset

Tuesday 10 September 2013

TFS 2012 - Get a Release Build With Changesets Associated From a Given Changeset

If you have created a new release build definition with TFS for an application that is already in Production (which is deployed to production without a TFS build), you may want to do the next release build with changesets associated from a given changeset (from the last changeset delivered to Production).

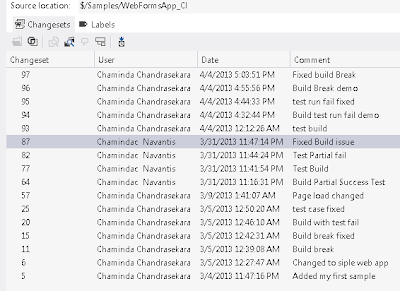
To make it clear have a look at below source control history in my demo app. My changeset 87 has already gone into Production. Now I am creating a new TFS release build definition and when I queue a build in this release build I want it to get associated with chagesets 93 to 97.


If  I queue a build with will build for latest sources in the TFS and no changesets get associated to the build.


To get my changesets 93 to 97 associated to build first I need to build for changeset  87. Then I can build for latest solution and it will associate from 93 to 97.

I can specify the changeset to build by advance options "Get Version" when I queue a build like below.


 Now when I queue the build it builds for changeset 87.


Now I queue another build with not specifying a changeset. This will build the latest sources


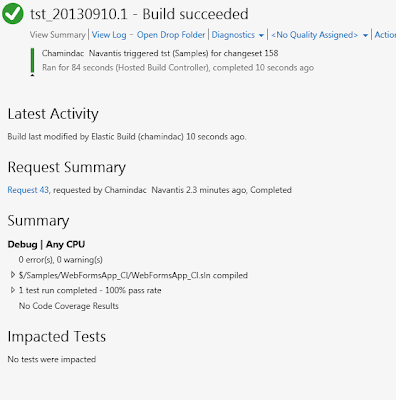
This build will associate the changesets from 93 to 97 as I expected


If it is necessary I can repeat the same steps to do another build from this definition to associate set of changesets that I would like to associate with it.

I will explain how to generate a Build Note with TFS build in my next post.

There are few types of parameters that can be send to "Get Version" of advanced options of queuing build. For details check http://msdn.microsoft.com/en-us/library/gg490833.aspx#VersionSpecs

Wednesday 4 September 2013

TFS 2013 - Team Explorer - Undock Pending Changes & Build windows

A much awaited capability to have "Pending Changes" window outside of the Team Explorer, like what we had in VS 2010, is added by MS in TFS 2013 Team Explorer (and in VS 2013). This will be a very good news for the developers who did not like the pending changes inside team explorer in VS 2012. (Including me as a matter of fact).

Cool thing about this is anybody who wants "Pending Changes" inside Team explorer, like in VS 2012, still can have it. People like me can switch it to a separate window.

Let me show you how to do this "Undock" of "Pending Changes" window from team explorer.

1. You can get "Pending Changes" window inside Team Explorer by clicking Pending Changes in Team Explorer Home.


2. Click on the top right hand side arrow as shown below.


3. There you go... now your Pending Changes appear as a separate window, you can dock it in VS as you like and unpin,pin works as all other windows.


4. If you hide it it will appear in the position you dock it in VS. You have the option to dock it back in Team Explorer by clicking the menu option or by closing the Pending Changes window.


5. Same behavior exists for Build explorer window as well.

Popular Posts