Serverless computing has become a hot topic these days. It is providing you with paying only for the actual time your code is running and resources you are consuming without any worries about infrastructure. Azure functions let you build functions that can scale dynamically based on the needs, with a languages of your choice. When you install Visual Studio Azure Development workload you get templates for developing Azure Functions. Let’s look at how to create a simple Azure Function “Hello World” in Visual Studio and most importantly how to get your CI/CD pipeline ready within couple of minutes.
Showing posts with label Visual Studio. Show all posts
Showing posts with label Visual Studio. Show all posts
Wednesday, 8 August 2018

Friday, 8 September 2017
Download Offline Installer for VS 2017
There is no ISO available to download for VS2017. You can view why Microsoft did not make ISO available, is discussed in here. However if you want to download VS 2017 to perform an offline installation you can follow the steps described below.
- Download the relevant VS installation .exe (for example vs_enterprise__984310617.1489458965.exe).
- Copy it to your local hard drive folder let’s say E:\Install
- Create a folder to download installation files say E:\Install\VS2017 (can be in a different path such as D:\VS2017)
- Open command prompt as administrator and change the directory to where your downloaded .exe is available
- Execute the command below
Saturday, 8 July 2017
Ignoring Visual Studio 2017 Created Files in Git
Visual Studio 2017 creates few files such as slnx.sqlite, .suo and these files often give trouble if you get it added to a branch in Git version control. Every time you open a solution in Visual Studio 2017, these files are indicated as pending changes and you are unable to do a pull, push etc. without undoing or committing these files. This is annoying since you actually do not want these to be added as changes to version control repository. You can try completely removing the files not needed from repository but if you are not willing to go through somewhat risky procedure, what options you have for solving this problem?
Let’s look at how to fix this issue.
.gitignore
Adding unwanted files to .gitignore works as long as you have not initially committed them to any branch. But in this case where it is already committed adding .gitignore entry such as /.vs/slnx.sqlite does not help.

Ignore changes to the files
You can run below command to ignore the changes to these files by assuming they are unchanged.
git update-index --assume-unchanged filename
To run the command open command prompt from team explorer window of Visual Studio by right clicking on the repository name of the connect page.

The command git update-index --assume-unchanged slnx.sqlite gives error “fatal: Unable to mark file slnx.sqlite” because it actually cannot find the file.

To find the correct paths you can execute git ls-files command and use the path listed to mark the file. You can list git untracked files as well by executing git ls-files -o but untracked files cannot be marked. Adding them to gitignore would be sufficient.

Providing correct path to file from the location you are running the command will make it execute without error message.

slnx.sqlite file no longer considered as changed.

You can undo the the assume-uchanged state by executing command below.
git update-index –-no-assume-unchanged filename
Thursday, 11 May 2017
Auto Generating CD Build/Release Pipeline Targeting Azure App Service for MVC Web Application
VSTS allows great flexibility with it’s new web based build and release management features. You have several templates which can be used to create build and release definitions you need quickly. Lots of out of the box tasks allow you to further customize your definitions to support the steps that you need to perform during a build or a deployment. Visual Studio Marketplace is getting more and more components added to it, allowing you to find a task for almost any build deploy step you may require to perform. Taking the steps to the next level, you can now even generate your build/release pipeline with Visual Studio 2017, after adding the extension Continuous Delivery Tools for Visual Studio.
Let’s walkthrough the steps of generating a CD pipeline for an MVC Web Application, to allow it to be deployed to Azure App Service.
Monday, 17 April 2017
Building ASP.NET Core 1.1 Web App with Team Services
ASP.NET Core 1.1 is available with Visual Studio 2017 and it is based on .csproj to provide us with a consistent experience inside Visual Studio. .csproj will be the way forward with ASP.NET Core and Microsoft encourages everyone developing on ASP.NET Core to move to Visual Studio 2017. You can see the recommendation in https://blogs.msdn.microsoft.com/dotnet/2017/03/07/announcing-net-core-tools-1-0/ quoted below. Microsoft will not be updating VS 2015 based tools for .NET core anymore.
Tuesday, 19 April 2016
Bower with VS 2015–Resolve ECMDERR Failed to execute "git clone https://github.com/components/ … exit code of #-532462766
Recently encountered error in getting bower packages with VS 2015 Update 1 (Enterprise), which is confirmed error on VS 2015 Update 2 Community as well, according to MSDN forum thread here.
PATH=.\node_modules\.bin;C:\Program Files (x86)\Microsoft Visual Studio 14.0\Common7\IDE\Extensions\Microsoft\Web Tools\External;%PATH%;C:\Program Files (x86)\Microsoft Visual Studio 14.0\Common7\IDE\Extensions\Microsoft\Web Tools\External\git
"C:\Program Files (x86)\Microsoft Visual Studio 14.0\Common7\IDE\Extensions\Microsoft\Web Tools\External\Bower.cmd" install --force-latest
bower jqueri-ui#* not-cached https://github.com/components/jqueryui.git#*
bower jqueri-ui#* resolve https://github.com/components/jqueryui.git#*
bower jqueri-ui#* checkout 1.11.4
bower jqueri-ui#* ECMDERR Failed to execute "git clone https://github.com/components/jqueryui.git -b 1.11.4 --progress . --depth 1", exit code of #-532462766

It does not load the version number of the package properly in bower.json as well.
It is same issue in corporate network and in no firewall, no proxy direct internet connection.
Search on the error and trying out so many suggestions, the most stable workaround is mentioned in this connect feedback (workaround link given stackoverflow answer).
Solution Step By Step
1. Download Git from http://git-scm.com/
2. Install in your machine.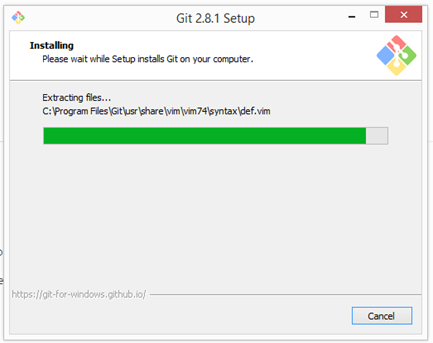

3. Open Git Bash
4. Run below command with Git Bash
git config --global url."http://".insteadOf git://
5. In Visual Studio right click on Dependencies – > Bower and click External tools
or click Tools, Options in Visual Studio.
6. Go to Project and Solutions –> External Web Tools in Options dialog.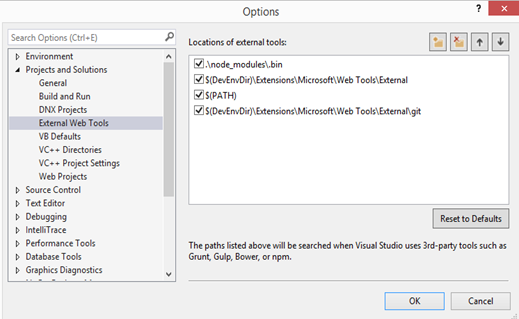
7. Uncheck “$(DevEnvDir)\Extensions\Microsoft\Web Tools\External\git” and add a new folder path to your Git installed location bin folder.
8. Close and open Visual Studio and you are good to go.
Now packages give version number in bower.json
Restore package completes smoothly.

One caveat with the solution is having to install external Git in the machine, which will not be used for anything other than fixing this issue. MSFT should fix the problem with embedded Git shipped with VS to make this a seamless experience for the developers.
PATH=.\node_modules\.bin;C:\Program Files (x86)\Microsoft Visual Studio 14.0\Common7\IDE\Extensions\Microsoft\Web Tools\External;%PATH%;C:\Program Files (x86)\Microsoft Visual Studio 14.0\Common7\IDE\Extensions\Microsoft\Web Tools\External\git
"C:\Program Files (x86)\Microsoft Visual Studio 14.0\Common7\IDE\Extensions\Microsoft\Web Tools\External\Bower.cmd" install --force-latest
bower jqueri-ui#* not-cached https://github.com/components/jqueryui.git#*
bower jqueri-ui#* resolve https://github.com/components/jqueryui.git#*
bower jqueri-ui#* checkout 1.11.4
bower jqueri-ui#* ECMDERR Failed to execute "git clone https://github.com/components/jqueryui.git -b 1.11.4 --progress . --depth 1", exit code of #-532462766

It does not load the version number of the package properly in bower.json as well.

It is same issue in corporate network and in no firewall, no proxy direct internet connection.
Search on the error and trying out so many suggestions, the most stable workaround is mentioned in this connect feedback (workaround link given stackoverflow answer).
Solution Step By Step
1. Download Git from http://git-scm.com/
2. Install in your machine.


3. Open Git Bash

4. Run below command with Git Bash
git config --global url."http://".insteadOf git://

5. In Visual Studio right click on Dependencies – > Bower and click External tools

or click Tools, Options in Visual Studio.

6. Go to Project and Solutions –> External Web Tools in Options dialog.

7. Uncheck “$(DevEnvDir)\Extensions\Microsoft\Web Tools\External\git” and add a new folder path to your Git installed location bin folder.

8. Close and open Visual Studio and you are good to go.
Now packages give version number in bower.json

Restore package completes smoothly.


One caveat with the solution is having to install external Git in the machine, which will not be used for anything other than fixing this issue. MSFT should fix the problem with embedded Git shipped with VS to make this a seamless experience for the developers.
Tuesday, 8 July 2014
Setup VS 2013 Release Management Server
Let’s look at step by step “How to setup a VS 2013 Release Management Server”, which is the heart of VS Release Management. To understand more, the best and the official resource you must go through is VS 2013 Release Management Installation Guide. Trial version of VS 2013 Release Management with update 2 can be downloaded from http://go.microsoft.com/?linkid=9843020.
Note: You cannot apply a license key for the trial to make it licensed version. Instead you have to uninstall trial and install licensed copy downloaded with MSDN or Volume License to apply license.
Prerequisites for VS 2013 RM (Release Management) Server is below as per VS 2013 Release Management Installation Guide.
Processor: 1 GHz Pentium processor or equivalent (Minimum); 2GHz Pentium processor or equivalent (Recommended).
RAM: 1024 MB (Minimum); 2048 MB (Recommended).
Hard Disk: On a clean machine, up to 2.2 GB of available space may be required. This is due to the dependency on .NET. Database can grow up to 1 GB per year (could be as low as 10 MB - depending on usage)
Display: 1024 x 768 high color, 16-bit colors (Minimum); 1280 x 1024 high color, 32-bit (Recommended).
Supported platform: • Windows Server 2008 R2 SP1 • Windows Server 2012 • Windows Server 2012 R2
Database requirements: Microsoft SQL Server 2008 or 2008 R2 or 2012
The installing user (user who is setting up the Release Management Server) requires local administrator rights and sysadmin rights on the SQL Server (SQL Server that is going to have Release Management Server database). I will be using TFS Admin as the installation user of the RM Server since I am setting up the RM Server in the same box where the TFS is installed. Ideally the RM Server should be set up in a different clean computer and TFS is not mandatory to do release panning and execution with VS 2013 Release Management. (TFS is optional, but can be integrated really well with VS 2013 RM to automate from builds to release).
As the first step we need to setup an account, to be used as the service account for the Release Management Server.


Run the downloaded rm_server.exe to launch the setup.


Accept license agreement and click “Install”.

Once install launch to configure.


In the configuration window specify the release management service account and SQL Server to create the RM database.

Apply settings, you will encounter the first error in RM Server configuration, and fortunately it is a descriptive error “The account specified is not a member of the local administrators group”.

Add the RM Service account to local administrators group to resolve this issue.

Now the configuration proceeds.

The next error which might occur if the server resources are limited (This demo environment has only one cpu core and 4GB RAM while running SQL, SharePoint Foundation2013, TFS in same box). The error message is not very helpful.

Log file shows failing when getting RM site state, looks like some time out.

Increase resources in the machine and retry the configuration, now fails with application pool already exists (I believe MSFT will make this experience of retry configuration, better in a future release).

Manually deleting app pool and any web sites created for Release Management will resolve the issue.

Retry configuration succeeds.

To confirm the success state of configuration verify below check list.
1. Release Management database is created in SQL Server.

2. RM Service account mapped to RM database dbo schema.

3. Release Management app pool is created with identity RM Service account, and RM web site is created as below.

4. Release Management Monitor windows service is running with RM Service account.

Now we have a VS 2013 Release Management Server up and running. Next post of series VS Release Management, I will explain “How to setup and configure Release Management Client”.
Note: You cannot apply a license key for the trial to make it licensed version. Instead you have to uninstall trial and install licensed copy downloaded with MSDN or Volume License to apply license.
Prerequisites for VS 2013 RM (Release Management) Server is below as per VS 2013 Release Management Installation Guide.
Processor: 1 GHz Pentium processor or equivalent (Minimum); 2GHz Pentium processor or equivalent (Recommended).
RAM: 1024 MB (Minimum); 2048 MB (Recommended).
Hard Disk: On a clean machine, up to 2.2 GB of available space may be required. This is due to the dependency on .NET. Database can grow up to 1 GB per year (could be as low as 10 MB - depending on usage)
Display: 1024 x 768 high color, 16-bit colors (Minimum); 1280 x 1024 high color, 32-bit (Recommended).
Supported platform: • Windows Server 2008 R2 SP1 • Windows Server 2012 • Windows Server 2012 R2
Database requirements: Microsoft SQL Server 2008 or 2008 R2 or 2012
The installing user (user who is setting up the Release Management Server) requires local administrator rights and sysadmin rights on the SQL Server (SQL Server that is going to have Release Management Server database). I will be using TFS Admin as the installation user of the RM Server since I am setting up the RM Server in the same box where the TFS is installed. Ideally the RM Server should be set up in a different clean computer and TFS is not mandatory to do release panning and execution with VS 2013 Release Management. (TFS is optional, but can be integrated really well with VS 2013 RM to automate from builds to release).
As the first step we need to setup an account, to be used as the service account for the Release Management Server.


Run the downloaded rm_server.exe to launch the setup.


Accept license agreement and click “Install”.

Once install launch to configure.


In the configuration window specify the release management service account and SQL Server to create the RM database.

Apply settings, you will encounter the first error in RM Server configuration, and fortunately it is a descriptive error “The account specified is not a member of the local administrators group”.

Add the RM Service account to local administrators group to resolve this issue.

Now the configuration proceeds.

The next error which might occur if the server resources are limited (This demo environment has only one cpu core and 4GB RAM while running SQL, SharePoint Foundation2013, TFS in same box). The error message is not very helpful.

Log file shows failing when getting RM site state, looks like some time out.

Increase resources in the machine and retry the configuration, now fails with application pool already exists (I believe MSFT will make this experience of retry configuration, better in a future release).

Manually deleting app pool and any web sites created for Release Management will resolve the issue.

Retry configuration succeeds.

To confirm the success state of configuration verify below check list.
1. Release Management database is created in SQL Server.

2. RM Service account mapped to RM database dbo schema.

3. Release Management app pool is created with identity RM Service account, and RM web site is created as below.

4. Release Management Monitor windows service is running with RM Service account.

Now we have a VS 2013 Release Management Server up and running. Next post of series VS Release Management, I will explain “How to setup and configure Release Management Client”.
Sunday, 6 July 2014
Visual Studio Release Management
Do we need to manage software releases/deployments in a well planned methodology? Do we need to track the details of the releases/deployments? Do we need to have a proper rollback strategy if something goes wrong in a deployment to production? I could keep asking more and more questions like this related to the software release management, and always the answer would be “YES”.
So what are our options, in terms of Microsoft ALM set of tools. TFS Lab environments can be used, but can we use it for production releases automation? Yes, if the client is willing to provide trusted access to production environment, via TFS Lab environments. But in most cases client would not like this. To add more pain to this Lab environments deployments would over utilize the build servers, with long running deployments. The solution for all this pain is addressed well in, new Visual Studio 2013 Release Management.
First we need to understand “Why” we need to manage releases. This post in NorthWest Cadence provides great insight.
There are three major components in VS 2013 Release Management.
1. Release Management Server.
Set of windows and web services that act as the core part of the release management. There is a portal providing approval capability to the release check points, without having to install Release Management Client or Visual Studio.
2. Release Management Client.
Windows Presentation Foundation (WPF) application provide the interface to manage the releases and configurations of release management.
3. Deployment Agent
Resides in target servers in the environment and performs the deployment actions such as installing, uninstalling, configuration etc. of software components.
Each of above performs its own duty, and resides in different computers. Together they make deployment automation a possibility with all the visibility and traceability expected in proper Application Lifecycle Management process.
The following diagram extracted from VS 2013 Release Management Installation Guide provides overview of “How it works”.

Even though above picture shows TFS, it is not mandatory to have TFS for VS Release Management to work. If the TFS is available can be tightly integrated with it. If not it could obtain payload for the deployment from any accessible drop locations (UNC path). This means the deployment could be even something not developed with .Net .
Below diagram from VS 2013 Release Management Installation Guide explains communication between components of release management.

The most important thing here is the Deployment Agent is downloading the components for deployment as a pull request. Nothing is pushed from Release Management Server to Deployment Agent. This enables the possibility of Release Management Server not requiring access to Production environments. Deployment Agent notify Release Management Server it’s availability via heartbeat.
Let’s start our journey to explore Visual Studio Release Management by setting up an environment step by step, with my series of blog posts in next few weeks.
1. Setup Release Management Server.
2. Setup Release Management Client.
3. Setup Deployment Agent.
4. Configure SMTP.
5. Configure TFS Connection
6. Setup Stage Types.
7. Setup Servers & Environments.
8. Setup Release Path.
9. Demo Release Template - Part 1.
10. Demo Release Template - Part 2.
So what are our options, in terms of Microsoft ALM set of tools. TFS Lab environments can be used, but can we use it for production releases automation? Yes, if the client is willing to provide trusted access to production environment, via TFS Lab environments. But in most cases client would not like this. To add more pain to this Lab environments deployments would over utilize the build servers, with long running deployments. The solution for all this pain is addressed well in, new Visual Studio 2013 Release Management.
First we need to understand “Why” we need to manage releases. This post in NorthWest Cadence provides great insight.
There are three major components in VS 2013 Release Management.
1. Release Management Server.
Set of windows and web services that act as the core part of the release management. There is a portal providing approval capability to the release check points, without having to install Release Management Client or Visual Studio.
2. Release Management Client.
Windows Presentation Foundation (WPF) application provide the interface to manage the releases and configurations of release management.
3. Deployment Agent
Resides in target servers in the environment and performs the deployment actions such as installing, uninstalling, configuration etc. of software components.
Each of above performs its own duty, and resides in different computers. Together they make deployment automation a possibility with all the visibility and traceability expected in proper Application Lifecycle Management process.
The following diagram extracted from VS 2013 Release Management Installation Guide provides overview of “How it works”.

Even though above picture shows TFS, it is not mandatory to have TFS for VS Release Management to work. If the TFS is available can be tightly integrated with it. If not it could obtain payload for the deployment from any accessible drop locations (UNC path). This means the deployment could be even something not developed with .Net .
Below diagram from VS 2013 Release Management Installation Guide explains communication between components of release management.

The most important thing here is the Deployment Agent is downloading the components for deployment as a pull request. Nothing is pushed from Release Management Server to Deployment Agent. This enables the possibility of Release Management Server not requiring access to Production environments. Deployment Agent notify Release Management Server it’s availability via heartbeat.
Let’s start our journey to explore Visual Studio Release Management by setting up an environment step by step, with my series of blog posts in next few weeks.
1. Setup Release Management Server.
2. Setup Release Management Client.
3. Setup Deployment Agent.
4. Configure SMTP.
5. Configure TFS Connection
6. Setup Stage Types.
7. Setup Servers & Environments.
8. Setup Release Path.
9. Demo Release Template - Part 1.
10. Demo Release Template - Part 2.
Thursday, 10 October 2013
TFS 2012/2013 - Different Layouts for Work Items in Web Access and VS/Team Explorer
Have you ever thought of having a different layout for a given work item in TFS Web Acess & inside Visual Studio/Team Explorer? Is it possible? Yes. It is. Let me show you how.
I am trying to have different layout for my User Story work item.
First I download the UserStory template xml using power tools.

Now for folks who are used to do TFS customizations only with power tools..Hey this not going work that way..You need to have a bit of a XML here.
Open the downloaded UserStory.xml file (for safety I keep original and use a copy of UserStory.xml as UserStoryModified.xml)
Go to the Form node and copy the Layout node content and paste it between Form xml tags
Then Add attribute Target to each of the Layout node "WinForms" for Visual Studio/Team Explorer, "Web" for Web Access layout.

Important: If you have used Name attribute in any nodes of the duplicated Layout node content make sure the "WinForms" and "Web" layouts have different names defined for example like below.


Now we can customize the layouts as we would like it to appear in Web Access & within Visual Studio or Team Explorer. (Again if you try to open this with TFS power tools you will only see the Layout which is in top. So you have to do this in xml :) )
For Visual Studio/ Team Explorer

For Web Access

After importing UserStoryModified.xml with power tools,
User Story in Visual Studio/Team Explorer

Same User Story in Web Access

Cool isn't it?
For more info check below
Specifying Different Layouts for Different Targets
Design the Layout of the Work Item Form
I am trying to have different layout for my User Story work item.
First I download the UserStory template xml using power tools.

Now for folks who are used to do TFS customizations only with power tools..Hey this not going work that way..You need to have a bit of a XML here.
Open the downloaded UserStory.xml file (for safety I keep original and use a copy of UserStory.xml as UserStoryModified.xml)
Go to the Form node and copy the Layout node content and paste it between Form xml tags
Then Add attribute Target to each of the Layout node "WinForms" for Visual Studio/Team Explorer, "Web" for Web Access layout.

Important: If you have used Name attribute in any nodes of the duplicated Layout node content make sure the "WinForms" and "Web" layouts have different names defined for example like below.


Now we can customize the layouts as we would like it to appear in Web Access & within Visual Studio or Team Explorer. (Again if you try to open this with TFS power tools you will only see the Layout which is in top. So you have to do this in xml :) )

For Web Access

After importing UserStoryModified.xml with power tools,
User Story in Visual Studio/Team Explorer

Same User Story in Web Access

Cool isn't it?
For more info check below
Specifying Different Layouts for Different Targets
Design the Layout of the Work Item Form
Subscribe to:
Posts (Atom)
Popular Posts
-
 Let’s look at how we can specify the artifact version to download based on the resource CI build linked to the CD pipeline and check on how ...
 -
 The hosts file in /etc/hosts is allowing the WSL distros to map IP addresses to domain names before going to domain name servers, similar...
 -
 Can a Coded UI test executed with a Console Application? Yes it is possible. I am going to explain how it can be done. I am going to exec...
 -
Pull Request are the controlled way to bring in the changes to your stable branches in your Azure Git repos, or for that matter all Git prov...
-
The new Azure Managed Redis can be deployed with balanced compute and memory with high availability, and useful modules such as RedisJson a...

