Many organizations still use old platforms and they are reluctant to move to new platform with fear of failure in doing the move. But hanging onto older products would not give any benefit as well as it would eventually fail to meet the demands of the modern business and software development requirements. Visual Studio Team System 2005 (TFS 2005) is such old tool, but still people using it for the production work. Let’s have a look at steps taken to move a TFS 2005 as a collection into TFS 2013.3 (again this is not the latest version, but this client demand was to get it to 2013.3), and the thing to keep an eye on to avoid any issues in the move.
Showing posts with label 2013. Show all posts
Showing posts with label 2013. Show all posts
Tuesday, 7 November 2017

Wednesday, 4 May 2016
Build ASP.NET Core 1.0 with TFS 2013.4 Build Server
To build ASP.NET Core 1.0 with Team foundation 2013.4 XAML builds, following steps should be done.
Prepare the build server
1. Install VS 2015 in the build server
2. Install below by login to the build server as build service user (tfsbuildsvc in this case). Install chocolatey in build server (its easy to do other installations when chocolatey is installed.)
- To install chocolatey run below command in PS window(run as administrator)
- install nodejs with below command
- Change directory to nodejs install path (C:\Program Files\nodejs)
- Install bower and gulp for global use using below commands
npm install bower -g
npm install gulp -g
Build Scripts – Pre Build
Pre build script to set dnx is required. use below script.
# bootstrap DNVM into this session.
&{$Branch='dev';iex ((new-object net.webclient).DownloadString('https://raw.githubusercontent.com/aspnet/Home/dev/dnvminstall.ps1'))}

# load up the global.json so we can find the DNX version
$globalJson = Get-Content -Path $PSScriptRoot\..\..\MainSolution\global.json -Raw -ErrorAction Ignore | ConvertFrom-Json -ErrorAction Ignore

if($globalJson)
{
    $dnxVersion = $globalJson.sdk.version
}
else
{
    Write-Warning "Unable to locate global.json to determine using 'latest'"
    $dnxVersion = "latest"
}

# install DNX
# only installs the default (x86, clr) runtime of the framework.
# If you need additional architectures or runtimes you should add additional calls
# ex: & $env:USERPROFILE\.dnx\bin\dnvm install $dnxVersion -r coreclr
& $env:USERPROFILE\.dnx\bin\dnvm install $dnxVersion -Persistent

# run DNU restore on all project.json files in the src folder including 2>1 to redirect stderr to stdout for badly behaved tools
Get-ChildItem -Path $PSScriptRoot\..\..\MainSolution -Filter project.json -Recurse | ForEach-Object { & dnu restore $_.FullName 2>1 }

dnvm upgrade -r clr
Make sure to add global.json file to the location of the solution file and check it in to version control.

Global.json content below specifying version globally.
{
  "projects": [ "Portal" ],
  "sdk": {
    "version": "1.0.0-rc1-update1"
  }
}
Build Scripts – Post Build Publish Script
In publish script environment variable settings to path should be added with below. This will allow to run PrePublish script specified in project.json
$env:Path += ";C:\Program Files\nodejs;C:\Users\tfsbuildsvc\AppData\Roaming\npm"

param($solutionName, $projectName, $projectPath, $buildConfiguration, $buildStagingDirectory)

$VerbosePreference = "continue"
$ErrorActionPreference = "stop"

&{$Branch='dev';iex ((new-object net.webclient).DownloadString('https://raw.githubusercontent.com/aspnet/Home/dev/dnvminstall.ps1'))}
$globalJson = Get-Content -Path "$PSScriptRoot\..\..\$solutionName\global.json" -Raw -ErrorAction Ignore | ConvertFrom-Json -ErrorAction Ignore

if($globalJson)
{
    $dnxVersion = $globalJson.sdk.version
}
else
{
    Write-Warning "Unable to locate global.json to determine using 'latest'"
    $dnxVersion = "latest"
}

& $env:USERPROFILE\.dnx\bin\dnvm install $dnxVersion -Persistent

$dnxRuntimePath = "$($env:USERPROFILE)\.dnx\runtimes\dnx-clr-win-x86.$dnxVersion"

#& "dnu" "build" "$PSScriptRoot\src\$projectPath" "--configuration" "$buildConfiguration"
Write-Warning "Path is $PSScriptRoot\..\..\$projectPath"

$env:Path += ";C:\Program Files\nodejs;C:\Users\tfs10buildsvc\AppData\Roaming\npm"

$publichLocation = "$buildStagingDirectory\$projectName"
[IO.Directory]::CreateDirectory($publichLocation)

& "dnu" "publish" "$PSScriptRoot\..\..\$projectPath" "--configuration" "$buildConfiguration" "--out" "$publichLocation" "--runtime" "$dnxRuntimePath"
Check in Build Scripts
Scripts are in below folder structure. Path changes ($PSScriptRoot\..\..\) to script required if it is checked in to different folder hierarchy.

Set Build definition to Run Build scripts
In build definition set to execute scripts as shown below. Set tool version in build definition to use VS 2015 tools. /tv:14

RunPreBuildScript.ps1
Invoke-Expression "$PSScriptRoot\SetDNX.ps1"
RunPostBuildScript.ps1
param($buildConfiguration)

Invoke-Expression "$PSScriptRoot\PublishWebSite.ps1 -solutionName MainSolution -projectName WebPortal -projectPath 'MainSolution\WebPortal' -buildConfiguration $buildConfiguration -buildStagingDirectory $Env:TF_BUILD_BINARIESDIRECTORY"
RunPreBuildScript and RunPostBuildScript are used since there could be more scripts that need to be executed and only one is allowed in XAML build definition. These script could invoke other scripts.
You could run into
npm WARN deprecated graceful-fs@3.0.8: graceful-fs version 3 and before will fail on newer node releases. Please update to graceful-fs@^4.0.0 as soon as possible.
npm WARN deprecated graceful-fs@2.0.3: graceful-fs version 3 and before will fail on newer node releases. Please update to graceful-fs@^4.0.0 as soon as possible.
npm WARN deprecated npmconf@2.1.2: this package has been reintegrated into npm and is now out of date with respect to npm
npm ERR! cb() never called!
npm ERR! not ok code 0

This is discussed in here. To disable this warning raising as an error change the project.json prepublish script section as below (Add --loglevel=error to npm install).

You can get a successful build with TFS build 2013.4, for ASP.NET Core 1.0.


Thursday, 22 January 2015
TFS 2013.4 Version Control – Enhanced Web Portal – Part 2
I have explained few of the enhancements available in TFS Web Portal for Version Control in Part 1. There are lot more really useful enhancements available.
1. It is possible to view a file as of in a given changeset and download the changeset version of the file to local machine.

2. Explore as a changeset version allows to view entire solution as of that particular version.


As of changeset version can be explored.

3. Download a solution as of a changeset version.

4. Annotate a chageset version of a file.


5. Compare a file for given two changesets.

6. Shelveset exploring has similar capabilities to changesets except few like explore as of version which is obvious since it is not committed, so no version is available.


View shelveset content, add comments/discussions, download shelveset file(s), compare with changesets are few of the available features.


7. Sharing a changeset as an email, enhances team collaboration.


Can share with multiple team members and add more custom content to email is possible.

Discussions etc. of the changeset are shrared via email and links are added for easy access.

8. Similar to changeset a shelveset can also be shared via email.

9. Rename history of the files can be viewed and show hide options available.

10. Branched history of file can be viewed with show hide options.

Let’s have look in to more new useful features of TFS2013.4 in coming posts.
1. It is possible to view a file as of in a given changeset and download the changeset version of the file to local machine.

2. Explore as a changeset version allows to view entire solution as of that particular version.


As of changeset version can be explored.

3. Download a solution as of a changeset version.

4. Annotate a chageset version of a file.


5. Compare a file for given two changesets.

6. Shelveset exploring has similar capabilities to changesets except few like explore as of version which is obvious since it is not committed, so no version is available.


View shelveset content, add comments/discussions, download shelveset file(s), compare with changesets are few of the available features.


7. Sharing a changeset as an email, enhances team collaboration.


Can share with multiple team members and add more custom content to email is possible.

Discussions etc. of the changeset are shrared via email and links are added for easy access.

8. Similar to changeset a shelveset can also be shared via email.

9. Rename history of the files can be viewed and show hide options available.

10. Branched history of file can be viewed with show hide options.

Let’s have look in to more new useful features of TFS2013.4 in coming posts.
Monday, 19 January 2015
TFS 2013.4 Version Control – Enhanced Web Portal – Part 1
Several enhancements are released with TFS2013.4 for version control in TFS web portal. Let’s explore them to understand how useful each of them.
1. It is possible to download a source code folder as a zip file from web portal. May be useful, but difficult to come up with a real usage example.


2. Code file view provides similar look at code files like in visual studio. This really helps to do code reviews etc. just using the browser. A download of code file is available as well.

3. Can show/hide annotations of a code file.

4. Changeset enhanced view provides file by file detailed view of changes.


Associated work items shown if any.

5. Discussions can be initiated as comments based on code. Other team members can reply to comments. Possible to add overall comment for the changeset.

6. Discussions as inline comments to the changeset code.

7. Create a work item based on a discussion on changeset. Would be really useful to create User Story/Bug/Task based on code reviews, discussion on implementation etc.


Discussion can be opened from work item.


8. Changesets can be viewed as list of files, files by folder or with full folder file hierarchy.

9. Several options to show comments (discussion comments) and filter files with discussions also available.

10. Changeset file changes can be viewed side by side or as inline changes. Inline view is really easy to read with line numbers.


11. As shown above options available to show hide comments made in portal.

12. Changeset file view can be in full screen mode.


There are lot more for for Version Control enhancements in Web Portal and I will show them in Part 2.
Monday, 4 August 2014
Setup Deployment Agent
Deployment Agent is responsible for downloading the payload for deployment form the Release Management Server and perform release steps in the deployment machine. Release Management Agent (Deployment Agent) is licensed separately for each target server and for details refer here.
Let’s have look at how to setup a deployment agent for VS 2013 Release Management. I have explained in earlier posts on setting up a Release Management Server and a Release Management Client.
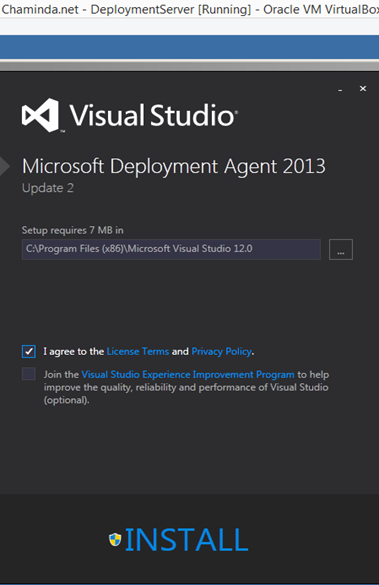
Launch Deployment Agent setup.

Installer will be very quick.
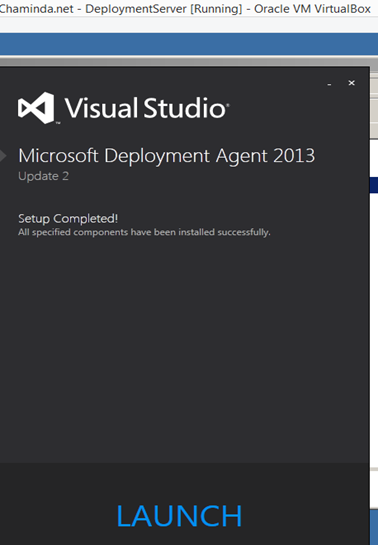
Launch to configure.
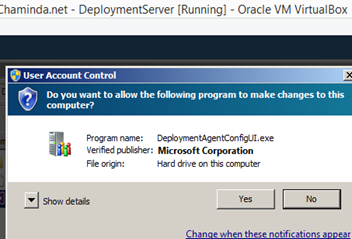

We need an account to set up agent. Let’s add a domain account.
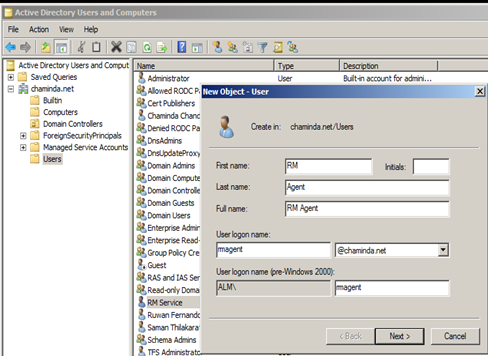
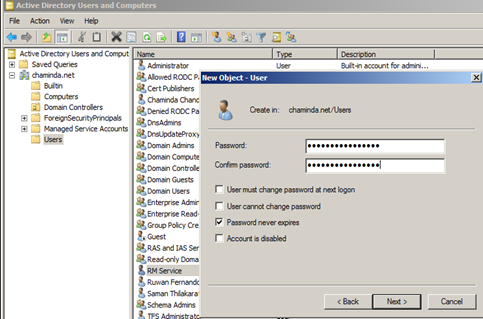
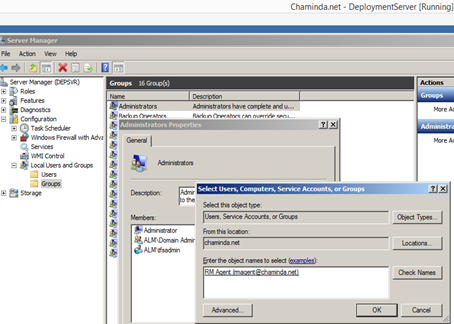
Make sure to add the rmagent account created above to the deployment machine local administrators group.

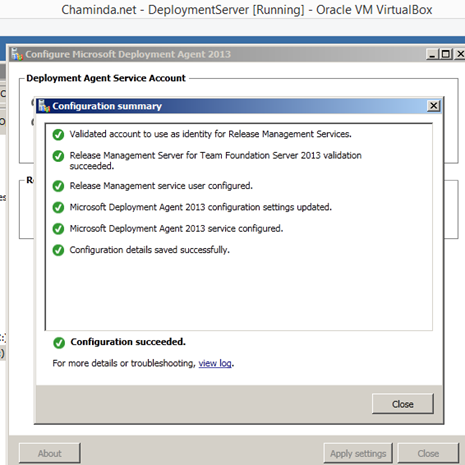
It is really easy when configuring a Deployment Agent in the same domain as Release Management Server. Use the created domain account as the account for Deployment Agent and provide Release Management Server url to configure. The user running the configuration should have Release Manger role in the server.

Configuration succeeds.
Successful configuration can be verified in services.

rmagent account is added as a service account to Release Management Server

Now the Deployment Agent machine can be registered in the Release Management Server.
Adding a deployment agent is easy in the same domain. To add a machine outside of domain follow below steps.
1. Create account rmshadowagent as window user in Release Management Server.
2. Create same account with same password in deployment agent machine, and add the rmshadowagent account to local admin group the deployment agent machine.
3. Add rmshadowagentwith only user name to RM server and make him ReleaseManager and a service user

4. Log on to deployment agent machine with rmshadowagent user or in deployment agent run the deployment agent configuration as rmshadowagent user (run as different user).
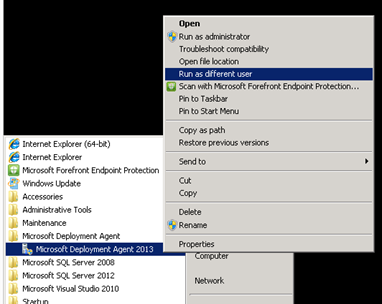

5. In configuration screen provide shadow agent user name (only rmshadowagent ) and password, and Release Management Server url. Release Management Server url can be exposed as https, so that this can be used to configure agent (example – Production machine in client’s environment) fully outside of the Release Management Server network.
Note use of .\rmshadowagent or machine\rmshadowagent will give error "user is not a release manager and service"

6. After “Apply Settings” and configured successfully, removal of shadow user (rmshadowagent ) release manger role is possible. (if adding new agent with this user again, temporary make him release manager)
Successfully configured agent machine can now be registered in the Release Management Server.
Let’s have look at how to setup a deployment agent for VS 2013 Release Management. I have explained in earlier posts on setting up a Release Management Server and a Release Management Client.
Launch Deployment Agent setup.

Installer will be very quick.


Launch to configure.


We need an account to set up agent. Let’s add a domain account.


Make sure to add the rmagent account created above to the deployment machine local administrators group.


It is really easy when configuring a Deployment Agent in the same domain as Release Management Server. Use the created domain account as the account for Deployment Agent and provide Release Management Server url to configure. The user running the configuration should have Release Manger role in the server.

Configuration succeeds.

Successful configuration can be verified in services.

rmagent account is added as a service account to Release Management Server

Now the Deployment Agent machine can be registered in the Release Management Server.
Adding a deployment agent is easy in the same domain. To add a machine outside of domain follow below steps.
1. Create account rmshadowagent as window user in Release Management Server.
2. Create same account with same password in deployment agent machine, and add the rmshadowagent account to local admin group the deployment agent machine.
3. Add rmshadowagentwith only user name to RM server and make him ReleaseManager and a service user

4. Log on to deployment agent machine with rmshadowagent user or in deployment agent run the deployment agent configuration as rmshadowagent user (run as different user).


5. In configuration screen provide shadow agent user name (only rmshadowagent ) and password, and Release Management Server url. Release Management Server url can be exposed as https, so that this can be used to configure agent (example – Production machine in client’s environment) fully outside of the Release Management Server network.
Note use of .\rmshadowagent or machine\rmshadowagent will give error "user is not a release manager and service"

6. After “Apply Settings” and configured successfully, removal of shadow user (rmshadowagent ) release manger role is possible. (if adding new agent with this user again, temporary make him release manager)
Successfully configured agent machine can now be registered in the Release Management Server.
Subscribe to:
Posts (Atom)
Popular Posts
-
 The hosts file in /etc/hosts is allowing the WSL distros to map IP addresses to domain names before going to domain name servers, similar...
 -
 Can a Coded UI test executed with a Console Application? Yes it is possible. I am going to explain how it can be done. I am going to exec...
 -
Pull Request are the controlled way to bring in the changes to your stable branches in your Azure Git repos, or for that matter all Git prov...
-
The new Azure Managed Redis can be deployed with balanced compute and memory with high availability, and useful modules such as RedisJson a...
-
We have discueed, that we have to use an environment variable to handle input parameter default values, if we are using trigger for workflo...


