How to fnd SKU information for SQL databses is documented here. The command suggested to use is az sql db list-editions -l region -o table . This would provide available list of SQL database SKU optons to chose form for a given region. However, the headings and parameters required in bicep is bit confusing to figure out intially. Let's look at how to map values for available SKUs provided by az sql db list-editions -l region -o table command, and parmeters in Bicep SKU for SQL database.
Showing posts with label sql. Show all posts
Showing posts with label sql. Show all posts
Saturday, 22 July 2023

Friday, 31 July 2020
Allow Azure Services on SQL Server with Azure CLI
Allow Azure services on Azure SQL Server lets other Azure Services such as function apps, app service apps etc. to be connected to an Azure SQL Server without needing to allow the outbound IPs of such services. You can enable this easily using the portal. Let’s look at how we can Allow Azure services suing CLI.
Friday, 28 September 2018
Build and Deploy SSIS with Azure DevOps Pipelines
SQL Server Integration Services (SSIS) projects can be created to perform ETL (Extract Transform and Load) operations. As Implementing of Continuous Delivery becoming a mandatory aspect of any type of software project it is vital for SSIS projects to be able to implement CI/CD. With the availability of the extension “SSIS Build & Deploy” in Marketplace for Azure DevOps, the CI/CD implementation for SSIS has become straightforward to implement. Let’s look at a sample to understand how to get CI/CD implemented for SSIS project with Azure DevOps.
Monday, 25 December 2017
TFS 2015.2 to TFS 2018 Upgrade–Lesson Learnt
It is great if the latest updates to TFS can be applied as and when they are released. But for a large organization it might not be sometimes easy. There may be few version gaps when you try to upgrade your TFS. Let’s discuss a problem with SQL server, faced while upgrading from TFS 2015.2 to TFS 2018, and how can it be fixed without getting into deeper troubles. This upgrade was done after a pre production trial using a clone of the TFS 2015.2, and no issues faced during TFS2015.2 from to TFS 2018 in the trial steps, which were exactly followed in production, except for clone TFS 2015.2 of course. Still in a production scenario you might run into unexpected 
Tuesday, 7 November 2017
Moving TFS 2005 Collection to TFS 2013.3 – Plan, Execution & Lessons Learnt
Many organizations still use old platforms and they are reluctant to move to new platform with fear of failure in doing the move. But hanging onto older products would not give any benefit as well as it would eventually fail to meet the demands of the modern business and software development requirements. Visual Studio Team System 2005 (TFS 2005) is such old tool, but still people using it for the production work. Let’s have a look at steps taken to move a TFS 2005 as a collection into TFS 2013.3 (again this is not the latest version, but this client demand was to get it to 2013.3), and the thing to keep an eye on to avoid any issues in the move.
Thursday, 31 March 2016
MSDeploy dacpac Deployment ERROR_EXECUTING_METHOD
When using the RM tool to deploy dacpacs as explained in “Deploy dacpac with MSDeploy in VS Release Management”, below error might occur.

Info: Adding MSDeploy.dbDacFx (MSDeploy.dbDacFx).
Info: Adding database (server=tcp:mydb.database.windows.net,1433;database=DeployTest;user id=
e;trustservercertificate=False;connection timeout=30)
Info: Initializing deployment: Pending.
Info: Analyzing deployment plan: Pending.
Info: Updating database: Pending.
Info: Creating deployment plan: Pending.
Info: Verifying deployment plan: Pending.
Info: Deploying package to database: Pending.
Info: Creating deployment plan: Running.
Info: Initializing deployment: Running.
Info: Initializing deployment (Start)
Info: Initializing deployment: Faulted.
Info: Initializing deployment (Failed)
Info: Creating deployment plan: Faulted.
Info: Verifying deployment plan: Faulted.
Info: Deploying package to database: Faulted.
Error Code: ERROR_EXECUTING_METHOD
More Information: Could not deploy package.
Unable to connect to target server.
Learn more at: http://go.microsoft.com/fwlink/?LinkId=221672#ERROR_EXECUTING_METHOD.
Error: Could not deploy package.
Error: Unable to connect to target server.
This is without much information and a generic error, might require tearing your hair out a lot, trying to resolve.
How to resolve
This could be easily a firewall blocking access to your SQL server, or firewall not allowed IP for your Azure database server. Fix could be easy as adding the required firewall exceptions.

Info: Adding MSDeploy.dbDacFx (MSDeploy.dbDacFx).
Info: Adding database (server=tcp:mydb.database.windows.net,1433;database=DeployTest;user id=
e;trustservercertificate=False;connection timeout=30)
Info: Initializing deployment: Pending.
Info: Analyzing deployment plan: Pending.
Info: Updating database: Pending.
Info: Creating deployment plan: Pending.
Info: Verifying deployment plan: Pending.
Info: Deploying package to database: Pending.
Info: Creating deployment plan: Running.
Info: Initializing deployment: Running.
Info: Initializing deployment (Start)
Info: Initializing deployment: Faulted.
Info: Initializing deployment (Failed)
Info: Creating deployment plan: Faulted.
Info: Verifying deployment plan: Faulted.
Info: Deploying package to database: Faulted.
Error Code: ERROR_EXECUTING_METHOD
More Information: Could not deploy package.
Unable to connect to target server.
Learn more at: http://go.microsoft.com/fwlink/?LinkId=221672#ERROR_EXECUTING_METHOD.
Error: Could not deploy package.
Error: Unable to connect to target server.
This is without much information and a generic error, might require tearing your hair out a lot, trying to resolve.
How to resolve
This could be easily a firewall blocking access to your SQL server, or firewall not allowed IP for your Azure database server. Fix could be easy as adding the required firewall exceptions.

Tuesday, 22 March 2016
Deploy dacpac with MSDeploy in VS Release Management
To deploy a dacpac against a target database, MSDeploy can be used. In powershell, following command allows to deploy a dacpac.
Invoke-Expression "& 'WebDeployFolderPath\msdeploy.exe' --% -verb:sync -source:dbDacFx=`'SourceDACPAC`' -dest:dbDacFx=`'DestinationDBConnection`',commandTimeout=100" -Verbose -ErrorAction "Stop"
Example
.\DeployDacpacMSDeploy.ps1 -WebDeployFolder "C:\Program Files (x86)\IIS\Microsoft Web Deploy V3" -SourceDACPAC "C:\temp\MyDb.dacpac" -DestinationDBConnection "Server=tcp:qa-db.database.windows.net,1433;Database=mydb;User ID=dbadmin@qa-db;Password=pwd;Encrypt=True;TrustServerCertificate=False;Connection Timeout=30" -CommandTimeout 100
A poweshell script can be developed, to use in a Release Management tool.
Using this poweshell script a tool in RM can be created as shown below.
Using the tool, create an action component.
This component can be used in a release template.
Database updates can be pushed to Azure SQL or any other target SQL server.
Invoke-Expression "& 'WebDeployFolderPath\msdeploy.exe' --% -verb:sync -source:dbDacFx=`'SourceDACPAC`' -dest:dbDacFx=`'DestinationDBConnection`',commandTimeout=100" -Verbose -ErrorAction "Stop"
Example
.\DeployDacpacMSDeploy.ps1 -WebDeployFolder "C:\Program Files (x86)\IIS\Microsoft Web Deploy V3" -SourceDACPAC "C:\temp\MyDb.dacpac" -DestinationDBConnection "Server=tcp:qa-db.database.windows.net,1433;Database=mydb;User ID=dbadmin@qa-db;Password=pwd;Encrypt=True;TrustServerCertificate=False;Connection Timeout=30" -CommandTimeout 100
A poweshell script can be developed, to use in a Release Management tool.

1 2 3 4 5 6 7 8 9 10 11 12 13 14 15 16 17 18 19 |
param( [Parameter(mandatory=$true)] [string]$WebDeployFolder, [Parameter(mandatory=$true)] [string]$SourceDACPAC, [Parameter(mandatory=$true)] [string]$DestinationDBConnection, [Parameter(mandatory=$true)] [string]$CommandTimeout ) $ErrorActionPreference = "Stop" Invoke-Expression "& '$WebDeployFolder\msdeploy.exe' --% -verb:sync -source:dbDacFx=`'$SourceDACPAC`' -dest:dbDacFx=`'$DestinationDBConnection`',commandTimeout=$CommandTimeout" -Verbose -ErrorAction "Stop" | Out-Host if ($lastexitcode -ne 0) { throw "Dacpac deploy failed." } |

Using the tool, create an action component.

This component can be used in a release template.

Database updates can be pushed to Azure SQL or any other target SQL server.

Monday, 8 September 2014
Tool to Execute Multiple SQL Scripts – VS 2013 Release Management – Part 1
Is it possible to execute set of SQL scripts downloaded to Deployment Agent in VS 2013 Release Management? Yes. But this requires a custom tool and an action.
Let’s see how we can do this step by step.
As the first step write a PowerShell script capable of executing batch of scripts in a transaction.
Next create a tool in Release Management Client as shown below.

Parameters are
Create an action as shown below using the tool created above.

This action can be used in a release template as shown below to execute SQL scripts in a transaction.

On failure scripts actions will not be committed and release management action will fail. In Part 2, I will show this tool in action.
Let’s see how we can do this step by step.
As the first step write a PowerShell script capable of executing batch of scripts in a transaction.
 Param([string]$ServerInstance, [string]$DatabaseName, [string]$ScriptPath)
  $ErrorOccured = $false
  #Executing following snapins to Invoke-SqlCmd
  Add-PSSnapin SqlServerCmdletSnapin100 -ErrorAction SilentlyContinue
  Add-PSSnapin SqlServerProviderSnapin100 -ErrorAction SilentlyContinue
  Write-Host "Executing patch scripts of path: $PatchScriptsPath"
  Start-Transaction -RollbackPreference Error
  Use-Transaction -TransactedScript {
   foreach ($file in Get-ChildItem -path $ScriptPath -Filter "*.sql")
   {
    Write-Host Executing: $file.name ...
    $ScriptPath = $ScriptPath + "\" + $file.name
    Invoke-Sqlcmd -ServerInstance $ServerInstance -Database $DatabaseName -InputFile $ScriptPath -ErrorAction SilentlyContinue -ErrorVariable errors
    foreach($error in $errors)
    {
     if ($error.Exception -ne $null)
     {
      $ErrorOccured = $true
      Write-Host -ForegroundColor Red "Exception: $($error.Exception)"
     }
    }
   }
  } -UseTransaction
  if ($ErrorOccured)
  {
   Undo-Transaction
   throw "Error occured while Executing SQL Scripts."
  }
  else
  {
   Complete-Transaction
   Write-Host Successfully executed all SQL scripts.
  }
Next create a tool in Release Management Client as shown below.

Parameters are
| Name | Type | Description |
| ServerInstance | Standard | SQL Server Name with Instance Name |
| DatabaseName | Standard | Name of the database the scripts should run |
| ScriptPath | Standard | Location of the scripts to be executed |
Create an action as shown below using the tool created above.

This action can be used in a release template as shown below to execute SQL scripts in a transaction.

On failure scripts actions will not be committed and release management action will fail. In Part 2, I will show this tool in action.
Tuesday, 5 August 2014
Custom Action to Run SQL Script With Parameters in VS 2013 Release Management Deployment Agent
How to pass parameters to SQL script running from VS 2013 Release Management? Let me show you step by step.
First we need a SQL Script to Run as a test. Here is a very simple SQL Script written in SQLCMD mode.
INSERT INTO [dbo].[Customer]
([Id]
,[Name])
VALUES
($(Id)
,'$(Name)')
GO
This script is inserting a record to a table with two columns. The script cannot be directly executed in SQL Management Studio since the $(Id) and $(Name) variables are not set. If tried will get below error.

To test the script run the below command in command prompt.
sqlcmd -S "POC-DOLPHINQA" -d "TestDB" -i "C:\Temp\TestSQL.sql" -v Id=3 Name="Chandrasekara" –b

This adds a row to the table successfully.

To create a new Action in the VS 2013 Release Management –> Log on to Client and go to Inventory tab and select Actions –> Click New
Create an action as shown below.

Arguments should be
-S "__ServerName__" -d "__DatabaseName__" -i "__ScriptName__" -v __Params__ -b
This will add below parameters to the action
ServerName – SQL Server Instance Name
DatabaseName – Database Name the script should run
ScriptName – Script to execute with full path (In deployment machine. Copying script to deployment machine can be done using XCOPY Deployer)
Params – Parameters for the SQL Script
Now this action can be used in Release template.

Let’s try a release.

The new action execution succeeded.

Table is added with new record.

This custom action can be used even to execute script while dynamically changing target DB, tables, columns etc. using SQLCMD syntax.
For example
Use $(MyDatabaseName)
SELECT x.$(ColumnName)
FROM Person.Person x
First we need a SQL Script to Run as a test. Here is a very simple SQL Script written in SQLCMD mode.
INSERT INTO [dbo].[Customer]
([Id]
,[Name])
VALUES
($(Id)
,'$(Name)')
GO
This script is inserting a record to a table with two columns. The script cannot be directly executed in SQL Management Studio since the $(Id) and $(Name) variables are not set. If tried will get below error.

To test the script run the below command in command prompt.
sqlcmd -S "POC-DOLPHINQA" -d "TestDB" -i "C:\Temp\TestSQL.sql" -v Id=3 Name="Chandrasekara" –b

This adds a row to the table successfully.

To create a new Action in the VS 2013 Release Management –> Log on to Client and go to Inventory tab and select Actions –> Click New
Create an action as shown below.

Arguments should be
-S "__ServerName__" -d "__DatabaseName__" -i "__ScriptName__" -v __Params__ -b
This will add below parameters to the action
ServerName – SQL Server Instance Name
DatabaseName – Database Name the script should run
ScriptName – Script to execute with full path (In deployment machine. Copying script to deployment machine can be done using XCOPY Deployer)
Params – Parameters for the SQL Script
Now this action can be used in Release template.

Let’s try a release.

The new action execution succeeded.

Table is added with new record.

This custom action can be used even to execute script while dynamically changing target DB, tables, columns etc. using SQLCMD syntax.
For example
Use $(MyDatabaseName)
SELECT x.$(ColumnName)
FROM Person.Person x
Sunday, 12 January 2014
04. Setup SharePoint Foundation 2013 for TFS - Setup Virtual Environment for TFS 2013 - Using Virtualbox
In this fourth step of Setup Virtual Environment for TFS 2013 - Using Virtualbox, I will explain how to setup SharePoint Foundation 2013 in the TFS server (I am going to setup SharePoint Foundation 2013 in the TFS box since I do not have hardware for many machines in my laptop).
But you have following choices to set up SharePoint for TFS (extract from TFS Installation Guide below) .
-
You can use Team Foundation Server standard or advanced configuration wizards
to install SharePoint Foundation 2013 on the same server as Team Foundation
Server. The Team Foundation Server extensions for SharePoint Products are
installed automatically during Team Foundation Server installation.
-
You can use Team Foundation Server extensions for SharePoint Products
configuration wizard to install SharePoint Foundation 2013 on a different server
from the one running Team Foundation Server.
-
You can use SharePoint Server. If you use the enterprise version of
SharePoint Server, you must configure it for dashboard compatibility (more on
dashboard requirements later).
- You can use a different version of SharePoint Foundation than the one that ships with TFS.
Even though it is possible to let TFS configuration wizard to install SharePoint Foundation 2013 automatically, I prefer to setup SharePoint Foundation and configure by my self.
01. First create TFS report reader domain account in the PDC, which we will be using as SharePoint service account (report reader account will be SharePoint service account if installed with TFS configuration wizard).
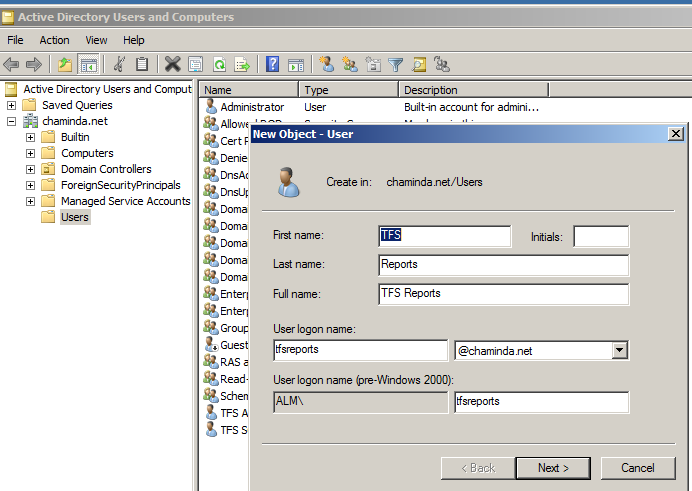
02. To fulfill the TFS report reader account requirement, grant it Allow Log on Locally in the TFS server VM. (Refer Accounts Required for TFS)


03. Download SharePoint Foundation 2013. Log on to TFS server with TFS administrator account and launch the SharePoint installation and install the prerequisites. For installing prerequisites in offline mode refer to here.


04. Once the prerequisites installation completed successfully restart the VM and Install SharePoint Foundation.


05. Once Installation done run the configuration wizard.


06. Select Create a new farm.


07. Specify a free port here.


08. Once configuration wizard Finish clicked it will launch SharePoint Central Administration website. Access with TFS Administrator account.

09. Start SharePoint farm configuration wizard.

10. Use the report reader as service account and deselect all other options and click next.


11. In Create site collection step provide below details


With above steps we have completed setting up SharePoint Foundation 2013 for TFS. Our next step will be installing and configuring TFS Server.
Monday, 6 January 2014
03. Setup SQL Server for TFS - Setup Virtual Environment for TFS 2013 - Using Virtualbox
This is the third step of Setup Virtual Environment for TFS 2013 - Using Virtualbox. In this step I will explain setup SQL Server instance with reporting services for Installing TFS Server 2013 - Single Server Deployment (since the limited RAM available for me I cannot set up many machines in my laptop ).
I have explained setting up a domain controller and VM for TFS in the isolated domain in previous two posts of this series.
Before installing SQL Server for TFS we need to setup a service account to run SQL server. Having a domain account as the SQL Server service account is not a requirement for TFS server. We can use a built in system account. But I prefer a domain account.
We are going to do below three main steps here.
a) Install SQL 2012
b) Install SQL 2012 SP1
c) Install Cumulative Update 2 for SQL 2012 SP1. (TFS Installation guide says "If you're using SQL Server 2012 with SP1, we recommend you also apply cumulative update 2 on
top of SP1 to address a critical SQL Server bug around resource consumption.")
Set up SQL 2012
01. Go to the PDC we have setup in the first step and add an account for SQL Server as shown below.

02. Next go to the VM for TFS and Web Server(IIS) role service.

Install ASP.Net role service as well.


03. Now shut down the TFS VM. To enable internet access to TFS VM (currently only isolated internal network enabled) add a second network adapter and setup it in NAT mode. For more information about different network options with virtual box refer here.

04. Start TFS VM and run SQL Server 2012 server setup (since we are going to setup Sharepoint Foundation 2013 in this machine we need to install SQL Server 2012 bit edition 64 or SQL Server 2008 R2 Service Pack 1 64 bit edition). Run system configuration checker.

05. Start setting up new instance.


06. We need only below features.


07. Set the SQL server service accounts as below.

08. Collation configuration

09. Add current user. In my case TFS Administrator domain account.


10. Set reporting services to install and configure.

11. Start installation

12. We are done with installation.

13. Reboot the TFS VM.
SQL Server SP1
01. Download SQL 2012 SP1(SQLServer2012SP1-KB2674319-x64-ENU.exe) and start installtion.


02. Reboot the TFS VM.
Cumulative Update 2 for SQL Server 2012 SP1
(SQLServer2012_SP1_CU2_2790947_11_0_3339_x64) get this file from the email link in MS support site.
01. Run the installation.


02. Reboot the TFS VM.
Now we have installed and configure SQL Server 2012 SP1 with reporting services ready for our TFS server. Next step is to set up SharePoint Foundation 2013.
Subscribe to:
Posts (Atom)
Popular Posts
-
As we discusssed in " Setup Redis Cluster with JSON and Search Modules on AKS with Binami Redis Using Custom Image " the cluster...
-
 Let’s look at how we can specify the artifact version to download based on the resource CI build linked to the CD pipeline and check on how ...
 -
 The hosts file in /etc/hosts is allowing the WSL distros to map IP addresses to domain names before going to domain name servers, similar...
 -
 Can a Coded UI test executed with a Console Application? Yes it is possible. I am going to explain how it can be done. I am going to exec...
 -
Pull Request are the controlled way to bring in the changes to your stable branches in your Azure Git repos, or for that matter all Git prov...


