Adding Azure Subscription to Azure DevOps as service connection is really simple when you have the same account you are using for Azure DevOps associated with your Azure Subscription. However, this may not be the case always and you may want to deploy to resources in a Azure Subscription which is not related to your Azure DevOps organization. Let’s see how to create a service connection in such situation to utilize it in a deployment pipeline.
Showing posts with label release management. Show all posts
Showing posts with label release management. Show all posts
Thursday, 9 May 2019

Sunday, 19 August 2018
Setting VSTS Release Variable Values At the Time of Creating a Release
VSTS builds have the option to set build variable values at the time of queuing a build. You have to select option for build variable “Settable at queue time” to enable the variable to be set its value at the time of queuing build. However, this feature was not available for VSTS Release and there was a user voice raised here requesting to allow setting release variables at the time of creating a release. As promised by MSFT, this feature is now available for VSTS Release. Let’s look at how to use it with VSTS web UI and with the VSTS REST API.
Saturday, 14 July 2018
Controlling Octopus Releases with VSTS Release Management
You may be using Octopus deploy for your deployment automation pipeline needs while you are having your builds and work items managed in VSTS. It is a good idea to manage the Octopus release pipeline via VSTS release management so that you have the opportunity to use automated test execution and capturing of test results, as well as easily generate release notes using the VSTS work items, using feature rich tasks and automation test results views in VSTS release management. Let’s look at the important steps required to make VSTS release management to successfully utilize your existing Octopus deploy process steps.
Wednesday, 11 July 2018
Securing Release Definitions When Multiple Teams Work on a Single Team Project
We have explored “Securing Build Definitions When Multiple Teams Work on a Single Team Project” in a previous post. Now the folders to group release definitions and applying permissions to isolate each team’s release definitions is also a possibility in VSTS. As we discussed in the “Securing Build Definitions When Multiple Teams Work on a Single Team Project” it is important to create the Build/Release admins VSTS permission group for each of the teams in the team project. Using the same admins group and the team we can setup permissions for release definitions folders. Let’s look at the steps in detail.
Friday, 22 June 2018
Using NuGet Packages as VSTS Release Artifact Source
If you are used to deploy your solutions with Octopus deploy which a re built with VSTS/TFS, you are used to package your build output as a NuGet package and use it in Octopus. Now you can use the NuGet packages with VSTS release management as well for deployment. For this you have to have the package management feature in VSTS enabled. As VSTS builds and their artifacts are discarded in a configured time period and the maximum time and number of builds is limited, keeping artifacts as NuGet packages would be useful you to keep your deployed artifacts for a longer period. Let’s explore how to use NuGet packages for deployment in VSTS release management.
Tuesday, 31 October 2017
TLS 1.2, PowerShell and Dynamics CRM with VSTS Release Management
PowerShell often used in tasks in VSTS release management. When accessing services authenticated via AAD (Azure Active Directory) it might require to use TLS 1.2 protocol, if it is configured to be required in AAD setup. Setting up the machine as per instructions here to allow TLS 1.2 may not work with PowerShell. In case you are accessing Dynamics CRM online with PowerShell using Microsoft.Xrm.Data.PowerShell in VSTS release management you might see this issue as “[error]Get-CrmConnection : The pipeline has been stopped.”
Sunday, 23 July 2017
New Release Definition Editor–Team Services
Release definition in Team Services helps you to define deployment pipelines across target environments. You can setup a release definition to deploy via agents, deployment groups or execute agent less activities. With the latest update to Team Services a new release definition editor is introduced. Let’s ex[lore the new editor.
Saturday, 3 June 2017
Deployment Groups in VS Team Services
Deployment groups provide robust out-of-the-box multi-machine deployment with team services release management. It allows you to run deployments across multiple machines. You can install agent on each of your target servers directly and run rolling deployment to those servers, unlike agent based deployments where you install build/deployment agents on proxy servers in an agent pool. You can use all tasks in task catalog on your target machines.
Deployment group allows you to create target deployment machine groups, without requiring you to register machines in agent pools or queues. Machine in a deployment group will have an agent registered with the named deployment group, within the team project providing required isolation for target environment (such as DevInt, QA, UAT, Demo, Production etc.), for a given product or project.
Logical group of targets (machines) having an agent installed on each of them is a deployment group. It represents your physical environments. It can be single-box, multi-machine or a farm of machines. You can specify the security context for your physical environments by using the deployment groups.
Let’s look at how to create a Deployment Group in Team Services.
Monday, 10 October 2016
Setup Test Farm and Test Clients for Test Execution
Let’s look at steps required for Setup Test Farm, Start and Stop, and Test Clients for Test Execution for setting up a Test Farm as Azure VMs–For TFS2015 Release Management(This is the 05th step) and other four steps are listed below.
Setup to start and stop Resource Group

Use a blob in azure to keep the status of the test client. Once test client done create a text file as done to notify the farm stop environment. This is required since TFS 2015 is not yet able to wait for multiple environments in release management to start its execution. (have a look at Release Management - Deploy based on conditions in multiple environments in here).
Script to do this
Then use a wait script to see if the test environments done in stop environment.
Wait script
Remove blob container script
Log on to to azure VM setting up as agent and create shadow user. add to admin.

http://chamindac.blogspot.com/2016/06/deploying-to-untrusted-domaintfs-2015.html
Machines created with same virtual network, enable file and printer sharing.. since same workgroup all will be accessible Same username password as administrator user.(Even different user would work.). All of the machines are in same workgroup in Azure (refer Create Virtual Machines in Azure for the Test Farm).
Setup the test agent deployment task and test execution task.
Windows file copy task to copy the test binaries to the test execution folder.
Test Run task to run the tests.
Once a test client is done it will be creating a text file in blob container to notify the waiting task monitoring the blob container.
Set environment done script.
When release run you might run into below issue.

This is because PowerShell remoting is not setup for test agent machine. Follow instructions in Enable PowerShell remoting in each test client and verify access from the test farm admin VM in Azure. to setup PowerShell remoting. Create directory in the test client from admin machine to verify.

Still you may run into below issue if you have more than one test client machine.

to verify from the admin machine execute below command
Get-Item WSMan:\localhost\Client\TrustedHosts
Only last machine added to trusted hosts available.
To fix Add all machines (http://stackoverflow.com/questions/21548566/how-to-add-more-than-one-machine-to-the-trusted-hosts-list-using-winrm)
Set-Item WSMan:\localhost\Client\TrustedHosts -Value "do-tf-tc01,do-tf-tc02,do-tf-tc03"

Test agent deployment cannot copy files error
System.AggregateException: Failed to execute the powershell script. Consult the logs below for details of the error.
2016-09-09T06:25:55.6714118Z ##[warning]Failed to connect to the path \\do-tf-tc03 with the user do-tf-tc03\doadmin for copying.System error 53 has occurred.
2016-09-09T06:25:55.6714118Z ##[warning] The network path was not found.
2016-09-09T06:25:55.6714118Z ##[warning]
2016-09-09T06:25:55.6714118Z ##[warning] ---> System.Management.Automation.RuntimeException: Failed to connect to the path \\do-tf-tc03 with the user do-tf-tc03\doadmin for copying.System error 53 has occurred.

Fix by allowing file and printer sharing in test client machine firewall.
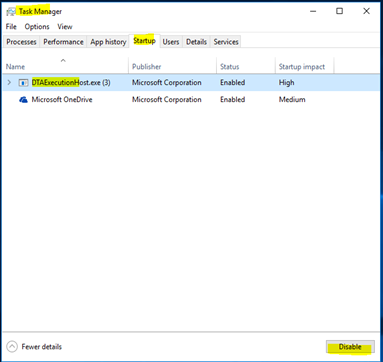
Once test agent machine restart this is causing issues.
[Window Title]
DTAExecutionHost.exe
[Main Instruction]
DTAExecutionHost.exe has stopped working
[Content]
A problem caused the program to stop working correctly. Windows will close the program and notify you if a solution is available.
[Close program]
Disable to resolve – Not a good fix at all.
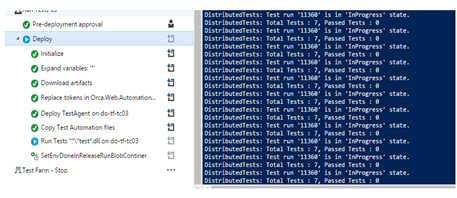
Another problem asking for login while trying to execute tests

To resolve
Setup a local account in Test Client and in TFS AT say tfstestsvcshadow. (This is used as the service account for Test Agent.

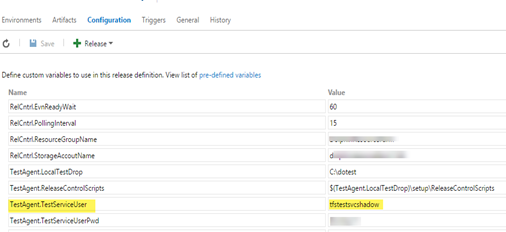
Add this user to team project collection test service account.
This resolves DTAExecution startup error as well. Enable the disabled DTAExecution in startup.
With this you will be able to execute the tests.
![[image%255B41%255D.png]](https://blogger.googleusercontent.com/img/b/R29vZ2xl/AVvXsEhXtAZBZPsPAWEoxymzTD3gbUT8A6tyGHNVV8UTNn_XZ-tdKt0telBrfFcA15Yyt0i7BP42cqNz0vk4z6LGhLExwu2aWJV4A2NiJECputwCK7Uv_-6Pjqi2b4-xEk5hS9jqp4FpKBv4UhdK/s1600/image%25255B41%25255D.png)
Look at Test Farm as Azure VMs–For TFS2015 Release Management to see how this is running.
- Create Virtual Network in Azure
- Create Virtual Machines in Azure for the Test Farm.
- Setup release agents in the admin machine in Azure, to use with each test client following instructions in here.
- Enable PowerShell remoting in each test client and verify access from the test farm admin VM in Azure.
Setup to start and stop Resource Group


Use a blob in azure to keep the status of the test client. Once test client done create a text file as done to notify the farm stop environment. This is required since TFS 2015 is not yet able to wait for multiple environments in release management to start its execution. (have a look at Release Management - Deploy based on conditions in multiple environments in here).

Script to do this
param(
    [Parameter(mandatory=$true)]
    [string]$storageAccountName,
    [Parameter(mandatory=$true)]
    [string]$ResourceGroupName,
    [Parameter(mandatory=$true)]
    [string]$releaseContainerName

)

#Add-AzureRmAccount

$releaseContainerName = $releaseContainerName.ToLower();

$StorageAccount = Get-AzureRmStorageAccount  -StorageAccountName $storageAccountName -ResourceGroupName $ResourceGroupName  #-StorageAccountKey $storageKey

Write-Host "Storage Account obtained"
$StorageAccount

$NewReleaseContainer = New-AzureStorageContainer -Name $releaseContainerName -Context $StorageAccount.Context -Permission Blob

Write-Host ("Release container:{0} created in storage account:{1}" -f  $releaseContainerName, $storageAccountName)

$NewReleaseContainer

Wait script
param(
    [Parameter(mandatory=$true)]
    [string]$storageAccountName,
    [Parameter(mandatory=$true)]
    [string]$ResourceGroupName,
    [Parameter(mandatory=$true)]
    [string]$releaseContainerName,
    [Parameter(mandatory=$true)]
    [string]$releaseEnvName
)

#Add-AzureRmAccount
$releaseContainerName = $releaseContainerName.ToLower();

$StorageAccount = Get-AzureRmStorageAccount  -StorageAccountName $storageAccountName -ResourceGroupName $ResourceGroupName  #-StorageAccountKey $storageKey

Write-Host "Storage Account obtained"
$StorageAccount

$releaseContainer = Get-AzureStorageContainer -Name $releaseContainerName -Context $StorageAccount.Context

Write-Host ("Release container:{0} obtaned in storage account:{1}" -f  $releaseContainerName, $storageAccountName)

$BlobContainer =  $releaseContainer.CloudBlobContainer;

Write-Host "Blob Container obtained"

$BlobContainer


$releaseEnvBlob =  $BlobContainer.GetBlockBlobReference($releaseEnvName)
Write-Host ("Release env:{0} blob reference obtained." -f $releaseEnvName)

$releaseEnvBlob.UploadText("Done");
Write-Host ("Release env:{0} done flag set." -f $releaseEnvName)
param(
    [Parameter(mandatory=$true)]
    [string]$storageAccountName,
    [Parameter(mandatory=$true)]
    [string]$ResourceGroupName,
    [Parameter(mandatory=$true)]
    [string]$releaseContainerName

)

#Add-AzureRmAccount
$releaseContainerName = $releaseContainerName.ToLower();

$StorageAccount = Get-AzureRmStorageAccount  -StorageAccountName $storageAccountName -ResourceGroupName $ResourceGroupName  #-StorageAccountKey $storageKey

Write-Host "Storage Account obtained"
$StorageAccount

Remove-AzureStorageContainer -Name $releaseContainerName -Context $StorageAccount.Context -Force

Write-Host ("Release container:{0} removed in storage account:{1}" -f  $releaseContainerName, $storageAccountName)


http://chamindac.blogspot.com/2016/06/deploying-to-untrusted-domaintfs-2015.html
Machines created with same virtual network, enable file and printer sharing.. since same workgroup all will be accessible Same username password as administrator user.(Even different user would work.). All of the machines are in same workgroup in Azure (refer Create Virtual Machines in Azure for the Test Farm).

Setup the test agent deployment task and test execution task.

Windows file copy task to copy the test binaries to the test execution folder.

Test Run task to run the tests.

Once a test client is done it will be creating a text file in blob container to notify the waiting task monitoring the blob container.
Set environment done script.
param(
    [Parameter(mandatory=$true)]
    [string]$storageAccountName,
    [Parameter(mandatory=$true)]
    [string]$ResourceGroupName,
    [Parameter(mandatory=$true)]
    [string]$releaseContainerName,
    [Parameter(mandatory=$true)]
    [string]$releaseEnvName
)

#Add-AzureRmAccount
$releaseContainerName = $releaseContainerName.ToLower();

$StorageAccount = Get-AzureRmStorageAccount  -StorageAccountName $storageAccountName -ResourceGroupName $ResourceGroupName  #-StorageAccountKey $storageKey

Write-Host "Storage Account obtained"
$StorageAccount

$releaseContainer = Get-AzureStorageContainer -Name $releaseContainerName -Context $StorageAccount.Context

Write-Host ("Release container:{0} obtaned in storage account:{1}" -f  $releaseContainerName, $storageAccountName)

$BlobContainer =  $releaseContainer.CloudBlobContainer;

Write-Host "Blob Container obtained"

$BlobContainer


$releaseEnvBlob =  $BlobContainer.GetBlockBlobReference($releaseEnvName)
Write-Host ("Release env:{0} blob reference obtained." -f $releaseEnvName)

$releaseEnvBlob.UploadText("Done");
Write-Host ("Release env:{0} done flag set." -f $releaseEnvName)
##[warning]DistributedTests: Task 'DownloadTestAgent' for machine do-tf-tc01:5985's Error :
System.Management.Automation.Remoting.PSRemotingTransportException:
Connecting to remote server do-tf-tc01 failed with the following error message :
The WinRM client cannot process the request. If the authentication scheme is different
from Kerberos, or if the client computer is not joined to a domain, then HTTPS transport
must be used or the destination machine must be added to the TrustedHosts configuration
setting. Use winrm.cmd to configure TrustedHosts. Note that computers in the TrustedHosts
list might not be authenticated. You can get more information about that by running the
following command: winrm help config. For more information, see the
about_Remote_Troubleshooting Help topic.

This is because PowerShell remoting is not setup for test agent machine. Follow instructions in Enable PowerShell remoting in each test client and verify access from the test farm admin VM in Azure. to setup PowerShell remoting. Create directory in the test client from admin machine to verify.


Still you may run into below issue if you have more than one test client machine.
Unable to resolve path $env:SystemDrive\TestAgent. Connecting to remote server do-tf-tc01
failed with the following error message : The WinRM client cannot process the request. If
the authentication scheme is different from Kerberos, or if the client computer is not joined
to a domain, then HTTPS transport must be used or the destination machine must be added to the
TrustedHosts configuration setting. Use winrm.cmd to configure TrustedHosts. Note that
computers in the TrustedHosts list might not be authenticated. You can get more information
about that by running the following command: winrm help config. For more information, see the
about_Remote_Troubleshooting Help topic. ---> System.AggregateException: One or more errors
occurred. ---> System.Management.Automation.Remoting.PSRemotingTransportException:
Connecting to remote server do-tf-tc01 failed with the following error message : The WinRM
client cannot process the request. If the authentication scheme is different from Kerberos,
or if the client computer is not joined to a domain, then HTTPS transport must be used or the
destination machine must be added to the TrustedHosts configuration setting. Use winrm.cmd to
configure TrustedHosts. Note that computers in the TrustedHosts list might not be
authenticated. You can get more information about that by running the following command:
winrm help config. For more information, see the about_Remote_Troubleshooting Help topic.

to verify from the admin machine execute below command
Get-Item WSMan:\localhost\Client\TrustedHosts
Only last machine added to trusted hosts available.

To fix Add all machines (http://stackoverflow.com/questions/21548566/how-to-add-more-than-one-machine-to-the-trusted-hosts-list-using-winrm)
Set-Item WSMan:\localhost\Client\TrustedHosts -Value "do-tf-tc01,do-tf-tc02,do-tf-tc03"

Test agent deployment cannot copy files error
System.AggregateException: Failed to execute the powershell script. Consult the logs below for details of the error.
2016-09-09T06:25:55.6714118Z ##[warning]Failed to connect to the path \\do-tf-tc03 with the user do-tf-tc03\doadmin for copying.System error 53 has occurred.
2016-09-09T06:25:55.6714118Z ##[warning] The network path was not found.
2016-09-09T06:25:55.6714118Z ##[warning]
2016-09-09T06:25:55.6714118Z ##[warning] ---> System.Management.Automation.RuntimeException: Failed to connect to the path \\do-tf-tc03 with the user do-tf-tc03\doadmin for copying.System error 53 has occurred.

Fix by allowing file and printer sharing in test client machine firewall.

Once test agent machine restart this is causing issues.

[Window Title]
DTAExecutionHost.exe
[Main Instruction]
DTAExecutionHost.exe has stopped working
[Content]
A problem caused the program to stop working correctly. Windows will close the program and notify you if a solution is available.
[Close program]
Disable to resolve – Not a good fix at all.

Another problem asking for login while trying to execute tests


To resolve
Setup a local account in Test Client and in TFS AT say tfstestsvcshadow. (This is used as the service account for Test Agent.


Add this user to team project collection test service account.

This resolves DTAExecution startup error as well. Enable the disabled DTAExecution in startup.
With this you will be able to execute the tests.

Look at Test Farm as Azure VMs–For TFS2015 Release Management to see how this is running.
Friday, 9 September 2016
Deploy to Azure with TFS/VSTS–Region in Azure Web App Deployment
An error coming at random times on Azure Web App Deployment, release management task. When error occurred, message says “An error occurred when the request was processed on the remote computer”.

Bit of investigation revealed, the region of the Azure Web App is actually in “South US”, and another in “Central Canada” while the relevant deployment step (Azure Web App Deployment), having “East US”.


Fixing this to have correct region as per web app, resolved random failures in web app deployment.


Tuesday, 30 August 2016
Azure Web App Swap Slot–With VSTS Release Management using Azure RM
Using deployment slots in Azure is very useful when it comes to production deployments. You can deploy to a deployment slot and then verify and swap the slot with production.
Azure App Service site created with a slot called Deploy.

It is deployed with Visual Studio Team Services, Release Management using a linked Azure Resource Management Service endpoint.

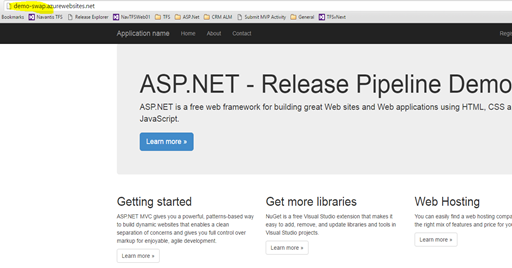
Once the deployment done to “Deploy” slot, demo-swap-deploy.azurewebsites.net is deployed with simple web application.

Still the main site (Production slot) is shown as just created.

Azure Resource Manager command “Invoke-AzureRmResourceAction” can be used in PowerShell to swap the slot.
param($resourceGroupName, $websiteName, $slotName, $targetSlotName)

$ParametersObject = @{targetSlot  = $targetSlotName}
Invoke-AzureRmResourceAction -ResourceGroupName $resourceGroupName -ResourceType Microsoft.Web/sites/slots -ResourceName $websiteName/$slotName -Action slotsswap -Parameters $ParametersObject -ApiVersion 2015-07-01 -Force

Script requires following parameters.
-resourceGroupName "ch-demo-resgroup" -websiteName "Demo-Swap" -slotName "Deploy" -targetSlotName "Production"
- resourceGroupName – Resource Group Name of the Web App
- websiteName – Web App Name
- slotName – Slot Name
- targetSlotName – target Slot
This script can be setup to execute with Azure PowerShell task, in release management.

Once this is executed, slots get swapped.


After swap “Deploy” slot contains what was in “Production” slot and “Production” slot now has the newly deployed site.

Sunday, 28 August 2016
Setup Test Farm as Azure VMs–For TFS2015 Release Management
A test farm which can run test parallel, using more than one test client can improve the time taken to execute the automation test plan. To use resources only on demand setting this up in Azure Virtual machines would be a great option. Let’s look at how we can setup, a test farm, to use with TFS 2015 (TFS 2015 on-premise, update 2.1 onwards).
A fully setup test farm with release management would look like below.(Deployment environments in the release pipeline not shown here for brevity)

Test Farm – Start This environment runs on release agent locally (in corporate network). Expand Variables allows usage of a variable with another configuration variable in release management. Download Artifacts is used to limit the output getting downloaded, to scripts required for starting the test farm in Azure. CreateReleaseRunBlobContainer is used to setup a temporary blob container in azure to allow monitoring of all parallel test machines completion of assigned test execution. Azure resource group deployment step will start the test farm virtual machines, and the wait poweshell script will wait specified number of seconds, after machines started for them to be fully ready. Each of above will be discussed in detail later.
Run Test These environments will run tests parallel in azure VMs. To achieve this, one admin VM is setup in azure with multiple release agents, which deploys test agent to test client. Each test client VM will run a test agent.

Test Farm – Stop This will monitor the blob on azure to determine, if all test environments done with test executions and then shutdown the Azure VMs.
When create release with definition a message popup to say that agents not available for Run Test, this is because Azure machine containing the agent is not started. But this will be OK since the first environment starts Azure VMs.

Once setup fully The test farm can be started on demand and execute tests and shutdown once the test execution done.


In above Test Farm Started, and Tests executed and the Farm Stopped. The Test run steps show as rejected, but actually they are executed fine, only some tests failed marked it as a failed environment (partially succeeded for environment, feature available in VSTS is not yet available for on premise TFS). But this is expected in test run and continue on error for test execution, will enable to run all the tests and after test steps in the given environment (This will e discussed in detail in a later post).

Let’s look at how this can be setup in detail in following posts.
- Create Virtual Network in Azure
- Create Virtual Machines in Azure for the Test Farm. A machine to run release agents (admin machine) and any number of test client machines need to run parallel. All the machines should belong to same workgroup.
- Setup release agents in the admin machine in Azure, to use with each test client following instructions in here.
- Enable PowerShell remoting in each test client and verify access from the test farm admin VM in Azure.
- Setup Test Farm, Start and Stop, and Test Clients for Test Execution.

Subscribe to:
Posts (Atom)
Popular Posts
-
 Let’s look at how we can specify the artifact version to download based on the resource CI build linked to the CD pipeline and check on how ...
 -
 The hosts file in /etc/hosts is allowing the WSL distros to map IP addresses to domain names before going to domain name servers, similar...
 -
 Can a Coded UI test executed with a Console Application? Yes it is possible. I am going to explain how it can be done. I am going to exec...
 -
Pull Request are the controlled way to bring in the changes to your stable branches in your Azure Git repos, or for that matter all Git prov...
-
The new Azure Managed Redis can be deployed with balanced compute and memory with high availability, and useful modules such as RedisJson a...

