To clone an instance of a TFS server while the current live instance is running it is required to take backups as explained in “Cloning Your TFS Server Part 01 – Backing Up and Restoring Databases” and restore the DBs in new hardware. After that there should be preparation activities run as described in “Cloning Your TFS Server Part 02 – Prepare Restored Databases” to make sure the current and cloned TFS instances are not getting corrupted, when both running simultaneously in the same network. Let's go through the configuration steps to configure the cloned TFS instance.
Showing posts with label configure. Show all posts
Showing posts with label configure. Show all posts
Wednesday, 23 August 2017

Sunday, 20 July 2014
Setup Release Management Client
This is the second step of setting up VS 2013 Release Management environment. Prerequisite for this step is Release Management Server which is described here.
Trial version of VS 2013 Release Management with update 2 can be downloaded from http://go.microsoft.com/?linkid=9843020.
Note: You cannot apply a license key for the trial to make it licensed version. Instead you have to uninstall trial and install licensed copy downloaded with MSDN or Volume License to apply license.
In the downloaded ISO run rm_Client.exe to install Release Management Client. This is a very quick install.
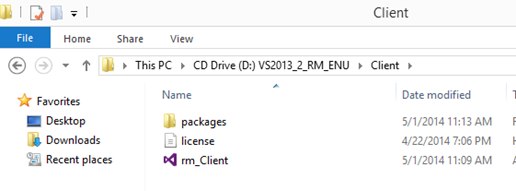
Installation is quick and smooth.


Once lunched provide the url of the release management server. example – http://ReleaseManagmentServer:1000
Below picture shows TFS since this installation of the Release Management Client is done on tfs box.

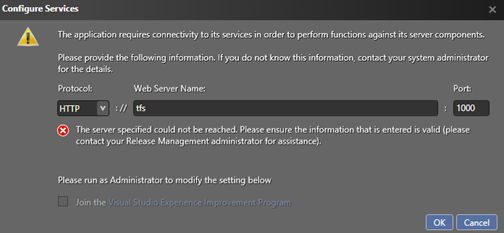
This url is correct but cannot be connected by the client.
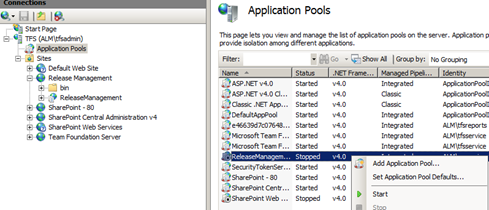
Check if Release Management Server app pool is running and if not start it.
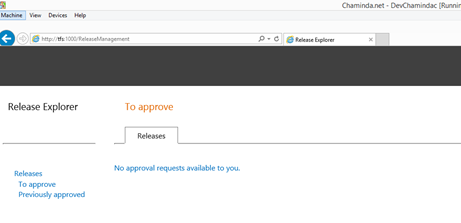
Try browsing to http://releasemanagemntserver:1000/ReleaseManagement

This could happen, if the Release Management Server is installed in TFS box with Sharepoint Foundation. To resolve this issue refer Release Management Server in TFS box with Sharepoint Foundation, the fix specified in there is below.
On the machine where the Release Management Server was installed with TFS and Sharepoint, start a Command Prompt. Run as Administrator but not sure this was required.
Navigate to C:\Windows\System32\Inetsrv
Enter the following command
appcmd.exe set config -section:system.webServer/globalModules /[name='SPNativeRequestModule'].preCondition:integratedMode,bitness64

Browsing to http://releasemanagemntserver:1000/ReleaseManagement succeeds.
Below error occur if the user running Release Management Client is not added as a user in Release Management Server.
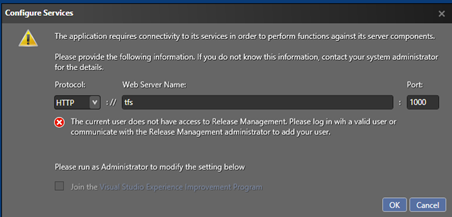
To resolve this issue add the user to Release Management Server, users, by clicking new on Administration tab Manage Users. (To do this log on to the Release Management Client with a user already available in release management server – example - run client as installation user of release management server).

Add the required user.

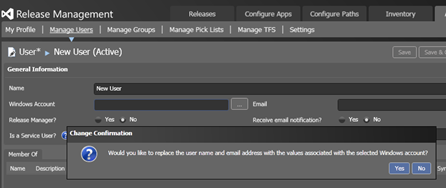
Release manager is the super user role in Release Management Server.

The user should be able to connect to the Release Management Server from a remote machine using the Release Management Client.
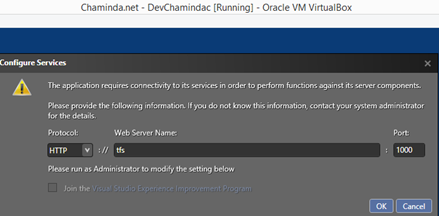


We have setup a Release Management Server, and Release Management Client accessing the server from a remote machine successfully. Next step is to set up Deployment Agent(s).
Trial version of VS 2013 Release Management with update 2 can be downloaded from http://go.microsoft.com/?linkid=9843020.
Note: You cannot apply a license key for the trial to make it licensed version. Instead you have to uninstall trial and install licensed copy downloaded with MSDN or Volume License to apply license.
In the downloaded ISO run rm_Client.exe to install Release Management Client. This is a very quick install.

Installation is quick and smooth.


Once lunched provide the url of the release management server. example – http://ReleaseManagmentServer:1000
Below picture shows TFS since this installation of the Release Management Client is done on tfs box.

This url is correct but cannot be connected by the client.

Check if Release Management Server app pool is running and if not start it.

Try browsing to http://releasemanagemntserver:1000/ReleaseManagement

This could happen, if the Release Management Server is installed in TFS box with Sharepoint Foundation. To resolve this issue refer Release Management Server in TFS box with Sharepoint Foundation, the fix specified in there is below.
appcmd.exe set config -section:system.webServer/globalModules /[name='SPNativeRequestModule'].preCondition:integratedMode,bitness64

Browsing to http://releasemanagemntserver:1000/ReleaseManagement succeeds.

Below error occur if the user running Release Management Client is not added as a user in Release Management Server.

To resolve this issue add the user to Release Management Server, users, by clicking new on Administration tab Manage Users. (To do this log on to the Release Management Client with a user already available in release management server – example - run client as installation user of release management server).

Add the required user.


Release manager is the super user role in Release Management Server.

The user should be able to connect to the Release Management Server from a remote machine using the Release Management Client.


We have setup a Release Management Server, and Release Management Client accessing the server from a remote machine successfully. Next step is to set up Deployment Agent(s).
Tuesday, 8 July 2014
Setup VS 2013 Release Management Server
Let’s look at step by step “How to setup a VS 2013 Release Management Server”, which is the heart of VS Release Management. To understand more, the best and the official resource you must go through is VS 2013 Release Management Installation Guide. Trial version of VS 2013 Release Management with update 2 can be downloaded from http://go.microsoft.com/?linkid=9843020.
Note: You cannot apply a license key for the trial to make it licensed version. Instead you have to uninstall trial and install licensed copy downloaded with MSDN or Volume License to apply license.
Prerequisites for VS 2013 RM (Release Management) Server is below as per VS 2013 Release Management Installation Guide.
Processor: 1 GHz Pentium processor or equivalent (Minimum); 2GHz Pentium processor or equivalent (Recommended).
RAM: 1024 MB (Minimum); 2048 MB (Recommended).
Hard Disk: On a clean machine, up to 2.2 GB of available space may be required. This is due to the dependency on .NET. Database can grow up to 1 GB per year (could be as low as 10 MB - depending on usage)
Display: 1024 x 768 high color, 16-bit colors (Minimum); 1280 x 1024 high color, 32-bit (Recommended).
Supported platform: • Windows Server 2008 R2 SP1 • Windows Server 2012 • Windows Server 2012 R2
Database requirements: Microsoft SQL Server 2008 or 2008 R2 or 2012
The installing user (user who is setting up the Release Management Server) requires local administrator rights and sysadmin rights on the SQL Server (SQL Server that is going to have Release Management Server database). I will be using TFS Admin as the installation user of the RM Server since I am setting up the RM Server in the same box where the TFS is installed. Ideally the RM Server should be set up in a different clean computer and TFS is not mandatory to do release panning and execution with VS 2013 Release Management. (TFS is optional, but can be integrated really well with VS 2013 RM to automate from builds to release).
As the first step we need to setup an account, to be used as the service account for the Release Management Server.


Run the downloaded rm_server.exe to launch the setup.


Accept license agreement and click “Install”.

Once install launch to configure.


In the configuration window specify the release management service account and SQL Server to create the RM database.

Apply settings, you will encounter the first error in RM Server configuration, and fortunately it is a descriptive error “The account specified is not a member of the local administrators group”.

Add the RM Service account to local administrators group to resolve this issue.

Now the configuration proceeds.

The next error which might occur if the server resources are limited (This demo environment has only one cpu core and 4GB RAM while running SQL, SharePoint Foundation2013, TFS in same box). The error message is not very helpful.

Log file shows failing when getting RM site state, looks like some time out.

Increase resources in the machine and retry the configuration, now fails with application pool already exists (I believe MSFT will make this experience of retry configuration, better in a future release).

Manually deleting app pool and any web sites created for Release Management will resolve the issue.

Retry configuration succeeds.

To confirm the success state of configuration verify below check list.
1. Release Management database is created in SQL Server.

2. RM Service account mapped to RM database dbo schema.

3. Release Management app pool is created with identity RM Service account, and RM web site is created as below.

4. Release Management Monitor windows service is running with RM Service account.

Now we have a VS 2013 Release Management Server up and running. Next post of series VS Release Management, I will explain “How to setup and configure Release Management Client”.
Note: You cannot apply a license key for the trial to make it licensed version. Instead you have to uninstall trial and install licensed copy downloaded with MSDN or Volume License to apply license.
Prerequisites for VS 2013 RM (Release Management) Server is below as per VS 2013 Release Management Installation Guide.
Processor: 1 GHz Pentium processor or equivalent (Minimum); 2GHz Pentium processor or equivalent (Recommended).
RAM: 1024 MB (Minimum); 2048 MB (Recommended).
Hard Disk: On a clean machine, up to 2.2 GB of available space may be required. This is due to the dependency on .NET. Database can grow up to 1 GB per year (could be as low as 10 MB - depending on usage)
Display: 1024 x 768 high color, 16-bit colors (Minimum); 1280 x 1024 high color, 32-bit (Recommended).
Supported platform: • Windows Server 2008 R2 SP1 • Windows Server 2012 • Windows Server 2012 R2
Database requirements: Microsoft SQL Server 2008 or 2008 R2 or 2012
The installing user (user who is setting up the Release Management Server) requires local administrator rights and sysadmin rights on the SQL Server (SQL Server that is going to have Release Management Server database). I will be using TFS Admin as the installation user of the RM Server since I am setting up the RM Server in the same box where the TFS is installed. Ideally the RM Server should be set up in a different clean computer and TFS is not mandatory to do release panning and execution with VS 2013 Release Management. (TFS is optional, but can be integrated really well with VS 2013 RM to automate from builds to release).
As the first step we need to setup an account, to be used as the service account for the Release Management Server.


Run the downloaded rm_server.exe to launch the setup.


Accept license agreement and click “Install”.

Once install launch to configure.


In the configuration window specify the release management service account and SQL Server to create the RM database.

Apply settings, you will encounter the first error in RM Server configuration, and fortunately it is a descriptive error “The account specified is not a member of the local administrators group”.

Add the RM Service account to local administrators group to resolve this issue.

Now the configuration proceeds.

The next error which might occur if the server resources are limited (This demo environment has only one cpu core and 4GB RAM while running SQL, SharePoint Foundation2013, TFS in same box). The error message is not very helpful.

Log file shows failing when getting RM site state, looks like some time out.

Increase resources in the machine and retry the configuration, now fails with application pool already exists (I believe MSFT will make this experience of retry configuration, better in a future release).

Manually deleting app pool and any web sites created for Release Management will resolve the issue.

Retry configuration succeeds.

To confirm the success state of configuration verify below check list.
1. Release Management database is created in SQL Server.

2. RM Service account mapped to RM database dbo schema.

3. Release Management app pool is created with identity RM Service account, and RM web site is created as below.

4. Release Management Monitor windows service is running with RM Service account.

Now we have a VS 2013 Release Management Server up and running. Next post of series VS Release Management, I will explain “How to setup and configure Release Management Client”.
Subscribe to:
Posts (Atom)
Popular Posts
-
 Let’s look at how we can specify the artifact version to download based on the resource CI build linked to the CD pipeline and check on how ...
 -
 The hosts file in /etc/hosts is allowing the WSL distros to map IP addresses to domain names before going to domain name servers, similar...
 -
 Can a Coded UI test executed with a Console Application? Yes it is possible. I am going to explain how it can be done. I am going to exec...
 -
Pull Request are the controlled way to bring in the changes to your stable branches in your Azure Git repos, or for that matter all Git prov...
-
The new Azure Managed Redis can be deployed with balanced compute and memory with high availability, and useful modules such as RedisJson a...

