Monday, 6 January 2014

02. Create VM for TFS and Add it to the Domain - Setup Virtual Environment for TFS 2013 - Using Virtualbox

This is the second step of Setup Virtual Environment for TFS 2013 - Using Virtualbox. I will explain how to create a VM foTFS server and add it to the domain that we have set up in Create a PDC in an Isolated Internal Network.

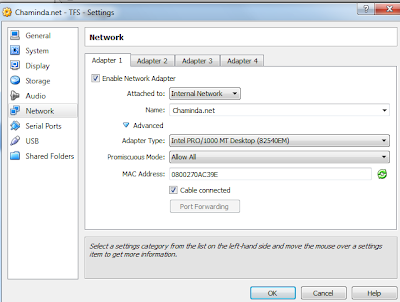
01. Create a VM for TFS server using the BaseWin2008R2SP1.vhd which  we have created Create a PDC in an Isolated Internal Network(First two steps). Set the network adapter as shown in the below image. Provide a name for the Internal Network of Virtual box network(in my case it is Chaminda.net the same internal network my domain controller (PDC) available). If you want internet access enabled through host to the TFS VM then set up a second Network Adapter as NAT. For more information about different network options with virtual box refer here.

02. Start the VM for TFS and assign static IP address for IPv4 (make sure to set the default gateway and preferred DNS server to the domain controller (PDC) IP) and enable File and Printer sharing.


03. Rename the VM computer name to TFS and restart. After restart your VM it should look like below.


04. Verify IP and access to domain controller.


05. Go to Computer Properties and Add the TFS VM to ALM domain (Domain NetBIOS name we have entered when we set up the domain server) .


06. Select restart later here.


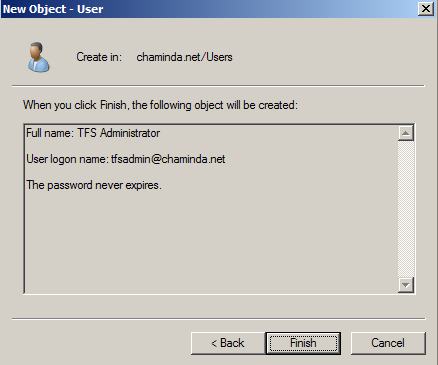
07. Log on to domain controller (PDC) and go to Active directory Users and Computers. Set up a new account in the domain for TFS administrator.




08. In TFS VM add the TFS Administrator to the Administrators group.


09. Restart the TFS VM and log in with TFS Administrator.


10. Run cmd.exe and type net view to see the network computers. You may see below error.


11. Log on to domain controller (PDC) and start Computer Browser service. (This service can be run in a different server in the domain, but for us it is ok to run in PDC since we are creating limited number of VMs here inside a single PC or a Laptop.


12. Now in TFS server net view will show that the PDC is available. But still TFS is not listed.


13. Set the following in the TFS server.


14. Click on Network in TFS server and enable network discovery.


15. In TFS server net view lists both PDC and TFS.


We are now done with getting a VM up and running for setting up TFS in our domain isolated from the host network. Our next step is to setup SQL Server for the TFS server (we are going to set up TFS on single server environment, meaning SQL DB layer and TFS Application tier in same machine).

03. Setup SQL Server for TFS - Setup Virtual Environment for TFS 2013 - Using Virtualbox

This is the third step of Setup Virtual Environment for TFS 2013 - Using Virtualbox. In this step I will explain setup SQL Server instance with reporting services for Installing TFS Server 2013 - Single Server Deployment (since the limited RAM available for me I cannot set up many machines in my laptop ).

I have explained setting up a domain controller and VM for TFS in the isolated domain in previous two posts of this series

Before installing SQL Server  for TFS we need to setup a service account to run SQL server. Having a domain account as the SQL Server service account is not a requirement for TFS server. We can use a built in system account. But I prefer a domain account.

We are going to do below three main steps here.
 a) Install SQL 2012
 b) Install SQL 2012 SP1
 c) Install  Cumulative Update 2 for SQL 2012 SP1. (TFS Installation guide says "If you're using SQL Server 2012 with SP1, we recommend you also apply cumulative update 2 on top of SP1 to address a critical SQL Server bug around resource consumption.")


Set up SQL 2012

01. Go to the PDC we have setup in the first step and add an account for SQL Server as shown below.


02. Next go to the VM for TFS and Web Server(IIS) role service.


Install ASP.Net role service as well.


03. Now shut down the TFS VM. To enable internet access to TFS VM (currently only isolated internal network enabled) add a second network adapter and setup it in NAT mode. For more information about different network options with virtual box refer here.


04. Start TFS VM and run SQL Server 2012 server setup (since we are going to setup Sharepoint Foundation 2013 in this machine we need to install SQL Server 2012 bit edition 64  or SQL Server 2008 R2 Service Pack 1 64 bit edition). Run system configuration checker.


05. Start setting up new instance.


06. We need only below features.


07. Set the SQL server service accounts as below.


08. Collation configuration


09. Add current user. In my case TFS Administrator domain account.


10. Set reporting services to install and configure.


11. Start installation


12. We are done with installation.


13. Reboot the TFS VM.


SQL Server SP1

01. Download SQL 2012 SP1(SQLServer2012SP1-KB2674319-x64-ENU.exe) and  start installtion.


02. Reboot the TFS VM.


Cumulative Update 2 for SQL Server 2012 SP1

(SQLServer2012_SP1_CU2_2790947_11_0_3339_x64) get this file from the email link in MS support site.

01. Run the installation.


02. Reboot the TFS VM.

Now we have installed and configure SQL Server 2012 SP1 with reporting services ready for our TFS server. Next step is to set up SharePoint Foundation 2013.

Friday, 3 January 2014

.Net Forum - Sri Lanaka Jan. 2014 Session - Build-Deploy-Test Part 2 - Unit Tests & Automation with TFS Builds

Done the second part of Build-Deploy-Test Automation session series @ Sri Lanka . Net Forum on 02 January 2014. Awesome start to the year for me with, receiving the precious award of MVP for ALM.

For the folks asked for the slides and the sample code I used at the session, download them from the below links.

Build-Deploy-Test -Part2 - Unit Tests.pptx
Demo_MS_Fakes.zip

References

Popular Posts