Tuesday, 11 February 2014

CRM 2013 Deployment Utilities for TFS Build

I have updated CRMCommandLineUtilities to support CRM 2013 Online deployment automation with TFS. This was a codeplex project by Ryan Corrigal which helped me a lot to implement CRM 2011 on premises automated deployments with TFS.


You can find the updated command line utilities @ http://sdrv.ms/1h9lzJW (Code is not yet perfect since some hardcoded values for timeouts.)


To use this easily with TFS build, in the LabDefaultTemplate deployment step, use the command
cmd /c $(BuildLocation)\Deploy_QA.bat $(BuildLocation)


Or if you are using TFS 2013, you can directly execute PowerShell script from the build to invoke command line utilities for CRM.
More information on Zip Files with builds and Deployment Scripts are in my previous posts


Useful Powershell Scripts and .bat files are here


http://sdrv.ms/1bKdCmM, http://sdrv.ms/1bKdTpF, http://sdrv.ms/1bKdZh0


I will update more usage info in future posts. The final goal would be to achieve something similar to below.


The error messages displayed in the build screenshot above are handled and they are coming when verifying the async process status, due to CRM online service sql timeouts. But this is ok since the import continues and finally status check confirms 30 for process succeeded. Immediately afterwards Publish attempt may fail and I have introduced retry mechanism to make sure publish successful.


Sunday, 2 February 2014

05. Install & Configure TFS 2013 - Setup Virtual Environment for TFS 2013 - Using Virtualbox

In this fifth step of Setup Virtual Environment for TFS 2013 - Using Virtualbox, We are going to setup and configure TFS 2013 in the virtual environment.

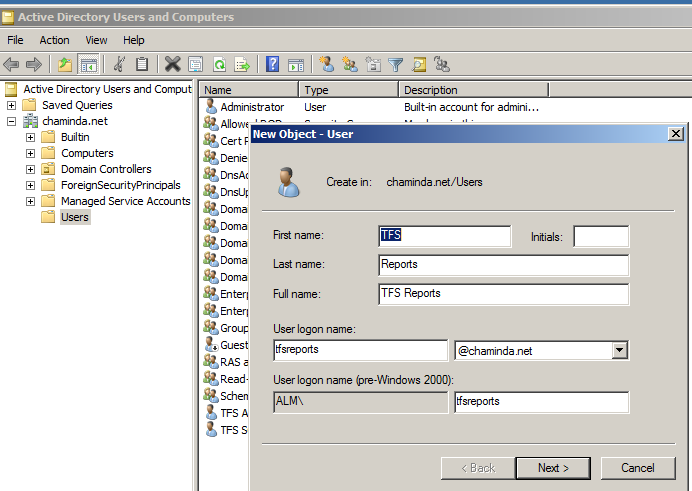
01. The first step is to setup a service account for TFS. Log on to PDC and setup account for TFS service as below.


02. Log on to TFS machine we have setup, and set up log on as service permission for TFS Service account (Refer Accounts Required for TFS).


03. Start TFS 2013 Installation.


04. Restart required.


05. Once installation done start configuration in advanced mode.


06. Specify the DB server. (For me it is the single server deployment and SQL in the same server)


07. Specify the TFS account we have created above.


08. Below settings are preferred for app tier.


09. Select configure reporting option.


10. Populate URLs with the specified report server. (We have configured report server here).


11.  Specify SQL server for TFS here.


12. Specify the TFS Report Reader account we have created here.


13. Select configure SharePoint Foundation option.


14. Since we have setup SharePoint Foundation in the same box we have to select the option as below.


15. Set a collection name for the initial team project collection.


16. Review configuration with one warning on memory (Can't help it at this time :) )


17. Click configure and TFS 2013 will be configured in VirtualBox VM.


We have successfully set up the TFS server in our virtual environment using VirtualBox. The next step is to setup a build server for the project collection we have created above.

Thursday, 23 January 2014

Resolving - "Verify that the machines are accessible using the user name and password provided" in TFS Lab Setup in Workgroup Environment

I have encountered yet another issue while configuring TFS LAB standard environment and though it would help some one if I explain how did I resolve it.

The error happens in verify step of lab configuration and it is giving "Verify that the machines are accessible using the user name and password provided". Lucky for me this time I do not have to explain much all is well explained here thanks to Subramanyam [MSFT].

The next related error "The agent can connect to the controller but the controller cannot connect to the agent" is explained in my blog post.

The fixes are valid for joining Standard machines to TFS LAB environment, from not trusted domains or work-group.

Sunday, 12 January 2014

04. Setup SharePoint Foundation 2013 for TFS - Setup Virtual Environment for TFS 2013 - Using Virtualbox

In this fourth step of Setup Virtual Environment for TFS 2013 - Using Virtualbox, I will explain how to setup SharePoint Foundation 2013 in the TFS server (I am going to setup SharePoint Foundation 2013 in the TFS box since I do not have hardware for many machines in my laptop).

But you have following choices to set up SharePoint for TFS (extract from TFS Installation Guide below) .
  • You can use Team Foundation Server standard or advanced configuration wizards to install SharePoint Foundation 2013 on the same server as Team Foundation Server. The Team Foundation Server extensions for SharePoint Products are installed automatically during Team Foundation Server installation.
  • You can use Team Foundation Server extensions for SharePoint Products configuration wizard to install SharePoint Foundation 2013 on a different server from the one running Team Foundation Server.
  • You can use SharePoint Server. If you use the enterprise version of SharePoint Server, you must configure it for dashboard compatibility (more on dashboard requirements later).
  • You can use a different version of SharePoint Foundation than the one that ships with TFS.
Even though it is possible to let TFS configuration wizard to install SharePoint Foundation 2013 automatically, I prefer to setup SharePoint Foundation and configure by my self.

01. First create TFS report reader domain account in the PDC, which we will be using as SharePoint service account (report reader account will be SharePoint service account if installed with TFS configuration wizard).


02. To fulfill the TFS report reader account requirement, grant it Allow Log on Locally in the TFS server VM.  (Refer Accounts Required for TFS)


03. Download SharePoint Foundation 2013. Log on to TFS server with TFS administrator account and launch the SharePoint installation and install the prerequisites. For installing prerequisites in offline mode refer to here.


04. Once the prerequisites installation completed successfully restart the VM and Install SharePoint Foundation. 


05. Once Installation done run the configuration wizard.


06. Select Create a new farm.


07. Specify a free port here.


08. Once configuration wizard Finish clicked it will launch SharePoint Central Administration website. Access with TFS Administrator account.


09. Start SharePoint farm configuration wizard.


10. Use the report reader  as service account and deselect all other options and click next.


11. In Create site collection step provide below details


With above steps we have completed setting up SharePoint Foundation 2013 for TFS. Our next step will be installing and configuring TFS Server.

Popular Posts